Followers

Monday, August 31, 2015

Horseshoe Star

Good morning friends

Happy Labor Day!!!

Today I wanted to share something I found on Pintrest.  I am constantly pinning projects and hardly ever make them, but I do love looking at all the fun things people create.  This time I actually recreated something, but with a twist.

This is what I found on Pintrest.  Love, love, love this!


My only fear was that using real horseshoes would be #1, VERY heavy and  #2 dangerous if it fell by either breaking something or someone!  But I had the perfect solution!  So let's get started.

A little bit of background why I used this particular horseshoe.  
When we bought our house we found this horseshoe among some flowers in a flower bed.  
My husband said this was going to be our "lucky" horseshoe and it needed to stay in the yard.  
It's very old and rusty, but it's been with us ever since. (14 years)  


I started out with my Amazing Mold Putty from the Amazing Casting Products 
and created a mold of my horsehoe.


Since the mold putty sets up fairly quickly I did this in chunks.  
Adding a little bit of mold putty all the way around.


It doesn't have to be pretty, just function-able.  
Also, you want to make sure you have NO seams.


Then I used my Amazing Casting resin and filled the mold 5 times as I needed 5 horseshoes.  
When the resin sets up in about 10 minutes, depending on how big or small your mold is, it hardens white.

Now, I seem to have lost my pictures of my mold actually curing, but they turned out wonderful.  


Next I laid them out and used my painters tape and taped off the areas that would not need to be painted.


and again


and again

until I got this:


Isn't this just AMAZING?

I used my E6000 to glue the cross pieces together and let that cure for about 24 hours. 

I wanted to make triple sure this would not break apart.

Now the best part of this entire project, this weighs less than nothing.  Seriously!!!  
Could you imagine what 5 solid horseshoes would weigh?

And now it hangs in my tree for all to see!


I am completely thrilled with this piece!

I hope I've inspired you to find your project on Pintrest and follow through!

As always have a great day and God Bless.

Tuesday, August 25, 2015

Repurpose #cre8time Wallhanging

Good day friends,

So recently I had a burst of energy and "cleaned" by craft room.  In doing so I found so many wonderful things to play with.  It was like Christmas...  I am a serious hoarder of EVERYTHING.  I have many great plans and then forget about them or stash them away and don't remember why I wanted to "keep" this or that when I find it again.

A while back we were cleaning out some shelves and I found this old cassette holder.  Yes, it was full of cassettes also.  I don't even own a cassette player anymore, but thought I could re-purpose the old thing.  Into my hoarding room it went to be totally forgotten about.

Again, while I was cleaning the other day I came across it.  Now I do know I had kept it thinking I was going to stash all my ink pads in it, but since then I found some cool wooden cassette holders that were a bit bigger than this and nicer looking.  Now I was heading to the trash with it when I remembered a pintrest idea.  Someone had taken cereal boxes and covered them with paper and make some home decor wall hangings.  Well, we don't eat cereal out of boxes, we are bag cereal eaters.  So there goes that idea ... but


I traced around a piece of cardboard to fit the case.


I also reinforced it with some "cheap" duct tape I got at the Dollar store.
This tape isn't as good as the real duct tape, so I use it for other things.


Then I found some pretty wrapping paper and wrapped it like a present.
I was careful not to wrap it all the way to the holes for hanging, 


and now some cheap wall decor.
I'm going to have to find another box of some kind and add another one
maybe lengthwise to match.

I think the granddaughters will like this in their room.

Instead of throwing things away, re-purpose them!

I hope you've enjoyed this simple homedecor project and look forward to hearing what you think!

As always, have a great day and God Bless!

Tuesday, August 18, 2015

#cre8time - Take it or Leave it Menu


Hello crafties,

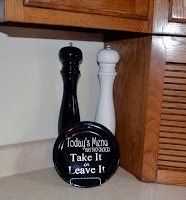
Just wanted to show off a Menu Plate I made last week.

Lately my grandbabies have stopped eating.  Well, not really, but they all have different tastes.  Today one will eat spaghetti and next week she won't.  One would eat macaroni and cheese at every meal.  The other one doesn't eat meat!  It drives me crazy sometimes.  Last week all three of them drove me absolutely crazy with their eating at the dinner table, EVERY NIGHT!  I just throw my hands up in the air!

Now although they can't read, I made a dinner plate plaque cutting some vinyl with my cricut.  Remember, me, the hoarder?  Yes, I have these black plates in my stash because someday I was going to do something with them.  Well, I guess someday was last week.

I vinyled the saying:
Today's Menu
Has two choices
Take it 
or 
Leave it

and burnished it to the plate.  Set it in a plate holder and now it sits proudly in my kitchen!  


Easy peasy and cost next to nothing.  I'm sure if I went to the home interior section of a store I would have spent at least $10 on something as simple as this.  I love being able to create for myself and others.


I hope you've enjoyed my little Menu sign and would love if you left me a comment.

As always, have a great day and God Bless!

Monday, August 17, 2015

#Cre8time Dream Star and chalk paint

Good moring crafties!

I'm so excited to share my post and I hope you enjoy reading all about it my off the cuff project.

I've seen these 3d stars everywhere and have always wanted to make some, 
but for whatever reason haven't attempted it until NOW!
I've been stalking pintrest like crazy lately and found some tutorials on how to make them.  
Well duh, how easy peasy.  So let's get started 


Using my cricut of course I cut 2 stars 6 x 6 from some thin chipboard.
If you don't have a cutting machine of any kind you can cut them by hand, 
just make sure they are identical cuts.


Then using my scoreboard I scored lines from point to end all the way around the star.


Now you want those valleys and peaks, so fold alternating.
Do that to both stars.


Now I glued them together with hot glue.  
That seemed to be the best solution.


I just added hot glue to a point and ran a bead down and mashed the star together.
It's a bit tricky, but you can do it!  Just be careful because they don't call it hot glue for nothing!


Now I did want my star to look distressed so I added some petroleum jelly 
to the tops so that the paint wouldn't stick to the entire star.


Now while I was on pintrest I also found a recipe for making my own chalkpaint.  
I used 2 ounces of unsanded grout, some acrylic paint and HOT water to give it a smoothness.


and started to paint.  
While it took to the chipboard I wondered if I should have gessoed it!


So I did the other side.


and then painted it.


gessoed


natural chipboard.
I did sand both sides a little with an emery board.  Chalkpaint is a bit unusual.

But, I like them both!


I did wind up using the natural side for my piece.
Then I added a bit of stencil cream in brown and green to give it an aged patina look.


I used the same chalkpaint on a small canvas piece, 
stenciled some green around, rubbed brown around the edges.
I cut the word Dream with my cricut from vinyl and dug in my never ending box of resin pieces 
(made with my Amazing Casting Products)
to find this elephant and fleur de lis, just because, and glued them to the outer edges.


Doesn't this star look fabulous?
The chalkpaint did flake a little while I was sanding it,
but I love the look of vintage, shabby chic that it gives it.


And now it sits proudly on my headboard!

Whew, that was a lot for one post, but I'm over the top thrilled with my newest project.
I hope you've enjoyed it as much as I have and would love to hear your thoughts!  Leave me a comment and let me know what you would dream up if you could craft anything in the world.

As always, have a great day and God Bless.


Sunday, August 16, 2015

Let's Celebrate at Anything But a Card Challenge #50 with a Wedding

Good morning friends,

Today is a sad and happy day for me.

Sad, because today is the LAST installment of Anything But a Card challenge #50 CELEBRATE.  I've only been a design team member there for about a year now and as things progress the team has decided it's time to say goodbye.  I'm sad that we will no longer be together designing for such a great blog, but it's also understandable.

Happy, because I made something to share with you that is very dear to me.  My son is getting married in a month and I made their glasses and a vase for them to Celebrate their wedding.  I love glass etching and my Armour Etch gets used a lot!

Although I did not put a tutorial together for this, I'm sure you are familiar with Armour Etch and what it can do.  If not, please check out some of my previous posts and familiarize yourself with the ease of this product.

Birthday plate 

Bookmark

Jewelry Holder

Re-purposed Liquor bottle

Donation Plaque

Personalized Golf Glasses

Hot Cocoa Bottle

Butterfly Bottle

I guess I've made a few things, LOL and I haven't even blogged about all of them!

Anywhooooo, this is what I did for our current challenge.


I tried to make the words stand out a bit with the orange paper inside the vase.
Etching is very hard to photograph.


The vase will hold some peacock feathers at the table.


Although this may look a bit intimidating, using Armour Etch is a breeze.

I hope you've enjoyed my pictures and my post for out last challenge at Anything But a Card and PLEASE  join in for our last "celebration" challenge.  I look forward to seeing what you create.  Remember, there are only 3 rules.
1.  Create anything but a card
2. Follow the theme "Celebrate"
3. Have FUN!

As always, have a great day and God Bless.


Saturday, August 15, 2015

Friends Plaque

Hello everyone and happy Saturday.

Happy Birthday Shelly!
Today is my best friends birthday and while I cannot be there to celebrate with her, 
I did want to make her something and sent it.

Lately I've been on a sign making adventure.  
I love my new found craft and wanted to share this one with you!


The board was something I had in my stash from who knows where.  
I didn't alter it at all.  This is how it was!
I love the aged and weathered look!

All I did was cut the saying with my cricut in vinyl and burnished it to the board.

Friends 
are the 
most important 
ingredients in 
the recipe 
of Life!

As always, have a great day and God Bless!


Friday, August 14, 2015

#cre8time - Faux Geli Plate Printing with Amazing Mold Rubber

Good day friends,

today I wanted to introduce you to my very first faux geli plate printing.  I've been watching one of my creative friends make some amazing backgrounds lately.  She is a wonderful card maker and such an inspiration.  You can find Annette on instagram  @paper_pajamas or at her blog paperpajama.blogspot.com.

So anyway, she has inspired me to try this geli printing thingy without her knowledge!  Teehee.  Well, I could not see myself spending money on a geli plate because who knows if I'd like it all that much.  Believe me, I have enough crafty things to keep my busy.  However, as you also know, I belong to the Amazing Casting Products design team and our fearless leader had posted making  non geli plate a while back so I thought I'd give it a try.


Frisbee


Here is my faux geli plate using my Amazing Mold Rubber.  I just used a regular Frisbee I had in my stash as my "mold" and poured my mold rubber mixture directly into it after mixing it up (you can see a video tutorial HERE) and let it set for about 2 1/2 hours.

I really had no idea where I was going with this, but oh my, I've had a grand old time.  I just used scraps of paper from my stash and started to play.

I used texture plate, cut outs, rubber stamps and even a fork.  LOVED playing today.
Here are some examples of some of the papers I made:


my texture plates


I forget that if you use a rubber stamp it will be backwards, so I used the paint from the rubber stamp and stamped that on some paper and viola, another awesome image!


I love the texture that this piece gave!


This was some paper I had run through my cuddlebug and is textured.  Really love how this came out.
I just with the picture were better!  You can really see some awesome detail in there!


See the Pink ribbon in the above photo?  

Here is the result:


Love how these came out!


Here I started with the pink and blue paint again 
and dipped a styrofoam ball into some black paint and rolled it around
in the pink and blue paint.
I got messy, but wait till you see the outcome!


LOVE,LOVE,LOVE these papers!

Now I can't wait to sit down and make some cards with all my lovelies!

I hope you've enjoyed reading my post today and would love for you to leave me a comment!

As always, have a great day and God Bless!