Followers

Showing posts with label Ribbon. Show all posts

Saturday, June 17, 2017

Christmas in July smoothfoam wreath

Good morning

Today I wanted to show you a quick wreath I made last night getting ready for Christmas in July!

About a year ago I won a contest sponsored by Smoothfoam crafts! I received six different smooth foam wreaths in various sizes! What I absolutely love about the smoothfoam wreaths is that they are sectioned so you can see exactly where you want to place your ribbon or any other embellishments and no measuring is needed!


In searching through my stash I also found some white foam stars.

I  started with my wreathform and cut some denim strips about an inch wide and the length of the pant leg! Then tied those denim strips on to three sections of the of the wreath form.


I also wrapped the rest of the form with red and white Christmas ribbon and added some bows and hot glued them on with those white stars to give it more dimension.


I did the same thing to the denim section.

By adding some of the strip of denim from the seam I created the hanger and here it is in all it's glory!


I hope you like my quick tutorial using the smooth foam wreath form.
 Thanks for coming and I hope to see you again soon - Brenda


Sunday, July 19, 2015

Anything But a Card Challenge #49 - Armour etching book mark

Good morning friends,

welcome to another challenge at Anything But a Card #49 Open Theme.  Today I am showing you the simplest of ideas.  I used to do a lot of mosaic work and have accumulated plenty of these glass tiles.  I may use them again sometime for mosaic work, but I have plenty and could use a couple for this project.  I decided I wanted to make myself a bookmark.  I also wanted to personalize it!  So let's get started:


I took some regular stickers from my stash with my initials and placed them onto my glass tiles.


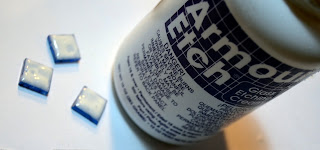
Using my Armour Etch I applied it all over the entire tile.


Let it set up for about 5  minutes and wipe it off.  See the difference of the etched tile vs the original?  Then just peel the stickers off the tiles.  I did make all 3 of my letters, but only needed the Bs.  


Then I used some No-Sew fabric glue and glued the edges of some ribbon after I measured it against a book and leaving a couple inches longer.


I used some E6000 to glue my tiles to the ribbon and let it set up for 24 hours just to make sure.


And here is my ribbon bookmark.

Hope you've enjoyed my easy peasy tutorial for making a bookmark.  Hopefully you will hop on over to Anything But a Card and join in the fun!  There are only 3 simple rules:

1.  It's an OPEN THEME, so let your imagination run wild.
2.  Create ANYTHING BUT A CARD.
3.  Have FUN!

Have a great day and God Bless.

Friday, September 26, 2014

Steampunk addiction?


Good day friends...

As you all know I am one of the designers over at ABAC and love it.  One of the reasons I so love designing over there is our fearless leader, Susan, challenges me!  This month is Steampunktember and if you read my blog you will know I am NOT a Steampunker.  This month was the very first time I tried anything Steampunk and with that being said, I created some more things because I am so in love with this new genre for me!

My first piece was supposed to be a necklace, but it got too big so I decided I would turn it into a Christmas ornament.  Of course I used my Amazing Crafting Products, some beads, flock, inks, rub n buff and ribbon.


My second piece is definitely a necklace.  Again using the same products I mentioned above with a slight variation adding a rhinestone.


I hope you enjoyed my pieces and if you have a chance hop on over to ABAC and enter your Steampunk project.  You still have a couple of days to join us.

As always, have a great day and God Bless.


Sunday, September 21, 2014

Fore! Sucker Favors

Good day all and happy Sunday,

So ... you all know that my DS is a golfer and I love making things for him, but I also forget that he is now a Freshman in high school and doesn't want mommy making him things to take to school.  He still wants me to make things for HIM alone, but taking things for his classmates (in this case) his golf team was NOT going to fly.

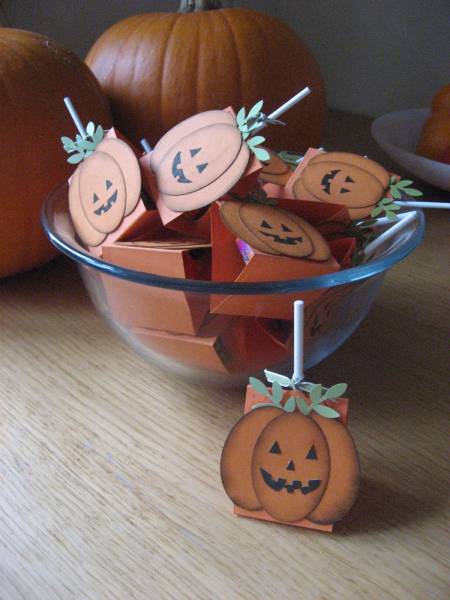
How this all came about was I was on Pintrest (my addiction, I pin ALOT, but hardly make anything) and the other day and saw these cute Halloween favors.  Aren't they adorable?  Now she didn't have a how to tutorial here, but I think it's pretty self explanatory on how to make these.
                                                    
Well, that got me thinking, I could make something for his golf team using this general idea, so off to my craft room I went.  I haven't paper crafted in a quite a while and actually shopped my stash and this is what I used.
Supplies:
Maroon (Highschool colors), white and black cardstock.
Google eyes
Green ribbon
Stamp
Sucker
Tools:
Scissors
SCAL
Scoreboard
Gluedots 
Using my SCAL program I made 4 pieces of rectangles 6.25 by 2.75 and added to circle cutouts on each end for the ribbon.  
Then I scored them at 2.5 from each end 
I also cut 4 circles at 2 inches 
This was a super duper find on my recent "junk-ing" trip at Savers.  All three stamps made by Stampin Up for $2.99, FORE, uh I mean SCORE! 
I used the Fore Stamp for the mouth after highlighting the edges a bit with my black inkpad. 
I kinda think this was ingenious if I do say so myself.
Then pop dotted my googly eyes eyes and free hand cut out tiny triangles (not uniformed at all) and attached them also with glue dots.  I glued them onto the base of the maroon cardstock holder and tied a green ribbon to hold them shut.  
And here you have them.  
Now I showed the first one to my DS and he said "cute mom, but please don't make them for the team!"  I wonder how he knew that that was my intention, hehehe!  I guess high school boys don't want golf sucker holders.  So instead, Coach has FORE (4, seriously) little children, so I will be giving them to him to give to his kids.

I really do love how they turned out and this project took me maybe half an hour.

I will be entering this project over at Decorate to Celebrate for their Anything Goes challenge.

Monday, March 24, 2014

SS Transparent challenge

Good evening,

I'm back entering another challenge over at Simon Says Stamp Blog.  I have to say since I've started paper crafting more and more I can't believe I took such a long break.  I'm so glad that I got back into the swing of things.

This week's challenge is called "I can see clearly now" and the take is anything transparent, vellum etc.  I knew right away that I wanted to create something to fit this theme.  Now remember, I save EVERYTHING.  Seriously, it's baaaddd, but clearly I have exactly what I needed for this challenge.  I started with
the packaging from a cricut cartridge and cut it down to size 
then I embossed it with my cuttlebug Stars folder 
Perfect embossing. 
I did want some of the stars to pop, so I masked them off 
and using my Stazon ink I inked direct from pad to star. 
I cut out a star with my cricut and inked around it and the saying 
"You are a Star" 
I laid the "transparency" on to the card and created a pleated ribbon to make it look like a curtain. 
Easy, easy, easy and oh so much fun!

I hope you've enjoyed my quick card and hope to see you again real soon.  
Remember, if you are looking for a challenge, the Simon Says Stamp Blog is a great blog to participate in.

As always, have a great day and God Bless!

Wednesday, March 27, 2013

Butterfly kisses...

Good morning,

I'm so glad you came to see what I've created for Sakura Craft and Hobby today.  Remember you still have time to use the coupon code SHIMMER03 to get your 20% off of the Mixers till the end of the month.

Today I want to show you a few differences in color.  Now all the projects have used the same color, but you  will see how the colors differ depending on the background they are painted onto.

My first and most important project is the one I'm most proud of...LOL

I started with a mold of a frame and poured it with my casting resin.
Then I took some packaging (recycle) and cut 
it to fit onto the back of the frame.
Then I started to paint...I used the red shimmer
to highlight the butterfly and flowers on top of a gold acrylic. 

I used bottle caps to put the 3d crystal in and mix the shimmers into it so I can just throw the bottle cap away (recycle)
I painted the packaging with the green shimmer
and adhered it with some 3d crystal lacquer.  

I also painted the butterfly with the red shimmer and dotted it with black acrylic paint 
see how the packaging shimmers.  I also used the green to highlight some of the flowers on the frame...LOVE  
I covered a piece of wood I got from Hobby Lobby with some bronze shimmer paper and used the 3d crystal lacquer to adhere the frame to it. 
I stamped Butterfly wishes...with some stayzon in red and black overlapping it 
Awesome...I love how this shimmers.  These mixers are wonderful. 
Now, when I have leftover paint I either paint something I already have or I just paint it on some paper.  I painted the left over green shimmer on some black paper   
used my leaf punch and punched a few leaves out 
and highlighted them with a silver jelly roll pen.  I will be using these either on a card or maybe a scrapbook page.  Time will tell...I don't like waste. 
I also took some black river rocks that I have in my stash and painted them with the green shimmer mixer. 
Check out how awesome these shimmer 
I added a bail to the back of the rock and I will turn this into a pendant.

Now you can also dye fabric.  With the kit of shimmers you will also get a bonding agent.  I added a bit of the shimmer, bonding agent and water and mixed them together. 
Then I dipped some white ribbon and tulle into the mixture and here is the result.  The tulle didn't take too well, but it does still have a green tint to it.  The ribbon doesn't "shimmer" a lot, but does have a nice green tint to it also.
I also added the same combination into a spray bottle and sprayed some white flowers.  
NOW these really shimmer
Using the left over mixture of shimmer, bonding agent and water I dipped clear acrylic beads into it and let sit for about half an hour and I got some tinted beads.  Not too dramatic, but just enough of a hue of color.  How awesome is all of this? 


I cannot wait to show you what else I've done with all of these projects, so make sure you keep coming back and checking out all the tutorials.

As always, have a great day and God Bless.