Followers

Showing posts with label Frog Dog Studios. Show all posts

Thursday, June 5, 2014

Luscious Stamped Pendant with Embossing

Good morning friends,

Today I am going to show you a technique I hope you will enjoy. Many times I use my products not like they are supposed to be used. I love to experiment and with that let's see what I have to share with you today.


I received the new Frog Dog Studio May Mixed Media Kit and wasn't quite sure how to use it. There are a lot of cool items in this kit, but for me it was a bit overwhelming. I'm not much of a artist in the sense of drawing and painting. Today I am sharing what I have done with some of the parts and pieces.


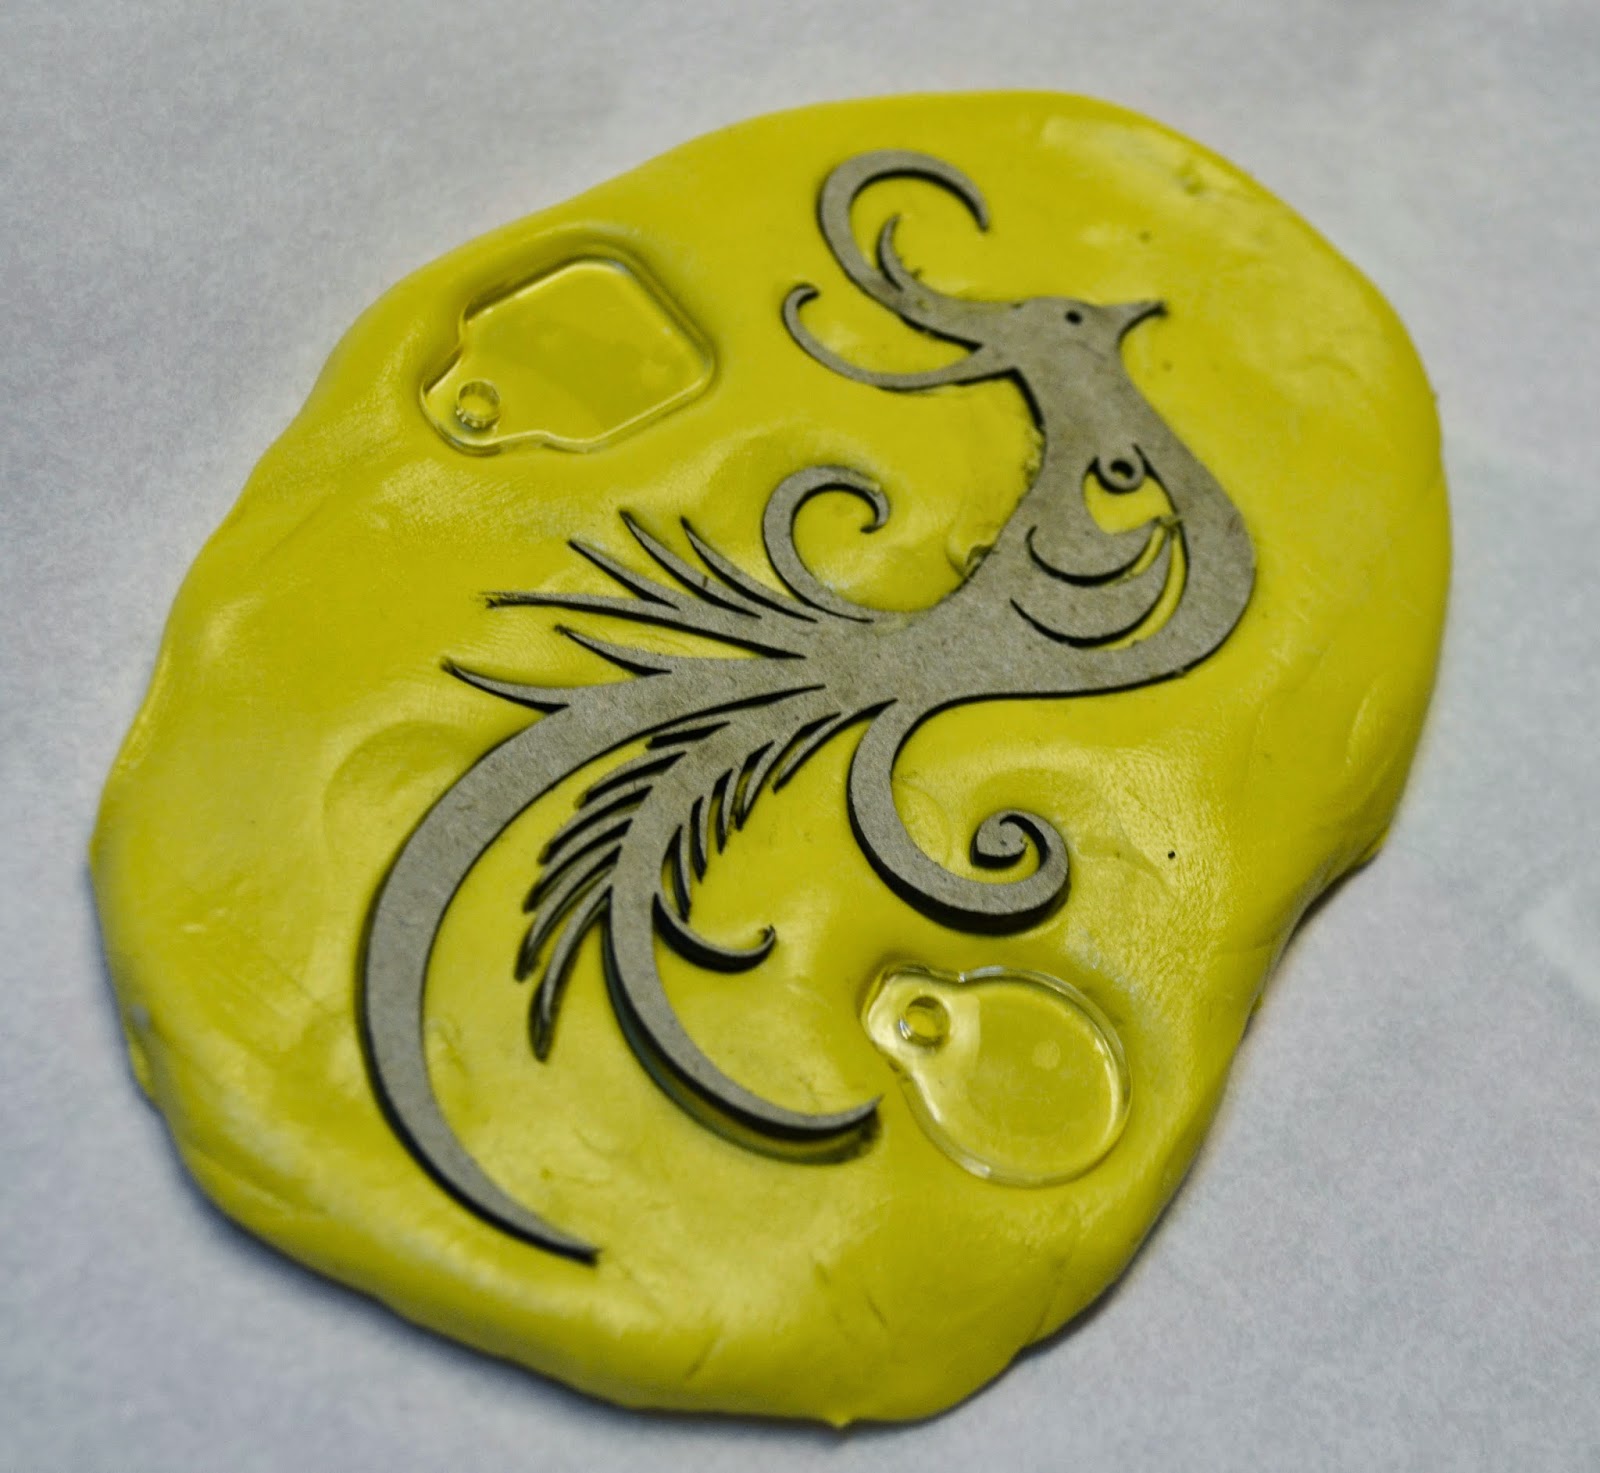
In the April Kit we received these awesome acrylic pieces. Of course I had to mold them before using them. You can go here to see a video how to make your molds using the Amazing Mold Putty. I molded this piece with the Amazing Casting Resin and Alumilite Metallic Silver Powder.


I applied the Beach Hut Paper Artsy Chalk Acrylic paint directly to my stamp and pressed my Amazing Casting Resin piece directly onto the stamp upside down and let it dry. Then I used the Pastel Peach Quick Dry Fluid Chalk onto another part of the stamp and pressed my resin piece directly onto it upside down again. The reason I did it this way is so that I could control which part of the stamp I was using, since it is a big stamp.


I just ran my stamp under some warm water soapy after I was finished stamping and it came pretty much clean. The paints do not alter your stamp in any means, just not as gray as it was brand new. You just don't want to let the acrylic paints dry and clog up the detail in the stamp.

Now before I did all this I knew I wanted my piece to have a textured, 3D effect. How was I going to create that texture of the stamp? How about embossing it? I of course did not have any colored embossing powders to match those colors that came with the kit – but last month we also received these fabulous Aumidust Powders. SO off to experimenting again... I combined regular clear embossing powder with the Orange Alumidust and mixed them together.


Eureka!!! DIY Orange Embossing Powder!


Then after I had stamped my image from above, I sprinkled the embossing powder over the resin piece IMMEDIATELY. The Pastel Peach says its quick dry and I didn't know how "quick" drying it was.


Poured the remaining embossing powder back into my container and, then I set the embossing powder with my heat gun. The result is fabulous shimmery detail.


I wanted my piece to shine so I mixed up some of the Amazing Clear Cast Resin and added a layer to dome my piece. You might be curious as to what I have my pendant suspended on... CLICK HERE to see my DIY Doming Platform for resin.

That had to set up and cure for about 24 hours...


and now I have another pendant created all while experimenting.


I hope I've given you some ideas on how to use your products – not the way they were intended... don't be afraid to experiment. Sometimes you may "fail" but I always have fun trying new and different things. I really love the dimension and layers of texture captured in the Amazing Clear Cast Resin.

Until next time, have a great day and God Bless!

Tuesday, June 3, 2014

Oil Pastels to coloring Resin

Good morning friends,

If you were here yesterday looking for the second post to my Frog Dog Studio post from a week ago I apologize.  I know I had said the 2nd of June but in my head I had the 3rd in mind.  SORRY!  But I'm here today to with you another fun project using Frog Dog Studio's May kit.  LOVE IT!

here is the kit, now again, like I had stated in the previous post I am not a painter, drawer so I wasn't sure what I would do with the oil pastels that come with this kit.  But if you know me, I need to experiment like always and this is what I created.
and this
Now I am sure you want to know how I did this?  
Well be aware this is a heavy picture post.
Let's start with the leaf...
I created a mold using my Amazing Mold Putty.  You can go here to see how a mold is made. 
I then mixed up my Amazing Casting Resin with some Alumilite Black dye and poured my mold. 
and here is my leaf ready to be played with. 
I pulled out the Oil Pastels that came with the kit 
and colored over my leaf.  Not being careful at all and just coloring 
here and there mixing both the yellow and red randomly. 
Then the magic begins...I heat set the oil pastels...they melt and intertwine beautifully 
Look at that...it's AMAZING!  I think I will turn this into a broach for fall.

Now let's see how I created my necklace...
I started with a mold of an old lock and only poured the main part with my Amazing Casting Resin and black alumilite dye.  I did have to cut a bit away as I only wanted the ROUND part.  I just used my exacto knife to trim around the edges.
I started out with the same concept of coloring certain areas with the oil pastels and heat set 
them also, but this time I chiseled off some of the green oil pastels and
 flaked them here and there onto the piece...and heat set. 
then I also colored a matching key with the oil pastels and heat set. 
and here it is... 
Please tell me what you think as I just love experimenting and when it works I'm on cloud nine.  
This has got to be one of my favorite experiments right now.  
I did plan on sealing these pieces with Amazing Clear Cast Resin 
to make them all shiny but I ran out of time to show you here.  

Until next time, have a great day and God Bless.


Sunday, May 25, 2014

Bird of Paradise Tile

Good morning crafters,

Today I am here to show you a tile I made by experimenting.  I've been playing with a few products and created this:

I started out with some Creative Paperclay and a wood tile. 
Cutting around the wooden tile I cut out paperclay and although it's an air dry clay I baked it for about half and hour turning it every 7 minutes of so to get a nice even bake.  I use a small toaster oven to bake all my clay and never use it for anything else. 
I still had a little bit of this gorgeous paper left over from my April Frog Dog Studio kit and decided to "muddy" it up a bit using some alcohol inks. 
I also used some Alumilte Silver Metalic Powder and Alumidust in Orange and created a spray mist.
Here is what the tile looks like after mod podging the paper to it. 
You can still see some of the original paper, but I did want just a hint of the details.  Once I got the color I wanted I modpodged the paper to the tile and sanded around the edges.  Then I took my orange ink pad and ran that around the edges to give it almost a burnt look.
Now, I mixed up the Amazing Clear Cast resin and painted it over my tile.  Then I mixed a bit of the Alumilite Blue Dye into the remaining clear cast resin and puddled it around the top of my tile and "blew" it with my heat gun.  It gave it some interesting detail.  I sprinkled some orange glitter in the blue area just for bling. 
I used up the rest of the clear cast resin with the Alumilite blue dye to cast my bird of paradise also from the April Frog Dog Studio kit and I created a mold of it using my Amazing mold putty.  Actually, if you missed that post, you can see it here.
After she was set up, I demolded her and glued her to my tile 
I added a pop tab to the back of my tile as my hanger and now I have a very unique tile to hand in my bathroom just because that color palette will work there very well. 

Thanks for stopping by today and as always, have a great day and God Bless!

Sunday, April 6, 2014

Frog Dog Studio Last Day

Good day crafters,

today I am coming full circle and showing you what I had created to the start of this week's projects .  All week long I've been showing you items I used from the April kit from Frog Dog Studios.

In your kit you would receive this:


The Frog Dog Studio April Mixed Media Kit includes:
(1) **Alumidust Powder - Red Plum; (1) StazOn Midi Ink pad - Claret; (1) StazOn Midi Ink pad - Blue Hawaii; (1) iZink Pigment Ink bottle - Gold; (1) Stampendous Mica Fragments Jar, Pearlized; (1) Dusty Attic Chipboard set - Birds; (1) Stampendous Mini Clipboard Canvas pack; (1) Set Canvas Mini's - Canvas Corp; (3) Sheets of Decopatch Tissue Paper; and (16) Tim Holtz Clear Fragments (random sizes/shapes). ** Alumidust is one of the many additives from the Alumilite Corporation. Valued at over $45.

And of course you would want to purchase the add-on kit! 


The Frog Dog Studio  April Add-On Kit includes:
(1) Amazing Clear Cast Resin – 16 Fluid Oz Box; (1) Amazing Mold Putty – 2/3 lb Box; (25) 1 oz Measuring Cups; and (50) Wooden Stir Sticks. Valued at over $47.

I love getting new fun things to play with.
LOVE this paper.  It's so thin, almost transparent and the colors are beautiful.  When I was growing up in Germany we had this sort of paper for gift wrapping.  I totally forgot all about it until I held this paper in my hands.  Oh the memories holding that paper just brought back.

So now I had to figure out what to make.  I knew I was going to mold that Bird of Paradise using my Amazing Mold Putty, but what was I going to do with her?  
You can find directions for proper mixing here by typing "how to make a mold" in the search bar on the top or you can watch a video here.
It only takes about 10 minutes tops to cure
Look how lovely she came out
Then I prepared my Amazing Casting Resin.  This product is incredible as it has no odor and sets up within minutes.  Just make sure you mix equal parts of A & B and stir until it isn't cloudy anymore.  Don't stir too long as it does set up within minutes.
Whenever I make a mold I try to fill all the voided spaces with other doodads.  In this month's kit you will receive some acrylic tags in various sizes, so I created a duplicate of those.  Also, when I mix my resin, I tend to make more than I need, so therefore I fill other molds to have on hand for future projects.
Once I've poured my mold, I actually take a paper towel and kinda run around the edges of the item to avoid extra resin around the edges.  This picture shows what the resin does shortly after pouring.  You can see how the resin is starting to set up in the small circular tag.
Almost completely set up, still a bit of clear milky color in the corners of the Bird of Paradise.
Completely cured, hard as a rock
Now when I demold things, I start from the outer edges.  The Amazing Mold Putty mold is flexible and therefore you can bend your items out instead of just trying to pull them up.  In demolding it this way you avoid pulling those fine or thin areas, like these feathers, off..
and there your have a duplicate of the chipboard Bird of Paradise.  
I used my exacto knife to clean a bit around the edges and this process from molding to pouring to cured to cleaning up edges took all about 15 minutes.
Now I had recently made a trip to my Dollar Store after getting my Frog Dog Studio kit, when I found this awesome mirror set.  Immediately I had an idea of how I could use some of the pieces from this kit to embellish this up.  I thought the color scheme was identical too.
I took the existing packaging and traced as close to the mirror as possible with a pencil.
Then I cut it out with a pair of scissors and
laid that transparency directly onto the gorgeous paper to find the exact area that I wanted to use.
Maybe you can see the edge here?
Then cut that out a bit larger than the original to fit my handheld mirror perfectly.
Now if you look at the mirror and the paper, you will see that it was not a perfect color fit.  The paper has more green and the mirror is more steel blue.  I wasn't sure how I was going to fix this, but where there is a will there is always a way!
I used Mod Podge to cover the backside of the mirror, going in one direction first and then crossways again.
Once I laid the paper onto the mirror I burnished the edge a little with my thumbnail to give it that extra seam.
See how nice that laid down?  You can even see a little bit of the pattern from the handheld mirror.
Now while that was drying I went back to my Bird of Paradise to finish her off.  I used the Claret Stazon ink that came with my kit and directly pounced it onto my bird.  So, remember me showing you that the color wasn't a perfect fit with the paper and the mirror.
Therefore I also added some of the Blue Hawaii Stazon, mixed in a bit of the Lt. Green Alumidust and golded the bird with the Pigment Izink (gold) all which came in my kit.  I think she turned out gorgeous.
I had 3 silk leaves in my over flowing stash of silk flowers and 
knew these would work perfectly to embellish my mirror.
I sponged the Claret Stazon directly onto the leaves also.  Even though this technique worked, it didn't give it enough color.  I pulled out my Deep Red Alumidust that came with the kit and mixed it up with some of Alene's PaperGlaze and painted the middle of those leaves.  I wasn't really being careful since no leaf is exact in coloring anyway (and I can't even paint by numbers).
Hot gluing the embellishments onto the mirror gave it that perfect touch.
I do believe my Bird of Paradise completed this mirror perfectly in color balance.

Wouldn't this make a beautiful gift for someone's dressing table?


I hope you've liked my one example of this beautiful kit from Frog Dog Studio 
and all the projects I've showed you this week.  If you have missed any, just head back through my blog and you will see the entire week of Frog Dog Studio inspiration. 

As always, have a great day and God Bless.