Followers

Showing posts with label Decorate to Celebrate. Show all posts

Wednesday, October 19, 2011

Halloween Wreath at DTC

Good morning friends
Wow, I can't believe how time flies...Halloween is right around the corner and it's time to Decorate to Celebrate Halloween Style.  I just love this new DT I am on because I can make decorations till the ghosts come home...I mean cows come home.  LOL  Speaking of ghosts...yup you guessed it, today's decoration has something to do with ghosts.  For trick or treating we always go back to our old neighborhood and spend the evening with my best friend and her husband.  She always puts out a huge a spread of food and then we take the kiddos trick or treating.  Well her kids have outgrown that stuff and my Austyn has already said this is his last year, but I have Miss Bella to take trick or treating then.  Anyway, after trick or treating we come back to Kim's house and we have hot chocolate and something to eat...usually sloppy joes or loaded potato skins or loaded nachos...and sift through the kiddos bags and like I said, she puts on a huge spread.  This has been a tradition for about 13 years now and we so look forwards to it every year.  So I always make her something for hosting such a great party before and after the trick or treating.
So this is an eraser that came in a pack of 12
different style, from the dollar tree and I created a 
mold of it using my new found LOVE for 
Amazing Moulding Putty (so be on the watch for more molds)
here is what the mold looks like when done.  It sets
up fairly quickly so I can start making my embellishments
within minutes...yeah, love the ease of this.
Then I used my Creative Paperclay ® 
to create my little ghosts.
aren't they cute?
I did paint them with white acrylic paint 
but I forgot to take a picture
Now as you know I am a frugal crafter.  A while back 
I made a wreath using a frisbee that had the center cut
out of it and have been desperately trying to find more
of those buggers with no luck.  We were cleaning out 
the cupboards last week and I had a dozen ice cream
pail lids so hubby gave me the idea to cut the center
out of them and use them as the wreath base...wow,
really, why didn't I think of that...thanks honey!!!
So I traced another circle inside the lid and cut an X
with my exacto knife and then cut the triangle pieces
out...perfect!!!
Then I wrapped ribbon around the lid
and hot glued the ends.
I also added a pop top to the back as the hanger.
I made a bunch of rosettes and recently I saw someone
had a design on the edges so I used my hole punch and
punched every other score mark with it
I added some stick pins to the top
here is my rosette with the little ghost attached with
hot glue and those cute little google eyes.  I did
ink around the edges of the ghost for depth.
I used my SCAL 3 and the
Ecraft to cut the BOO out
I got this file last year from
somewhere and can't remember 
where from, so if you recognize it
please let me know and I will link you!!!
and here is my finished product.  
Isn't this just the cutest ever?
Thanks so much for stopping by today and I will see you back here in 2 weeks.  Now don't forget to make your own decorations for a Halloween Party and link up at Decorate to Celebrate  I can't wait to see what you create!

Wednesday, October 5, 2011

Late Breaking News

Good afternoon,


I just wanted to quickly share some late breaking news.  As most of you know I've been a guest designer over at Decorate to Celebrate for the last month.  DTC is a blog where we showcase decorations for lots of theme parties.  This have been fun to do and I thank Amy and Rhonda for asking me to help them out by spreading the word about it and also making some party decorations.  The blog consists of decorations for a themed party.  Other than invitations or place cards, no cards are allowed!!!  Well this morning I had another guest design spot and you find the post here.  Well, the late breaking news is I am now officially a Designer over there and now I will be for sure posting every two weeks...yeah!!!  So now I ask you to please hop on over to DTC and link up a party themed decoration.  

DTC #10 Tweens N Teens Party

Good morning and Happy Wednesday, everyone! I am so excited to be a guest designer over at  Decorate to Celebrate again!  Decorate to Celebrate is a super-fun challenge blog dedicated to showing off decorations for every celebration.  This is my third guest design spot over there and I am hoping for many more to come.
The theme for today's challenge is: Tweens and Teens Party (anything having to do with a party for them).  I decided on a movie night theme.  My kids loved to entertain at my house all the time.  I always had kids over for one reason or another...I miss those days.  Austyn doesn't entertain much at home yet, but I'm hoping that will change soon.
So, to begin with you have to have an invitation right?
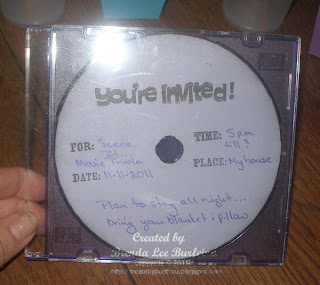
So I took an old cd, lots of them laying around
and adhered paper to the front of the cd.  Then 
I stamped You're invited and all the pertinent information
directly on the paper, hand wrote the exact details
and put it in a plain cd case.
Next I cut the "popcorn" boxes from an SVG file
from Scrapping Table in different colors.
 I absolutely love her All Wrapped Up file
I then downloaded a clipart of a director's clapboard
and imported into my SCAL and traced it.  I cut it
out in white and then again in black and added their
names with a white gel pen.
I also downloaded a "film reel" and did the same thing
as I did with the director's clapboard and cut it out in 
matching colors to the popcorn container as a straw marker.
Now everyone knows whose straw belongs to whom.
Now the next time you want to have a party, think of adding a theme 
to it and create your own decorations.
Thanks so much for stopping by today and thanks again Amy and Rhonda for letting me be part of your fabulous blog as a guest designer! Don't forget to make your own decorations for a Tween or Teen Party and link up at Decorate to Celebrate  I can't wait to see what you create!

Wednesday, September 21, 2011

Decorate to Celebrate #9, Birthday

Good morning and Happy Wednesday, everyone! I am so excited to be a guest designer over at  Decorate to Celebrate again!  Decorate to Celebrate is a super-fun challenge blog dedicated to showing off decorations for every celebration.  This is my second guest design spot over there and I am hoping for many more to come.
The theme for today's challenge is: 
BABY BIRTHDAY (anything having to do with a baby's birthday or even "birth" day.  So, I thought I'd take you back in time and show you what I had done for my little Miss Bella's 1st Birthday.  I just love being a grandma and celebrating lots of milestones with her.  I wish I had been "this" crafty when my babies were little, but now I get to decorate and embellish for her and the new baby, (in March).


So here we go:  First when Miss Bella was born I made her a "Birthday" cake plate.  This way each year for her birthday we can set her cake on it. 

Here is a picture showing how I used the vinyl on the backside of the plate with the etching cream.  I know the vinyl is cow patterened.  I had gotten it on clearance somewhere.  Its a huge roll and I use it mainly for etching purposes. 
Here is the picture of it completed.  We will use this plate every year for her birthday cake or cupcakes.  Depending on what we have.
This is the diaper cake I had made for her shower
Then for her 1st birthday I made this:


I used my Cricut and my SCAL.  First I created a triangle shape and welded circles onto it to create the scallop look.  I cut this at 4.7 by 5.4 inches (Pink).  Then I created another triangle (Green) and fit it inside.  I cut a scallop circle (Brown) in SCAL at 2.42 inches.  I used the Bernard MT Condensed font to spell Bella's name (Green) and then again with the Shadowed Blackout (Rounded)(Pink).  I used my ATG gun to adhere all the pieces together.  I also used SCAL (game pieces in the shapes library) and broke apart and cut just the crown out of pink cardstock.  I added some rhinestones to the crown for some added bling.  I then used my ribbon punch to punch holes in the triangles and slipped this cute pink and brown ribbon through it.  The best part of this whole project?  I used everything from my stash.  YEAH!!!  I just love the look of this banner.  
  Our theme for her birthday is Princess and Frogs.  Frogs you might ask?  Well, all of my kids had a special theme as they were growing up and you always received something of that theme for each birthday, christmas or special occassion.  My daughter picked tree frogs for Bella.  I know you might think that's kinda weird, but really there are a lot of frogs that are super duper cute.  I am really loving it.  Anyway, this post has nothing to do with frogs.  Hehehe.
I used SCAL and a plain cupcake wrapper to dress up her cupcakes.  I welded Bella's name onto the cupcake wrapper and then I used my new Cri-Kits (green glitter pen) that I won over at Joy's Life to write Princess on the wrapper.  I used the font Fiolix Girls with my SCAL.  This is probably one of my favorite fonts.  The pens really work great.  Then I cut Bella's name out in the DCWV All Dressed Up Glitter Stack in green and adhered them to her name.  SO stinking cute, if I do say so myself.  
 
I also made the party hat for Bella.  All I did was took a piece of paper 6 by 11 and formed it into a party hat.  You know the ones you can buy for a birthday party.  I adhered both sides together with my ATG fun and formed the party hat.  Kristal over at Kandrewdesigns had made a crown a while back for the Knock out Breast Cancer.  She gave the file for free and I snagged it up.  I wasn't sure what I was going to do with it, but now I am glad I grabbed it.  I altered it a little bit by making it smaller top to bottom and then I adhered it to the party hat.  I used the same letters that I had used for the cupcake wrappers and adhered them to the crown.  I then punched two holes on either side of the party hat and added some elastic.  I didn't go too overboard on embellishing it or adding too much detail because, she won't leave it on for long anyway, she doesn't like anything on her head. 
And here are just some random pictures showing the cake and cupcakes.
I made a cake just for her to dig into


And this was the frog for the big cake.  Isn't he just the cutest?
and here she is after digging into her own cake.

Thanks so much for stopping by today and thanks again Amy and Rhonda for letting me be part of your fabulous blog as a guest designer! Don't forget to make your own decorations for a Baby Birthday or "Birth" day and link up at Decorate to Celebrate  I can't wait to see what you create!
.

Saturday, August 27, 2011

Wedding Cake

Good morning my dearies,


I'm sorry I haven't been here much this week, but my personal life is a bit crazy at the moment and I've just had a lot going on.  I am hoping I can get out of this stuff soon and get back to normalcy...is that even a word?  I won't bore you with all the details because I really want you to come back to visit...hahaha.  I do think that crafting is my therapy and I needed to dig into something time consuming so that I would be able lose myself in a project and this is what I came up with.


My friend Amy at Love to Crop has a challenge for the Decorate to Celebrate blog.  The theme for this challenge is WEDDINGS, ENGAGEMENTS, and BRIDAL SHOWERS!!  So we want to see all of your decorations and party supplies celebrating everything fantastic about the UNION of two people in LOVE!!   I just couldn't resist in creating this beautiful Wedding Cake.  Now as I said, this was very time consuming, but I just LOVE, LOVE, LOVE how it turned out.  So here we go, (picture heavy):
Here is the cake....
doesn't that just look nummy?
The cake was cut with the Tags, Bags,
Boxes and more cart on my cricut
at almost 7 inches
I inked the edges with a soft 
pastel pink for definition.
If you want to know where I got the idea from the Roses
head over to Penny Duncan's blog.
The rose for the slices were cut on my E-craft from
white copy paper at 1.5 inches.  I misted the flowers with my 
homemade glimmer mist before assembling them. 
 I did not coat each flowers to it's fullest to give it highs and lows shadows.
The roses for the center were cut at 1 inch and the
green leaves were cut from glitter paper also on my E-craft.
The slices open up.
I embossed each piece of cake with my cuddlebug
and the Textile texture folder.  Isn't this just gorgeous?
The lace was from my stash, but I believe it came from
a yard sale or maybe a thrift store.  I have tons of this stuff.
It looks so real.
I used my E6000 glue to glue the plate onto a candlestick
One last look.  I am so happy with how this turned out.

Before adding this to my blog I had shown some of the pictures to a friend the other night.  Her daughter is getting married on 9-10-11 (what a cool wedding date) and she commissioned me to make one for her with teal and brown.  As soon as I've completed it, I will post it on my blog.  
I am also going to etch the last name and the date onto the plate.  
That will be my "gift" to them.

So now hurry on and create something for a Wedding, Engagement or Shower and enter the challenge.

I am also linking this up over at Sew Woodsy.