Followers

Monday, May 16, 2016

Butterfly keys dancing with Amazing Casting Products

Good morning friends

I love perusing Pintrest and sometimes I find something that I want to make immediately.  Sometimes I have what I need on hand and sometimes I have to punt.  This is one of those times.

This is what I found on Pinterest:
Decorate with winged keys.

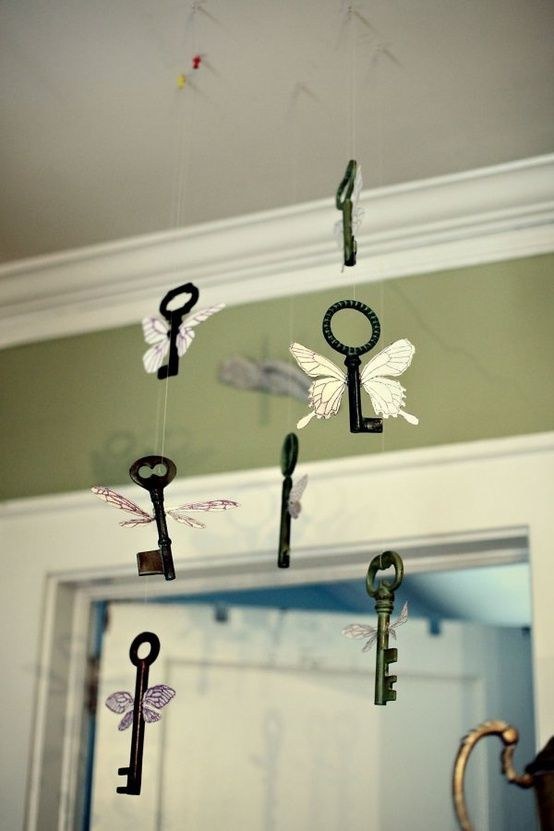
And this is what I made:


I started with my molds of keys that I made using my Amazing Casting Products.  I love keys!!!


I made my very lightweight keys.


Then I hot glued my butterfly wings to the keys


all different shapes ...


... and sizes


I tied fishing line to the keys and 
to an old embroidery hoop


I even glued some of the butterflies around the embroidery hoop


I love Pinterest, but I don't always make what I find 
exactly the way I saw it!  I like putting a spin on my project.

I hope you've enjoyed my version of the butterfly keys.

Thanks for looking and I hope you leave me a comment.

As always, have a great day and God Bless.


Sunday, May 15, 2016

Lucky Horseshoe #Reclaimedbarnwood


Happy Sunday to you all!

Today I wanted to show you something I am super proud of.  I've been creating a lot of reclaimed barnwood signs as of late.  I'm hoping to show some of my signs off in the upcoming weeks.  But today I wanted to share this one with you. Remember when I made my horseshoe wreath of sorts?


You can view that post HERE

Well I wanted to use the horseshoe mold again for this project.
I haven't used this mold for about 8 months, but it's still as pliable as the day I created it.


First I "painted" the mold with the Alumilite powders.
Just dip your dry paintbrush in the powder and dust the mold.
I also used my Amazing Casting Resin mixed with the 
Alumilite Silver Metalic Powders for the base of the horseshoe
I made it look old and rusty.


The resin piece is super lightweight and it was easy to screw into my board.
I also painted the screws over so that they didn't look "new".
You can hardly even see them! 


I just love how grungy this looks.


And here is my L U CKY sign, painted and ready for it's forever home.  
Now had I used a real horseshoe this sign would also have been very heavy.

I hope you've enjoyed this quick and simple tutorial and would love if you left me a comment.

As always, have a great day and God Bless.

Saturday, May 14, 2016

Keychain with Amazing Casting Products

Good day

I was gifted this lovely key chain a couple days ago and while I absolutely love it it's a bit heavy to put on my keyring.  You do know that too many things on your key ring is not good for your ignition right?  When your keys are heavy it weighs down on the ignition.  I really wanted to use this key chain, but don't want to wreck my ignition, so of course what do I do?  Yup Amazing Casting Products to the rescue because the resin piece will be super light weight!


First I mixed up equal parts of the Amazing Mold Putty and you can view mixing instructions HERE


After my mold was set which took less than 10 minutes
I mixed up equal parts of the Amazing Casting Resin with some 
the preparations for mixing HERE.


That set up within 10 minutes also.
I did run a little bit of Rub n Buff over the resin and
added some rhinestones. 


I love how this turned out and now I can proudly hang my 
car keys on it and not worry about wrecking my ignition.


Friday, May 13, 2016

Steampunk redux container

Good day

I just wanted to share a quick post of something I made yesterday for myself.  

A friend of mine gave this container to me a while back because she enables my hoarding addiction.
LOL
I love to repurpose things and little containers are my favorite.


So I started out with gesso ing the container.  One coat worked well.


Then I painted it purple.  My all time favorie color


Then I added some washi tape and my resin gears.  
I just used what I had on hand because I always have extra resin pieces laying around.


You can go HERE and see how I created my gears with my favorite Amazing Casting Products.


I even added some washi tape to the inside of the container.  The inside will hold all my push pins.


Now I wasn't sure how I would hang this, but of course in my hoarding of all stash I had some hook and loop tape.  Eeasy peasy hanging on the wall!


and here it is.  Now I just need to use my corkboard, LOL

I hope you've enjoyed my inspiration of redux container.  I love comments, so please let me know what you think of my idea!
Until next time, have a great day and God Bless.

Thursday, May 12, 2016

Simply Create Too Challenge #108 - Ladies Only

 Well hello there.  I so apologize that I am entirely 1 week behind in posting for the design challenge over at Simply Create Too.  I got so mixed up with the weeks.  The challenge for this week, actually last week was For Ladies only!    What a fun theme.

Now when my kids were little I made a lot of teacher gifts and now that I am a grandma of a school ager and  two in daycare they have asked me to continue making gifts.  Naturally  I love being asked so lets see what I did for their teachers.


I started with two mushroom cans.  They are about 3.5 inches tall.  I spray painted them both white. 
 While that was drying I cut multiple layers of flower petals with my cricut.  
I haven't paper crafted in a while and that was a lot of fun.


After my cans were completely dry, I hot glued some of this awesome pink burlap ribbon around the cans.


Then I layered all the flowers petals on top of each other and stuck a sucker in the middle.  I used some styrofoam to stick the suckers into and using a little hot glue I added another flower petal with a button in the center of the can  and viola ...


A super easy peasy teacher gift.

The grandbabies were pretty excited to hand out their teacher gifts.

I hope you've enjoyed my super easy Ladies only flower bouquet and I will see you again in 3 weeks.

Make sure to head on over to the Simply Create Too challenge blog and add your creation!