Followers

Showing posts with label Butterflies. Show all posts

Monday, May 16, 2016

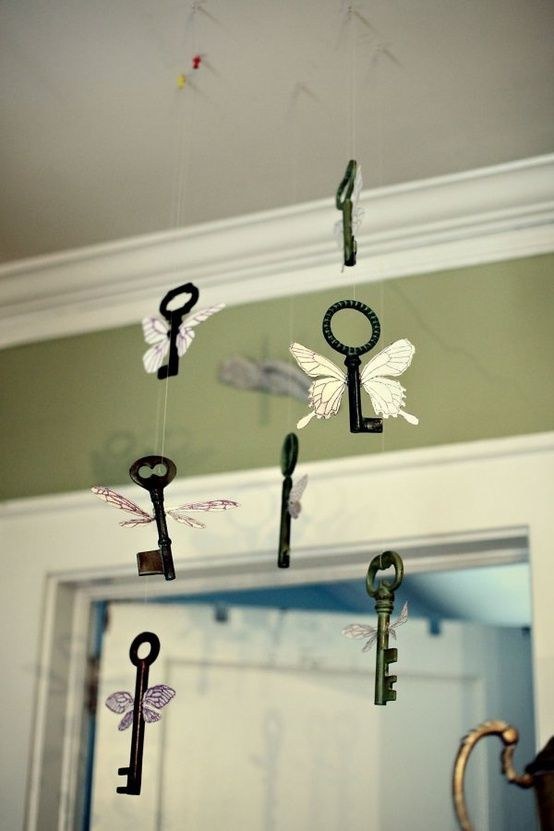
Butterfly keys dancing with Amazing Casting Products

Good morning friends

I love perusing Pintrest and sometimes I find something that I want to make immediately.  Sometimes I have what I need on hand and sometimes I have to punt.  This is one of those times.

This is what I found on Pinterest:
Decorate with winged keys.

And this is what I made:


I started with my molds of keys that I made using my Amazing Casting Products.  I love keys!!!


I made my very lightweight keys.


Then I hot glued my butterfly wings to the keys


all different shapes ...


... and sizes


I tied fishing line to the keys and 
to an old embroidery hoop


I even glued some of the butterflies around the embroidery hoop


I love Pinterest, but I don't always make what I find 
exactly the way I saw it!  I like putting a spin on my project.

I hope you've enjoyed my version of the butterfly keys.

Thanks for looking and I hope you leave me a comment.

As always, have a great day and God Bless.


Sunday, April 20, 2014

Butterfly in Flight Easter Basket at ABAC Challenge #34

Happy Easter!

It's time again for Anything But a Card "Spring Forward" challenge.  Since today is Easter I thought I would share something I created for our Easter Table.  

I started with a mold that I created with my Amazing Mold Putty and dusted the outer edges with my Alumidust.  LOVE this stuff. 
Then I mixed my Amazing Casting Resin Part A with the Terri Sproul mixers in pink. 
Then I mixed Part B into Part A and stirred them together real well. 
While my molds were setting up, I cut three pieces of electrical wire (yes, I have a huge stash of these wires in all sorts of colors).  The best part of this wire is that it's kinda flimsy and this will give my butterflies "flight".  Then just before the resin was almost set up, I inserted the wire into the resin and let it harden the rest of the way. 
While that was setting up, I cut a piece of styrofoam that will fit nicely in my basket and
hot glued my wires into it. 
Blue and Pink butterfly 
Orange and Pink butterfly 
Purple and Pink butterfly 
All three butterflies 
And here is my finished basket.  I cut the "egg" basket using my cricut and scrap pieces of paper from my stash in this pretty butterfly paper.  I added a bit of green tinsel grass and now I have a cute centerpiece for our EASTER table. 
Another look 

I hope I've inspired you to create something and join us over at Anything But a Card for the challenge "Spring Forward". Remember, it can be Anything But a Card!

As always, have a great day and God Bless!


Saturday, March 29, 2014

Unscripted Sketches 250 Thank You card


Good morning and happy Saturday!

Today was supposed to be my sleep in until my body wakes me morning and do absolutely NOTHING!  I've been crafting up a storm this entire week getting ready for an upcoming event and cannot wait to share it with all of you, but you will have to wait a bit yet!  I love teasers...

When I did wake up at 7:23 a.m. I was pretty amazed that I slept in almost a full 1 1/2 than when I normally wake up.  I got up, made coffee and decided to check in on facebook.  BIG mistake...or maybe not.  I found a post by Susan who is my leader over at Amazing Mold Putty and she mentioned that Unscripted Sketches had it's Saturday sketch up.
Sketch250

I don't know why, but it totally made me want to create a card with it.  So, taking my coffee I headed to my craft room and started looking for inspiration.  I have a 12 x 12 container with all sorts of unfinished or partially finished resin pieces in it and I've made it my goal to USE them and make something with them.  Whether it's a card, layout or a mixed media project, I've got to use them up.  I found this frame that I had poured a while ago and inspiration struck immediately.  The frame was made with a mold using the Amazing Mold Putty, poured with Amazing Casting Resin and Copper Alumilite metallic powder.
I pulled out my Alumidust in Deep Purple and Lt. Green and began working... 
Just dip your dry paint brush in the powder, highlight the area you want covered, spray with water and set with your heat gun!  EASY and no mess. 
I love the shimmer that it gives it. 
I did the same exact thing with the Bronze Alumidust on a piece of white card stock and after setting it with my heat gun I stamped my sentiment with black Stazon directly over the top of it. 
Then I traced around the frame and cut it out.  I also added a heart rhinestone right over the top of my "stamped" heart for that needed bling I always have to have. 
Some quick dry glue to the back of the frame and clamped with my chip bag clamps all from the Dollar Tree, hehehe and it can sit and set up for a minute. 
Now, another one of my goals is to use up some of my store bought embellishments.  Seriously people, I could open my own craft store with all the stuff I have.  I have a big problem when it comes to hoarding crafting supplies, but with that said, I always do have that perfect item. 
So I found these Iron On Rhinestuds from a clearance bin...is it possible to iron on paper?  
Let's try...I set my iron (which I had to ask hubby where it was 
since I do not iron anything; he does. What a good man!) 
to wool 5 setting and following the package directions began to iron the studs directly onto my paper. 
IT WORKS!  
Now, back to my stash of resin embellishments, I needed a butterfly and I'm sure I had one or two or three...When I pour molds and I have extra resin, I will pour molds that I have in my stash to not waste the resin.  That's why I have so many embellishments.  
Maybe I should figure out how  NOT to OVER MIX resin. 
I even found a purple butterfly, but that really isn't unusual because purple is my favorite color.
I highlighted the body and a bit here and there with a black sharpie.  Sharpies work fabulous on resin! 
I glued my butterfly next to the rhinestone studs and 
PERFECT match. 

Isn't that just the cutest Thank You card?  I say you can never have too many of them, so I might have to do this again and again using different color paper.  I'm really thrilled with how this card turned out.

Now, if I've inspired you to create a card using this week's sketch from Unscripted Sketches, I've done my job for the day!  
As always, have a great day and God Bless!

Thursday, March 20, 2014

Wall Hanging - Anything But a Card challenge #33

Good morning,

I have been so busy creating lately and have just had an awesome time doing it.  I decided to take on a few more challenges and today I am going to be adding my creation over at Anything But a Card Challenge 33: Sparkle.  I really need to get back into doing some scrapbooking and I think this will be the perfect avenue for me to pursue.  While I did not make a scrapbook layout per say this time around, I did do a layout wall hanging.

I started with some plain beer coasters and  I covered the first coaster with glittered card stock in purple.  I am seriously trying to use up as many scraps as I can so I have no idea where this paper comes from.  I cut "It's a Girl" from scraps with my cricut.  Then I added some fake flowers with some rhinestones and of course some butterflies.  Each of my grandbabies have an animal associated with their name and Alexis is butterflies.  You will be seeing more of my grandbabies and their "animal" personalities in the future.  The butterflies are made with my Amazing Crafting Products.  When I pour my molds I usually create multiples of them and I happened to have 4 butterflies; love it when I have the perfect embellishment on hand.  I painted them with Terri Sproul Mixers by Sakura.  Isn't that just the sweetest sleeping picture?
The second coaster was also covered with pink glittered cardstock paper.  I printed her date of birth, weight and length from my computer on some scraps and tore the edges and layered it.  Again the same fake flowers with some more rhinestone embellishments and I also made 2 pins with her name.  The big butterfly was also created with my ACP and you can see here how I did it originally.  I added some glitter to the butterfly for more "sparkle" affect.
The third coaster was covered with another purple glitter card stock.  The same fake flowers, another butterfly and I cut a "dress" trying to mimic her outfit in the picture.
Before adding paper to the back of the coaster I added "ribbon" to hold them all together.

Now for the most "sparkly" part.  I created the "hanger" for this lovely wall hanging.  I had a picture frame that broke and it had this awesome metal hanger.  I thought I could probably mimic the hanger by molding and casting it and manipulating it however I wanted.

Here is a step by step tutorial on how I did this:
here is my hanger molding with Amazing Crafting Resin mixed with Alumilite Metallic Silver
Before the hanger was completely cured I demolded it and while it was still plyable I 
taped it down to create the shape that would fit my coaster and let it cure the rest of the way. 
Then I painted it with some pink acrylic paint and while the paint was drying I sprinkled some glitter all over it for that "sparkle" affect I was going for. 
Once that was completely dry I hot glued it to the back of my coaster.  
The backside isn't the prettiest, but who is gonna see that?
and now I finally have Alexis' birth layout done! 
Very SPARKLY for this "sparkly" little girl! 
It's pretty sad that she just turned 2 and this is one of the first things I've done of her.  
Things are about to change!  
Stay tuned because I may be sharing some exciting news pretty soon!

I hope I've inspired you with this out of the "scrapbook" layout and can't wait to hear what you think.  
Leave me a comment and let me know if I've inspired you to do a layout for a non scrapbook.

Thursday, March 13, 2014

Special Girl sign SimonSays

Happy Sunny Day to you all,

It's so beautiful out today.  I cannot wait to finish this post and get outdoors.  It's been a very, very long winter.  I believe the high today should be around 60 degrees.  YEAH!

So, I've been entering some challenges over at Simon Says Stamp Blog.  They have a Monday and Wednesday challenge and this week's Wednesday challenge is "Mother's Day/Special Girl"  My granddaughter will turn 2 on Sunday and since she's pretty special I thought I'd make her something for her room.  I had purchased these foam signs a LONG time ago at my favorite store...The Dollar Tree and had planned on making something for the girls but never got around to it.  Going through my stash of "stuff" I came across this one and knew it was time for Alexis to get her own room sign.  


I started out with my cricut and cut Alexis in a basic block font and then again as a Shadow Black Out Round to give it some depth.  I also created the butterfly and flower from my Amazing Crafting Products.  You can go here and see how I originally did the butterfly.  This time I used my Casting Resin instead of the Paperclay (less drying time) to create my pieces and painted them both with my Terri Sproul mixers from Sakura Craft.  It's super easy to mix the mixers with some 3d crystal lacquer and it paints onto the resin fabulously.  I also created Alexis' name in resin, but the letters were just too small for the sign.  I will just have to make her another project :)

I glued all my pieces to the foam sign after "stamping" some flourishes directly onto the foam sign.  I tried it on the back first to make sure it would work and it was fabulous.  Then I highlighted the edged flourishes with some purple glitter glue. 

a few glitter glue dots to the letters 
more glitter glue to the rhinestones 
more glitter glue dots as butterfly's flight pattern
and now she has her own room sign.  

I just love how this turned out...now I should make one for Miss Bella also.

I hope you've enjoyed my post today and as always,
have a great day and God Bless.