Followers

Showing posts with label Cricut. Show all posts

Thursday, May 12, 2016

Simply Create Too Challenge #108 - Ladies Only

 Well hello there.  I so apologize that I am entirely 1 week behind in posting for the design challenge over at Simply Create Too.  I got so mixed up with the weeks.  The challenge for this week, actually last week was For Ladies only!    What a fun theme.

Now when my kids were little I made a lot of teacher gifts and now that I am a grandma of a school ager and  two in daycare they have asked me to continue making gifts.  Naturally  I love being asked so lets see what I did for their teachers.


I started with two mushroom cans.  They are about 3.5 inches tall.  I spray painted them both white. 
 While that was drying I cut multiple layers of flower petals with my cricut.  
I haven't paper crafted in a while and that was a lot of fun.


After my cans were completely dry, I hot glued some of this awesome pink burlap ribbon around the cans.


Then I layered all the flowers petals on top of each other and stuck a sucker in the middle.  I used some styrofoam to stick the suckers into and using a little hot glue I added another flower petal with a button in the center of the can  and viola ...


A super easy peasy teacher gift.

The grandbabies were pretty excited to hand out their teacher gifts.

I hope you've enjoyed my super easy Ladies only flower bouquet and I will see you again in 3 weeks.

Make sure to head on over to the Simply Create Too challenge blog and add your creation!

Friday, January 15, 2016

Toasting the New Year's Party with a Wine Themed set of Earrings and new design team!


Good day friends and Happy New Year! I am so excited to tell you about a new design team I am on!  YEAH!

I've been on the design team over at Get Creative Challenge and am having a wonderful time coloring digi images.  Angie is also running the Simply Create Too blog and I am one of the newest members over there now also.  I'm really excited about designing with these fabulous ladies because I get to make whatever I want to as long as I follow the theme!  YEAH!

This month's theme is PARTY TIME challenge #100 and thus I created some wonderful earrings that I wore on New Year's Eve.  

As some of you know I work in a wine store and I get asked over and over if we have any jewelry with a Wine motif. My boss just isn't into stuff like that – so I decided I wanted a pair of earrings to wear for New Years Eve and I wanted them to have a wine motif.

So let's get started!


I started out by cutting a wine bottle and glass shape {welded with my Cricut} out of some cereal boxes! I love to upcycle. I cut the pieces 14 times because I wasn't sure how thick I wanted the glued together pieces to be.


Here are my Cricut cuts and I used 5 of them to get the desired thickness.


Then I mixed up a batch of the Amazing Mold Putty – you can view mixing preparations HERE. I sprayed some UMR Mold Release onto the mold putty before pressing the chipboard into it because I did not want the chipboard to stick to it.


The mold came out beautifully!


Next I brushed some Lt. Green Alumidust where the bottle would be and left an area open where I think the glasses would be. I then mixed up some Amazing Clear Cast Resin {and you can watch a video tutorial HERE} because I wanted the "glasses" to be see through.


So far so good... I then took a silver paint pen and highlighted around the bottle, put a stopper on the top and edged around the wine glass area.


I added some seed beads with E6000® and used
a red paint pen to add some color to the bottle.


Attached some jewelry findings with E6000® 
and I was ready for New Years Eve!


I absolutely love my new earrings created just in time for the Party!
If you are going to CHA you might even see my cuts being used!

Now I hope you've enjoyed my post and my first project for Simply Create Too!

Make sure you follow the theme and join in some fun over there.

Tuesday, August 18, 2015

#cre8time - Take it or Leave it Menu


Hello crafties,

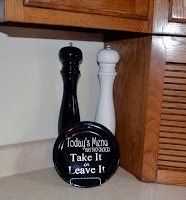
Just wanted to show off a Menu Plate I made last week.

Lately my grandbabies have stopped eating.  Well, not really, but they all have different tastes.  Today one will eat spaghetti and next week she won't.  One would eat macaroni and cheese at every meal.  The other one doesn't eat meat!  It drives me crazy sometimes.  Last week all three of them drove me absolutely crazy with their eating at the dinner table, EVERY NIGHT!  I just throw my hands up in the air!

Now although they can't read, I made a dinner plate plaque cutting some vinyl with my cricut.  Remember, me, the hoarder?  Yes, I have these black plates in my stash because someday I was going to do something with them.  Well, I guess someday was last week.

I vinyled the saying:
Today's Menu
Has two choices
Take it 
or 
Leave it

and burnished it to the plate.  Set it in a plate holder and now it sits proudly in my kitchen!  


Easy peasy and cost next to nothing.  I'm sure if I went to the home interior section of a store I would have spent at least $10 on something as simple as this.  I love being able to create for myself and others.


I hope you've enjoyed my little Menu sign and would love if you left me a comment.

As always, have a great day and God Bless!

Saturday, August 15, 2015

Friends Plaque

Hello everyone and happy Saturday.

Happy Birthday Shelly!
Today is my best friends birthday and while I cannot be there to celebrate with her, 
I did want to make her something and sent it.

Lately I've been on a sign making adventure.  
I love my new found craft and wanted to share this one with you!


The board was something I had in my stash from who knows where.  
I didn't alter it at all.  This is how it was!
I love the aged and weathered look!

All I did was cut the saying with my cricut in vinyl and burnished it to the board.

Friends 
are the 
most important 
ingredients in 
the recipe 
of Life!

As always, have a great day and God Bless!


Thursday, August 13, 2015

Welcome any time of the year Sign

Good morning friends,

I just wanted to share a quicky sign I made.

I saw something similar on Pintrest and wanted to try it.

I got these boards at my local craft store on clearance
and drilled holes with my dremel approximately 1.5 inches apart. 


Then I glued a pop tab to the back of the board with my trusty E6000 glue!


While that was setting up I cut Welcome with my cricut on blue vinyl.


Using and old room key I burnished the transfer paper to the vinyl,


and then burnished that to the board itself.


Then again using my cricut I cut 12 tags of this shiny blue cardstock


and some season pictures out of white vinyl.


And here is my quicky sign.


Fall


Winter


Spring


and Summer.

I hope you've enjoyed the sign I made.  Remember, not everything has to be complicated to make!

As always, have a great day and God Bless.

Monday, March 23, 2015

Get Creative Challenge #11, Oddball Art Miss You Card


Good morning friends,

I'm so excited to announce that I am the newest member over at Get Creative Challenges.  Now this is completing outside of my comfort zone but I am thrilled to step outside of it!  I accepted to be a SUB on the challenge team about a month ago and was ready to show my first card two weeks ago, but fate held up it's hand and said, "wait just a moment"!  A couple days later Angie told us that someone had to step down and would any of the subs be interested in becoming a full designer?  I dove right in, so here we go!  The reason this is outside of my comfort zone is that I have never done digi stamps before.  I've always been a regular stamper when I was making cards.  I have a boatload of stamps but hardly ever use them.  Maybe I should sell them, NAH!  Anyway, let's get to the challenge.

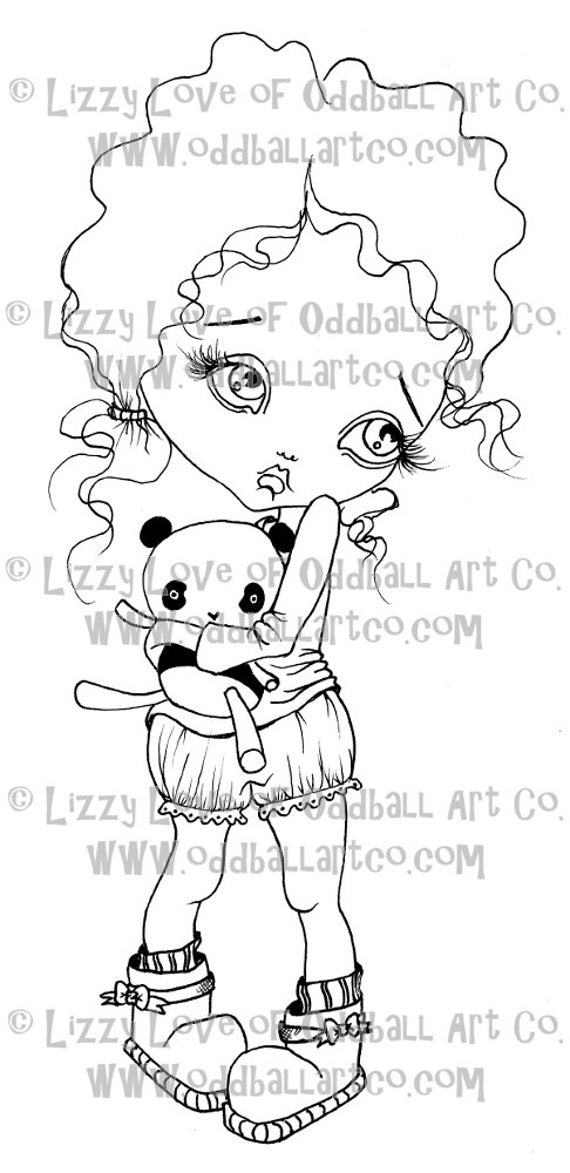
This is the image I chose from Oddball Art 

Digi Stamp Digital Instant Download Big Eye Bedtime Pajamas Girl Image No. 11 by Lizzy Love
and you can find her HERE.  

Big Eye Bedtime Pajamas Girl Image No. 11 by Lizzy Love

She is so cute but to me she looked sad and lonely and from that I created a "Miss You" card.  I know that's not what she stands for, but that was the inspiration I went with.  
Also for this challenge you MUST use a die cut of some sort.  


I used up papers, a velum quote and ribbons from my stash (again, trying to use up my hoarding supplies).  
I added some flowers that I cut with my Cricut and SCAL2 as my diecut to match the paper I went with.


I colored her using various pencils, chalks and even some pastel crayons.  
I think for my first card I did ok!


I also popdotted her to make her more of the focal of my card.  
As always, I have to use bling so I added some 
rhinestones to the flowers and the edge of the card.  
I am very pleased with the outcome and hope you come over and join us at Get Creative Challenges.  
Just link up with us and we will choose 3 winners!  


Sunday, December 21, 2014

Celestial Challenge #42 Week 3, Anything But a Card

Good morning and happy Sunday to you all.  It's that time again when I am showing you something I created for Anything But a Card.  If you haven't heard of us, you guessed it ... it's a challenge blog and we make ANYTHING but a CARD.  So come follow me through my tutorial for this month's theme "Celestial"  There were so many different ideas I kept coming up with until one evening while Christmas shopping with hubby I came across this.  We were at Target and I found this Luminary in the "Dollar" section.  Well, it wasn't $1, but $3 wasn't bad either.


but it was rather plain ... so ...
to the trusty Cricut we go and cut a Star Border out from the Scrapping Table.  You can find her here on Facebook.  I have been a loyal fan of Michelle's for a very long time and I do believe I own every one of her Svg files.  She went off the grid for awhile but I do see she is back and has even re-released some of her older files.  They are all FREE!  If you are looking for any svg files, she has plenty and make sure to tell her I sent you.  I do believe she will also be putting out some NEW files in 2015.
So anyway, I cut that out on some silver vinyl and attached it to my luminary.
I needed some bling, so in shopping my stash I found ALL of these awesome stars.  Huh, who knew?  I make my own glue dots, because I'm very frugal that way.  Just purchase some Alene's Tack It Over and Over glue, use some backing from used up vinyl projects or in this case, my backing from my ATG tape.  You need to let the glue dots set up for a couple of hours for sure.  I usually make about 5 sheets at a time.  Press your stars onto the glue dots and press them on your project ... that simple! 
And now I have a Starry Night Light sitting on my headboard.  
Love it!

I hope I've inspired you to create something for our challenge over at Anything But a Card and hope to see you link up with us.  Please leave me a comment and let me know what you think of my Starry Night Light and hope to see you again soon.

As always, have a great day and God Bless!


Sunday, March 30, 2014

Fit for a Princess ABAC challenge #34 "5"

Good morning crafters,

I'm so excited to share today because I am the newest member over at Anything But a Card.  I applied to participate in this challenge blog because my main goal is to start scrapbooking more.  I'm SOOOO far behind as baby Steven is almost 8 months old and I don't have a single page for him and Alexis just turned 2 and I hardly have her album started.  I'm such a bad Oma!

With that said, I did NOT create a page for my first challenge post...still such a bad Oma!  This week's challenge is "5".  You could use the number 5, 5 things, 5 colors, whatever 5 represented your idea.  Sadly there just wasn't anything I could do for that challenge that pertained to either of them for a layout, instead it did pertain to my other granddaughter, Miss Bella.  Bella will be 5 years old this year and will have started kindergarden.  I'm assuming that she will probably have made a few friends and will probably want to invite a few to her birthday party.  Now her birthday isn't until December, but I say it's never too early to start planning.  Especially if I am going to be making her party decorations and such as I always do!  So with that said, let's get started...

I had a crown svg pattern in my overloaded SCUT file that I really need to organize.  I have no idea where this file came from, so if it's yours, please let me know and I will give you kudos.  This is why I also need to organize them.

I opened the file in SCAL and manipulated it bit.  I created two crowns and cut the first one at 5 by 2 in pink and the second one at shadow blackout round in purple paper.  The crown even has 5 points to it :)
although the crown was fine it lacked a little personality.  

Then I hot glued a bamboo skewer to the larger crown 
Because the skewer will be laid between the two layers I pop dotted it and layered the pink crown on top 
I also cut out the number 5 for her age and pop dotted it also 
and added some glitter glue for sparkle!  
Miss Bella loves glitter as much as I do.
Of course, no crown would be complete without some bling and
 that was accomplished by gluing on some flat backed rhinestones.  
Miss Bella loves coming and playing in my craft room because I have sparklies as she calls my bling!
Now sometimes there is a mistake and you cannot fix it.  
Can you see my mistake?  
When I layered the pink crown on top of the purple one, my skewer 
showed through the pink triangle hole.  Ugh...trial and error!  
So I cut out two triangles using my cricut 
(I do keep all my cut files named with the project that I created them for, 
that's about as organized as I get for my cut files) 
a bit larger than the holes and glued them on and added a bit of bling. 
 I also wrapped the bamboo skewer with some pinkish ribbon and 
hot glued it to the top and tied another piece onto it.  
Now she will have a beautiful hand held crown for her party.  My plan is to cut more of these (depending on how many little girls will be at the party) 
and let them decorate them with glitter and stickers before adding the skewer. 
 I think these will make a great party favor and something
 they can take home to remember Bella's birthday party.

I hope I've inspired you to create something and join us over at Anything But a Card for the challenge "5". Remember, it can be Anything But a Card!

As always, have a great day and God Bless!