Followers

Wednesday, June 24, 2015

Harley Davidson Keychain with Amazing Casting Products

Good Morning crafters,

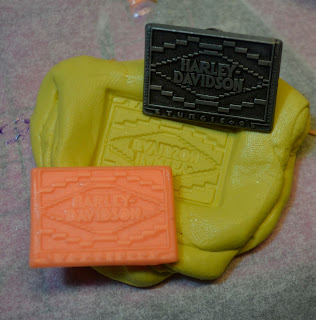
I wanted to show you a keychain I made a while back for a friend of mine.  It was her birthday and she is a huge Harley Davidson enthusiast.  I had this awesome pin that I had gotten many years ago and she has always commented how much she loves my pin.  I, however, was not about to give it away, but I knew I could duplicate it for her.


I started with my Amazing Casting Products and the Amazing Mold Rubber and created my mold.  I then poured the mold with the Orange Dye mixed with the Amazing Casting Resin.  It was ready in about 5 minutes


Then I added some of the Alumilite Silver Metallic Powder.


If you get some in areas you don't want, you can always use a q-tip and some rubbing alcohol to get it off!


I drilled a small hole with my dremel and added a jump ring and keychain and voila!
She LOVED it!

I hope you've enjoyed my quicky keychain.

As always, have a great day and God Bless.
Sunday, June 21, 2015

Anything But a Card challenge #48 Faux Glass leaf bracelet

Welcome to another post for Anything but a Card.  This month's challenge #48 is all about the OUTDOORS.  I so love creating for this blog, but sometimes time gets away from me.  I am here today to show you something I created a LONG time ago for another design team I am on.  I've been with Amazing Casting Products for 3 years now and love using all the products they have.  If you haven't heard about it, go HERE and see all the great things this group of designers have made.  I love creating jewelry and today's post is all about taking Out and About with you!


First start by mixing your Alumilite Violet Dye to part "A" of the Amazing Clear Cast Resin. Make sure to mix it up well and then mix that with your part "B" of the Amazing Clear Cast Resin again, stirring well to get it all mixed together well.


Then I used a piece of packing foam (recycled) as my sponge and "painted" it onto the ribbon coating both sides on top of a garbage bag. Leave your ribbon on the garbage bag to dry and it will just lift right off when it has dried. Once it's dry it becomes hard but yet still pliable. 


I made a leaf using the Amazing Clear Cast Resin with Alumilite (Flo) Green Dye. Doesn't it look like glass? I used a brown sharpie to add the veins on the leaf and then "painted" another coat of Amazing Clear Cast Resin over the top of that to shine up the "sharpie".


I attached the leaf with some E6000® and there I have an amazing fall bracelet. 


I also used my Crop-A-Dile™ to attach some eyelets to the "ribbon" and added a clasp.


I hope I've inspired you to make something for Anything but a Card and can't wait to see what you come up with.  There are only 3 simple rules to participate in this challenge.

1.  Use the Outdoors as your inspiration.
2.  Make ANYTHING BUT A CARD
3.  Have Fun

Thanks for looking and see you soon!

Wednesday, June 17, 2015

Bottle Caps and Amazing Casting Products

Good morning friends.

Today I am showing you a quicky.  On one of my recent shopping trips I came across these fun bottle cap stickers at Tuesday Mornings.  I got 3 different books and a few bottle caps for $7.  Nice!

This is one of the books.


I also created my own findings


Just peel off the sticker and apply within the bottle cap!  Easy peasy!


I attached my findings with some E6000.


I mixed up some Amazing Clear Cast Resin from Amazing Casting Products to pour into the bottle caps covering the image.  I mixed the two part Resin in a small cup and let it sit for about 10 minutes to get all the air bubbles out.  See how much clearer the 2nd mixture is?


See how nice this gets?


Here are all my finished bottle caps.  Now I will be making some necklaces and key chains.

I hope you've enjoyed my quicky.
As always, have a great day and God Bless!


Sunday, June 14, 2015

Get Creative Challenge #17 with Eureka Stamps

Good morning crafty peeps!  Today is another post for the Get Creative Challenge design team.  I've been having a real fun time participating in this design team challenge.  This month's theme was Father's Day or For the Boys.  I got real excited when I saw this image that I chose:

Yup, it's an elephant, yeah me!


I printed the image a couple of time and then I started by coloring the elephant with a gray crayon.  You don't have to be precise with this method.  Then I put some baby oil on a q-tip and went over the top of the crayon.  It smooths and blends the crayon nicely.


Cool, huh?


I have had this elephant paper in my stash for a long time and finally pulled it out to use for this card.  I ran it through my polka dot cuddlebug for some nice texture.


Then I fussy cut my elephant out and pop dotted him.


I also ran my black ink pad over the raised paper before applying the elephant.


I cut some gray paper in sort of a cloud shape and stamped It's Your Big Day from my 
Getting Cricky collection when I was on her design team.  
I then attached a string to the elephant's trunk leading to the "balloon" and some rhinestones.


I loved how this turned out and created another version using the same techniques but added 3 baby elephants to the card.  Only this time I added a hand printed caption.


I hope I've inspired you to head over to Get Creative Challenge and create a fun Father's day card or something For the Boys.

As always, have a great day and God Bless!