Followers

Showing posts with label vinyl. Show all posts

Sunday, June 11, 2017

HTV versatility

Good day friends,

I just wanted to share a few of my recent projects using HTV. I'm so in love with heat transfer vinyl. The possibility are absolutely endless!


A baseball cap 


A oven mitt filled with goodies


A birth announcement


Baseball shirts for moms


Canvas shoes


A statement shirt

I can't wait to work on more things to show you!

Friday, April 1, 2016

Toes in the water, A$$ in the sand reclaimed wood

Good morning friends,

I'm here today to show you a board I made for a friend.  I've posted a lot of my signs on facebook and now I have friends constantly asking me to make them something.  But of course I will try anything for a couple of bucks.  I've gone onto Etsy and other sites to see how much reclaimed barnwood signs are and oh my, I'm way undercharging.  With that being said, I do this for fun and have a blast making my friends happy!

So let's get started:

I started with a 12 x 12 board that my husband so nicely cut for me.  If you saw last weeks post about my wineglass holder you read that my daughter's boyfriend gave me a couple stack of reclaimed barnwood.  Yeah me!  This barnwood is over 100 years old.

I sanded and cleaned the wood very well.  You really need to do this to make sure it's safe for in your house.  I did not stain this board as I wanted the natural wood look.   Then I spray painted some black kinda in the middle of the board.  While that was drying ...


... with my cricut I cut out the saying with some dollar store sticky back shelf liner
and burnished it down very very good.  This is a must so that the paint doesn't bleed
and that will give you nice crisp lines.


Then I took some acrylic paint in a sea green
(oops, picture is upside down)


and spunged all over the board.

\

After it was completely dry I peeled the vinyl letters up
sanded the edges and all around the board
and viola ...


I think this turned out amazing and my friend absolutely loves it.

I hope you've enjoyed my sign and would love to hear some comments.

As always, have a great day and God Bless!

Friday, February 5, 2016

Simply Create Too Challenge #102 Love/Valentine


Good morning friends.

As you know Simply Create Too has a couple challenges each month.  Last month my challenge was Party Time and I had a fun time making some earrings.  This month my challenge for the blog is Love/Valentine.  Well that's easy since it's just right around the corner.

I started with some plain dollar store glasses to create these.  There are so many tutorials on pintrest on glittering them.  It's actually very, very easy.

Start with cleaning your glasses well.  I then brushed a medium layer of Mod Podge on the stem and the base of the wine glasses.  I sprinkled red or pink glitter all over the Mod Podged area.  LET THIS DRY COMPLETELY!  Very, very important to make sure your glue has completely dried.  I let them set over night.

The next day I ran a paint brush over the glitter to loosen any glitter that might not have adhered all the way.  Now this is where you have to determine if you need another layer of glitter or not.  The Pink glasses I had to add three layers of glitter because it was so fine with a layer of Mod Podge between each and then a layer of Amazing Clear Cast resin to finish it off.  Again make sure your Mod Podge dried completely.  I also etched the glasses with hearts using Armour Etch.


The Red glasses I only needed one layer of glitter because it was a coarse glitter and very dense.  I then added another layer of Mod Podge to "soften" the glitter and then put a layer of the Amazing Clear Cast resin from Amazing Casting Products over the top of that.  Now you can't feel the gritty of the glitter.


I added some vinyl lips and mustaches to two sets of the glasses and Yes, I put them in the store!
One set has already sold!  That excites me

(The chocolate suckers are a awesome too.  I print directly on the suckers with edible ink.  
Our motto is, If you can think it, we can print it)

So now, I hope you will head over to Simply Create Too and join us for our Love/Valentine challenge.

Tuesday, August 18, 2015

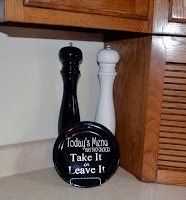
#cre8time - Take it or Leave it Menu


Hello crafties,

Just wanted to show off a Menu Plate I made last week.

Lately my grandbabies have stopped eating.  Well, not really, but they all have different tastes.  Today one will eat spaghetti and next week she won't.  One would eat macaroni and cheese at every meal.  The other one doesn't eat meat!  It drives me crazy sometimes.  Last week all three of them drove me absolutely crazy with their eating at the dinner table, EVERY NIGHT!  I just throw my hands up in the air!

Now although they can't read, I made a dinner plate plaque cutting some vinyl with my cricut.  Remember, me, the hoarder?  Yes, I have these black plates in my stash because someday I was going to do something with them.  Well, I guess someday was last week.

I vinyled the saying:
Today's Menu
Has two choices
Take it 
or 
Leave it

and burnished it to the plate.  Set it in a plate holder and now it sits proudly in my kitchen!  


Easy peasy and cost next to nothing.  I'm sure if I went to the home interior section of a store I would have spent at least $10 on something as simple as this.  I love being able to create for myself and others.


I hope you've enjoyed my little Menu sign and would love if you left me a comment.

As always, have a great day and God Bless!

Monday, August 17, 2015

#Cre8time Dream Star and chalk paint

Good moring crafties!

I'm so excited to share my post and I hope you enjoy reading all about it my off the cuff project.

I've seen these 3d stars everywhere and have always wanted to make some, 
but for whatever reason haven't attempted it until NOW!
I've been stalking pintrest like crazy lately and found some tutorials on how to make them.  
Well duh, how easy peasy.  So let's get started 


Using my cricut of course I cut 2 stars 6 x 6 from some thin chipboard.
If you don't have a cutting machine of any kind you can cut them by hand, 
just make sure they are identical cuts.


Then using my scoreboard I scored lines from point to end all the way around the star.


Now you want those valleys and peaks, so fold alternating.
Do that to both stars.


Now I glued them together with hot glue.  
That seemed to be the best solution.


I just added hot glue to a point and ran a bead down and mashed the star together.
It's a bit tricky, but you can do it!  Just be careful because they don't call it hot glue for nothing!


Now I did want my star to look distressed so I added some petroleum jelly 
to the tops so that the paint wouldn't stick to the entire star.


Now while I was on pintrest I also found a recipe for making my own chalkpaint.  
I used 2 ounces of unsanded grout, some acrylic paint and HOT water to give it a smoothness.


and started to paint.  
While it took to the chipboard I wondered if I should have gessoed it!


So I did the other side.


and then painted it.


gessoed


natural chipboard.
I did sand both sides a little with an emery board.  Chalkpaint is a bit unusual.

But, I like them both!


I did wind up using the natural side for my piece.
Then I added a bit of stencil cream in brown and green to give it an aged patina look.


I used the same chalkpaint on a small canvas piece, 
stenciled some green around, rubbed brown around the edges.
I cut the word Dream with my cricut from vinyl and dug in my never ending box of resin pieces 
(made with my Amazing Casting Products)
to find this elephant and fleur de lis, just because, and glued them to the outer edges.


Doesn't this star look fabulous?
The chalkpaint did flake a little while I was sanding it,
but I love the look of vintage, shabby chic that it gives it.


And now it sits proudly on my headboard!

Whew, that was a lot for one post, but I'm over the top thrilled with my newest project.
I hope you've enjoyed it as much as I have and would love to hear your thoughts!  Leave me a comment and let me know what you would dream up if you could craft anything in the world.

As always, have a great day and God Bless.


Saturday, August 15, 2015

Friends Plaque

Hello everyone and happy Saturday.

Happy Birthday Shelly!
Today is my best friends birthday and while I cannot be there to celebrate with her, 
I did want to make her something and sent it.

Lately I've been on a sign making adventure.  
I love my new found craft and wanted to share this one with you!


The board was something I had in my stash from who knows where.  
I didn't alter it at all.  This is how it was!
I love the aged and weathered look!

All I did was cut the saying with my cricut in vinyl and burnished it to the board.

Friends 
are the 
most important 
ingredients in 
the recipe 
of Life!

As always, have a great day and God Bless!


Thursday, August 13, 2015

Welcome any time of the year Sign

Good morning friends,

I just wanted to share a quicky sign I made.

I saw something similar on Pintrest and wanted to try it.

I got these boards at my local craft store on clearance
and drilled holes with my dremel approximately 1.5 inches apart. 


Then I glued a pop tab to the back of the board with my trusty E6000 glue!


While that was setting up I cut Welcome with my cricut on blue vinyl.


Using and old room key I burnished the transfer paper to the vinyl,


and then burnished that to the board itself.


Then again using my cricut I cut 12 tags of this shiny blue cardstock


and some season pictures out of white vinyl.


And here is my quicky sign.


Fall


Winter


Spring


and Summer.

I hope you've enjoyed the sign I made.  Remember, not everything has to be complicated to make!

As always, have a great day and God Bless.

Monday, July 27, 2015

Here comes my Mommy

Good day

Just wanted to share a quick post on a sign I made for my soon to be DIL's SIL.  Wow, now how was that for an introduction?

Mandy's (my soon to be DIL) brother was getting married and his soon to be wife had a child from a previous relationship and he was going to be in the wedding.  They wanted him to carry a sign as he walked down the aisle.  So Mandy got this wooden sign at Michaels and painted it a light gray with yellow trim.  Their wedding colors were gray, yellow and silver.


She then brought it over to me to have my vinyl a saying.  


Her soon to be SIL loved it!

Not all projects need to be complicated and sometimes it just feels good to make something simple.

As always, have a great day and God Bless!


Saturday, January 24, 2015

Evolution

Good Day Friends,

today is a special day as it is my youngest son's 15th birthday.  I cannot believe how fast time goes by.  He has grown into such a special young man.

Many of you guys know he's an avid golfer.  He's come so far in the last couple of years.  As a freshman he qualified for the Varsity golf team.  He did quite well in a lot of the tournaments last summer!  Because of where we live he's taking indoor lessons over the winter months to keep his game sharp.  It's kinda hard to golf in 20 degree snowy weather.  His coach praises him quite a bit!  He's gained a lot of strength and that should help his swing even more this summer.  I couldn't be prouder of him.

Anyway, I wanted to make him something for his birthday golf related...I know, I do that quite a bit.  I get enjoyment out of creating for him and he actually seems to love what I do!

I had seen a plaque a while ago and put it into my "to do" file.  I actually had forgotten all about it until I was going through some pictures looking for something in a particular.  Needless to say, I didn't find what I was originally looking for, but I did find a picture of the plaque that I wanted to recreate.  This is the picture of the plaque I saw, but I did want to change it up a bit and
here is how I made it:
I searched "evolution" in google and found this image
and added it to my SCAL2 program.

I searched "golfer" in google and found this image
and added it to the first image in my SCAL2 program.

I wrote out the word Evolution ... and added that to my image
 in SCAL2 and grouped everything together.


I searched "fairway" in google and found this image
and printed it out at home.

so from this

to this 

Cutting everything with my cricut and SCAL2 in black vinyl all at once
I added it to the front of the glass of a simple picture frame and together I created this.


I just love how this turned out.  

I hope you've enjoyed my quick and easy peasy birthday gift for my son.

As always, have a great day and God Bless!