Followers

Monday, September 29, 2014

Got Bones?

Good morning crafters,

I wanted to make sure you had a chance to check out my Mold Rubber Monday tutorial over at Amazing Mold Putty.  Here is a quick preview of what I made:


Make sure to leave me comment over there and let me know what you think of my necklace.

While you are over there, make sure to check out ALL the fun things the Design team has created.

As always, have a great day and God Bless.

Friday, September 26, 2014

Steampunk addiction?


Good day friends...

As you all know I am one of the designers over at ABAC and love it.  One of the reasons I so love designing over there is our fearless leader, Susan, challenges me!  This month is Steampunktember and if you read my blog you will know I am NOT a Steampunker.  This month was the very first time I tried anything Steampunk and with that being said, I created some more things because I am so in love with this new genre for me!

My first piece was supposed to be a necklace, but it got too big so I decided I would turn it into a Christmas ornament.  Of course I used my Amazing Crafting Products, some beads, flock, inks, rub n buff and ribbon.


My second piece is definitely a necklace.  Again using the same products I mentioned above with a slight variation adding a rhinestone.


I hope you enjoyed my pieces and if you have a chance hop on over to ABAC and enter your Steampunk project.  You still have a couple of days to join us.

As always, have a great day and God Bless.


Sunday, September 21, 2014

Fore! Sucker Favors

Good day all and happy Sunday,

So ... you all know that my DS is a golfer and I love making things for him, but I also forget that he is now a Freshman in high school and doesn't want mommy making him things to take to school.  He still wants me to make things for HIM alone, but taking things for his classmates (in this case) his golf team was NOT going to fly.

How this all came about was I was on Pintrest (my addiction, I pin ALOT, but hardly make anything) and the other day and saw these cute Halloween favors.  Aren't they adorable?  Now she didn't have a how to tutorial here, but I think it's pretty self explanatory on how to make these.
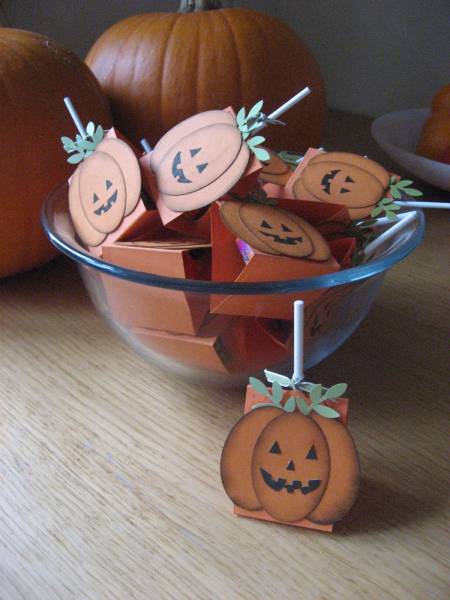
                                                    
Well, that got me thinking, I could make something for his golf team using this general idea, so off to my craft room I went.  I haven't paper crafted in a quite a while and actually shopped my stash and this is what I used.
Supplies:
Maroon (Highschool colors), white and black cardstock.
Google eyes
Green ribbon
Stamp
Sucker
Tools:
Scissors
SCAL
Scoreboard
Gluedots 
Using my SCAL program I made 4 pieces of rectangles 6.25 by 2.75 and added to circle cutouts on each end for the ribbon.  
Then I scored them at 2.5 from each end 
I also cut 4 circles at 2 inches 
This was a super duper find on my recent "junk-ing" trip at Savers.  All three stamps made by Stampin Up for $2.99, FORE, uh I mean SCORE! 
I used the Fore Stamp for the mouth after highlighting the edges a bit with my black inkpad. 
I kinda think this was ingenious if I do say so myself.
Then pop dotted my googly eyes eyes and free hand cut out tiny triangles (not uniformed at all) and attached them also with glue dots.  I glued them onto the base of the maroon cardstock holder and tied a green ribbon to hold them shut.  
And here you have them.  
Now I showed the first one to my DS and he said "cute mom, but please don't make them for the team!"  I wonder how he knew that that was my intention, hehehe!  I guess high school boys don't want golf sucker holders.  So instead, Coach has FORE (4, seriously) little children, so I will be giving them to him to give to his kids.

I really do love how they turned out and this project took me maybe half an hour.

I will be entering this project over at Decorate to Celebrate for their Anything Goes challenge.

ABAC Week 39 - Steampunked Key to my Heart

Good morning friends,

It's time for another ABAC challenge.  I will tell you right off that when I was told we were doing Steampunk, I went into panic mode.  See, I like the look of Steampunk, but I have NEVER done anything Steampunk.  I actually had to go out and search if there were any dos and don'ts.  I didn't find any, so with that being said, here is what I did:

I started out with a key that I recently acquired from a very dear friend of mine who is moving.  I found some odds and ends in my stash of resin pieces and things I hoard and started to play
I also created the wings from this mold I made with the Amazing Mold Putty.  I painted them with a mixture of Alumidust in gold, deep red and bronze and 3d crystal lacquer. 
You can see what I did with this mold from a previous project here.
I twisted some wire, found a circle thingy and added a bead cap.  Painted a spiky thing with a mixture of Deep Red Alumidust and the 3d crystal lacquer and wrapped some wire around it.  The heart was also from a mold I've had for a very long time that I found in my resin stash and it fit perfectly to my key.  Everything was glued on with E6000 or wire wrapped.  I added a bit of white tulle to give it a little softer feel and viola, Steampunked I did!  


I added a pin back to my key and now whenever I wear it I will think of my dear friend Dixie who definitely holds the Key to my Heart.  I'm actually pretty happy with my  - Steampunked project.

Head on over to ABAC and link up with us.  Remember the rules:
Steampunk
Anything But A Card
Have FUN!

I really love comments, so if you would be so kind, please leave me some feedback and tell me what you think of my Steampunked pin.

Wednesday, September 10, 2014

ATC Swap


Good morning crafters,

I went way out on a limb with this project...well, maybe not WAY out, but a bit different.  

Recently I joined an ATC Swap...what you say, Brenda did some papercrafting?  Amazing, LOL.  Yes, I did indeed do some papercrafting.  I had a lot of fun doing it, but I will give you a little background before I show you what I did.

So, my computer went on the flitz again.  I swear I have more trouble with this laptop than you can shake a stick at.  ???  Whatever that means, I just heard my mom in that.  Ok, so I was without my computer for 2 weeks, but had signed up for this ATC swap and the deadline was drawing near.  I had no idea what I wanted to do as the theme was Victorian and Book Quotes and literally a couple of days before the ATC needed to go in the mail I figured I had better get on them.  Now, without a computer I cannot print, I cannot manipulate.  I basically cannot craft, or so I thought.  Old school here we go.

My husband plays the piano and has gobs of sheet music.  I "borrowed" one of his books and made copies of some sheets music.  The paper was actually pretty old and it looks like he had written on some of it here and there.  Very distressed looking... (victorian?).  I found a quote from Jane Austen that I absolutely fell in love with.  It's from Pride and Prejudice and the quote is " To be fond of dancing was a certain step towards  falling in Love."

So I wrote, yes, by hand, that saying 12 times and cut it out in heart shaped.

I then distressed the paper a bit with some red chalk and black inking around the edges and here and there.  I glued my heart onto the sheet music which I had glued onto some chipboard and added some 3d crystal lacquer to it to make it shine.

I used my Amazing Crafting products and created a mold (Amazing mold putty) of a pendant I've had for a very long time and created 12 "Love" resin pieces.  I mixed up some Alumidust in Deep Red, Bronze and Silver and painted my mold before adding the Amazing Casting Resin.  Love the antique look.  I then glued them onto the hearts.

Once that was set in place the ATC still looked dull.  I added some pink and gold ribbon around the edges to soften them up.  Still something was missing.

I added some stick on swirls above the heart and to give it some pop of color, I added a leaf and some white sprays.  

I am really happy with the way they turned out.

Now, after I was all done and admiring my work, I realized I was only suppose to make 10 ATC, but I've made 12.  So, with that said, if you like my ATC and would like a chance to have one for yourself, leave me a comment and tell me what you like best about making ATCs.  I will choose one person at random next Monday the 15th of September.  


As always, have a great day and God Bless.


Monday, September 8, 2014

Golf Pin to Golf Tie Tack

Good morning crafters,

It's going to be a busy day for me today.  I've got payroll to do, then off to replenish my Hallmark stores and then off to our Golf Pot Luck this evening.  I'm pretty excited to be showing off hubby's new tie tack I made, but I kinda doubt he's going to wear a tie tonight, he'll probably wear it to the Golf Banquet though.

So let me show you what I made:

Susan, my friend and the design team leader from Amazing Crafting Products sent me a few things a while back she thought I might like.  In this fabulous box of goodies there was this gorgeous Golf bag pin.
 It's gold and the golf bag has mother of pearl (or at least looks like it) laid in it.  Now Susan did not know this, or maybe she did, but Mother of Pearl is my birthstone, so I was even more excited to have received this gorgeous pin.  I knew it would be going on my golf cap immediately and it's been there ever since, until now.  I know we will eventually be having a golf banquet so I thought it would only be fitting for hubby to have a golf tie tack.  (I'm assuming the banquet will be formal?  And if it's not he wears a tie to work everyday anyway so he can wear it then).

So off to gather my supplies:  Amazing Mold Putty to create my mold.  I try to make bigger  molds and add a few things together.  These are acrylic pieces off of a plastic necklace you can get anywhere.  I just cut them apart and I will be showing you a few things I made in the next couple of days/weeks.
See the golf pin to the right?


 Here is the mold after I took all the pieces out.

I dusted in some bronze Alumidust for the bag and Pewter Alumidust for the clubs and latch.  This works very well when you want two tones in one item.  You don't have to paint them afterwards.  I then filled the mold with Amazing Casting Resin with a couple drops of  black Alumilite Dye 
Cool huh? 
I added a tie tack back to the back of the bag and now hubby can wear his new tie tack whenever he wants and I will be putting my golf bag pin back onto my lucky golf cap where it belongs.

I hope you've liked my post today and I would love to hear what you have to say.  Leave me a comment and tell me what you would mold if you had the chance to mold ANYTHING?

As always, have a great day and God Bless.

Saturday, September 6, 2014

Rider Golf Plague

Good morning crafters,

Just wanted to show you a quickie post.  I crafted ALL day yesterday and will be showing you a few things in the next couple of days/weeks to come.  Some posts are scheduled way out but my crafting time is so limited right now since I am also babysitting my grandchildren a couple days a week/weekends and working.  I am trying to fit in as much crafting as possible, but I was also without a computer for 2 weeks and that put me way behind on blogging.  I tell you, blogging takes more time than the crafting itself.

Anywho, here is another Golf Plague I made.  Some of you may know my son loves to golf and just started his freshman year in high school.  He tried out for the golf team and made Varsity!!!  I'm so over the top about this.  They have played a few tournaments already and he is doing very well.  They've taken 3rd twice (honestly, his high school's golf team is the worse out of all 4 high schools in our town) and have had a few  scrambles also.  He will be going to an out of town tournament next Friday and he's a bit nervous about it.  Anyway, we are having out Golf Pot Luck this coming Monday and I thought I would make Coach a medal plague like I did for Austyn last summer.  You can see the original post here.

The high school is the Rough Riders and they are Rider Golf, so this is what it looks like.  Coach now has a place to hang all those medals they will be getting (wink, wink).

These are so easy to make with my Amazing Crafting Products, SCAL, vinyl, a few cup hooks, nails and reclaimed drawer fronts.  Maybe I will make one for each of the Varsity kids???  
I might need to redo my kitchen cabinets again, lol.  
(You'll understand if you read the original posting of this plague)

As always, have a great day and God Bless.

Sunday, August 17, 2014

ABAC Week 38 Repeating Pattern

Good morning friends,

I'm so excited about my current project for Anything But a Card.  Originally when I joined the design team it was because I either make cards or jewelry and I really wanted to do some scrapbooking.  I thought this would be a great way for me to get back into it, but again, I DID NOT make a layout for this weeks challenge...someday soon I will surprise you and have a layout.  Maybe...  I love the digital age, but honestly, I did a lot more when I had film, took it to the print store, had them print my pictures and came home to see how many of the 24 on a roll turned out, usually only half of them turned out, but I used them!  LOL  Now I have so many pictures on my computer and I just don't find the time to go through them, pick the ones I want, upload them to my Walgreens and pick them up.  How do you guys do it?  I'd really like to know if it's just me or if others have that same problem.

Ok, enough of that, let's get on with the project for this weeks challenge.  The new Challenge... Anything But a Card Challenge #38 - "REPEATING MOTIFS" a.k.a. PATTERNS. Not necessarily Zentangle (or tangling), but that certainly falls under this category. Repeating Motifs, rather than patterns all apply here... you don't have to use Zentangle... so your muse is free to create! 

I've been wanting to do some Zentangle as it's all the rage right now, but honestly, I can't draw.  I know that Zentangle you can pretty much do however you want, but all my lines aren't straight, my patterns aren't uniformed, etc.  But, I did make an attempt and I'm actually ok with the outcome.  So let's get started...

Of course, I have to use my Amazing Crafting Products as I do with MOST of my projects because I so LOVE this stuff.  You can create so many different things and again, I love to experiment with all the different products they have.
I used a mold I created for some Mini Chalkboards a while back and you can view that post HERE.  
First I mixed up my Amazing Casting Resin and added some Bronze Alumidust to the mixture.  If you have never seen this process, you can check out the tutorial on mixing your resin HERE and preparing your Amazing Mold Putty HERE.
Here it is unmolded and ready to be transformed into a hair barrette. 
I took an ordinary Bic Pen and started my design.  I did however heat set the piece after I drew my pattern just to be safe and that also "softens up" your resin piece so that it can be shaped to whichever form you want.  I then punched holes in either side of the piece with my crop-o-dial (which works so slick) and used my fake chop sticks to keep the shape. 
So, what do you think?  Again, I'm not a good drawer, but I am actually very pleased with the outcome. 
Another view of the barrette, this is more 
true to the color that it actually is. 

Now hope on over to ABAC and join in the fun with your patterned creations and link up with us.  I can't wait to see if I've inspired anyone to create some hair jewelry as I call it.

As always, have a great day and God Bless.

Thursday, August 7, 2014

Flip Flop Jewelry

Good morning crafters,

Today I am going to show you how you can transform a simple plastic necklace into a one of a kind flip flop adornment.  What am I talking about?  Here follow me to this Amazing transformation.
I started out with these plastic necklaces thanks to Susan, our fearless leader. 
After I cut them apart and made my mold, (you can go here to see how to prepare your Amazing Mold Putty), I dusted them with the Alumidust that you can be purchased off the website.  Click the Alumidust link and it will take you directly to all the different colors they have. 
Then I poured my Amazing Casting Resin tinted with the Black Alumilite Dye directly into the molds (you can click this link to see mixing preparations).  Just before the resin is cured I placed these clip on earrings right into the resin and it works so as a bond.   
Here you can see the finished piece vs the plastic piece. 
Clip them onto your flip flops and you have some Amazing jewelry that you can change out with every outfit. 
I hope you've enjoyed my post today and can't wait to show you another project in the next few days.

As always, have a great day and God Bless.

Saturday, August 2, 2014

Personalized Golf Glasses

Good morning crafters,

I am here today to show you how lucky you can be sometimes.  Well, it's really not that big of a deal, but I'm so super excited.

As most of you know we went to Florida this past May on our family vacation.  We stayed at a beautiful resort near St. Augustine and had a wonderful time.  We went to The Players Golf Tournament and had a fantastic time there also.  At our resort I wandered into the Clubhouse and spotted these amazing glasses that had a raised glass golf ball in the inside.  I so wanted to get them for my guys, but my vacation money was running out and at $20 a PIECE, I just couldn't justify it.  I was so bummed, but we can't always have what we want.  Here comes the best part of this story...yesterday I went junking.  I love going to thrift stores and such and mostly I browse, but yesterday I made a fabulous purchase, actually I made several, (ssshhhhh).  I found these
Identical to what they had in the Gift Shop at the clubhouse.  Want to the know the better part of this story?  Both of them together cost my $1.50.  YES, 75 cents a piece...I'm doing a happy dance.
So, of course I scooped them up immediately and went home and did this... 
I knew I wanted to personalize them so I took some of my scrap vinyl and cut their names with my cricut out with Arial Rounded MT Bold, nothing fancy, just nice letters. 
Placing them nicely on the glasses and 
using my Armour Etch, (you can buy this at Hobby Lobby and if you use a 40% off coupon it will cost you about $13 and you can use it over and over and over), LOVE< LOVE> LOVE> this product.  I painted the etching cream onto the glasses.  Depending on what you are making you may have to do this in sections especially if it's a round object because it does run and you DO NOT want to get any etching cream anywhere on your project except where you intend it to be.  Seriously, even a split second of touching the etching cream anywhere on the glass surface will leave a mark.  Also make sure you use some rubbing alcohol to clean your glass before etching to get any oils from your fingers off.
After only about 5 minutes your cream is ready to be wiped off.  I've been etching glasses for at least 5 years now and have never had to wait for more than 5 minutes.  I simply wipe the cream off with my finger and scrap it back into the bottle.  I've had this bottle of etching cream for about 2 years now and it still works as great as it did the day I opened it. Actually the longer you have your etching cream and depending on how much you use it, it get thicker and thicker and you will have less problems with it "running" on your surface.
And here is my finished project.
Now Steve can go have a gin and tonic while Austyn has a Powerade and they can enjoy watching a golf tournament on tv, as there is ALWAYS one on. 
They both love their glasses (I should have waited for Christmas to give them to them, but I couldn't contain my excitement) and I'm thrilled it only cost me $1.50.  YEAH!

I hope you've enjoyed my post today and make sure to come back over the next couple of weeks because I have some more junking finds to share with you.

As always, have a great day and God Bless.