Just wanted to share a quick post. My homemade CIU was featured at http://mysbroom.blogspot.com/2011/01/homemade-clip-it-ups-another-long-post.html Thanks Yoli. I have been using my CIU for about 7 months now and I love it. Its a great spacesaver. Check out her post and see all the different kinds there are.
As always have a great day and god bless
Monday, January 31, 2011


Sunday, January 30, 2011
Cricutless Card for Challenge
Good afternoon all
Today I want to show a quick and easy card I made for the Wacky Wednesday Challenge over at Morethanfavors. This week challenge was a color challenge. Pink, Green and Brown were the colors. I love this combination. I made a cricutless card. Wow, I can't believe it. I have a personal challenge when I make my cards for any challenges that I enter. My personal challenge is to use my scraps and stash. So here we go. I had this paperpack that I got at Walmart. It's the Best Occasions Scrap Pack. It's got a lot of pastels in it and really liked the pink with white flowers. Really love this pack. I was in a swap over the holidays and my swapper (is that right?) sent me this very pretty ribbon. It's pink, green and brown...yeah. She also sent me these cute velvet brads. Yup, there were brown ones. Then she also sent me this stamp set from Basic Grey. The stamps are: Just Because, I miss you (used on the card), You're amazing, two different flowers and a dashed line. Super cute stamp set. I used my EK border punch of the little dots to make the rosette. I love making them lately. I used my McGill Bow punch and adorned it with a rhinestone I colored green. I stamped the sentiment in green on pink cardstock and then layered on brown cardstock. Again, this card was super, super easy and took no time at all. The hardest part of the card was getting my rosette to cooperate. LOL

Today I want to show a quick and easy card I made for the Wacky Wednesday Challenge over at Morethanfavors. This week challenge was a color challenge. Pink, Green and Brown were the colors. I love this combination. I made a cricutless card. Wow, I can't believe it. I have a personal challenge when I make my cards for any challenges that I enter. My personal challenge is to use my scraps and stash. So here we go. I had this paperpack that I got at Walmart. It's the Best Occasions Scrap Pack. It's got a lot of pastels in it and really liked the pink with white flowers. Really love this pack. I was in a swap over the holidays and my swapper (is that right?) sent me this very pretty ribbon. It's pink, green and brown...yeah. She also sent me these cute velvet brads. Yup, there were brown ones. Then she also sent me this stamp set from Basic Grey. The stamps are: Just Because, I miss you (used on the card), You're amazing, two different flowers and a dashed line. Super cute stamp set. I used my EK border punch of the little dots to make the rosette. I love making them lately. I used my McGill Bow punch and adorned it with a rhinestone I colored green. I stamped the sentiment in green on pink cardstock and then layered on brown cardstock. Again, this card was super, super easy and took no time at all. The hardest part of the card was getting my rosette to cooperate. LOL

As always, have a great day and god bless.

Friday, January 28, 2011
Festive Fridays 1-28
Welcome all to another Festive Fridays. If you are new to us, sit back and relax and enjoy some wonderful Christmas Cards. Yes, I did say Christmas. Festive Fridays will be every other Friday with samples of Christmas cards. This way, you can be making your cards all year long and you will avoid the mad rush when you could be enjoying the Christmas Season. You should have just come from Debbie. If you stumbled upon this post you can go back to Terri and start at the beginning. I will also have a complete list of the Festive Friday hop at the end of this post in case you get lost along the way.
Recipe:
Red Cardstock - Best Occasions Shiny Paper Pack (walmart)
White Cardstock
Baby Blue Cardstock
Ribbon
Rhinestones
Cri-kit Gel Pen (Red)
Popdots
ATG
Carts used:
Winter Woodland
George and Basic Shapes
Blackletter
The Cardbase (Red)(Winterwoodland) I cut at 8 1/2 x 5
The Birds (White)(Winterwoodland) were cut at 4.5 x 5
The insides (Baby Blue) were cut at 3.5 x 4.5
First I used my Winter Woodland cart to cut the dove card base in red. I used my cri-kit gel pens to write the words, LOVE, PEACE and JOY and also the tag Wishing You using my Blackletter Font. I then cut the dove out around the words. I cut two pieces of baby blue cardstock and adhered to the inside of the back of the opening and the other piece will go to the right inside. Before I stuck that on I also drew the dove with my red cri-kit gel pen. I inked around the dove with silver to give it some dimension. I glued the one part of the dove directly onto the card base and the other layer I only glued the body down. It makes the dove look as if it were flying with some dimension. I adhered the tag to another baby blue piece of cardstock and popdotted it. I cut a piece of baby blue ribbon and wrapped it around the front of the card and tied a bow to the dove's neck. I also adhered 3 rhinestones to the bottom of the card for balance.
This was super easy peasy to make and I am going to enter this card also in the
Created for Getting Cricky Challenge The challenge is for the birds LOL
. I really like these card bases. I hope you enjoyd my card and now your next stop will be Yolonda


Here is the complete lineup in case you get lost.
Brenda Lee Burfeind (you are here)
Sunday, January 23, 2011
Birthday Card Take Two
Hello again!!!
So, I am blogging for the 3rd time tonight. If you read two posts down, I had made a birthday card for my son who turns 11 tomorrow. I was pretty happy with the card until I showed my DH. He looked at me in a very strange way and said: "and how old is he going to be tomorrow?" I guess that meant the card was too babyish. So off to my craft room again. After the day I've had I really didn't want to try to do anything but I guess he was right. The card is more for a baby or younger child. So, since I do love making these z fold cards, I thought this one up real quick. Litterally took me 10 minutes from start to finish. Austyn is a real airplane buff. We have an airshow every 3 years in our town and since we live right across from the airport we have front row seats, so to say. I purchased the Stand and Salute cart especially for his scrapbook pages. I used the cart and cut the jet at 4 1/2 inches. The jets are in 3s but I used the hide contour feature in DS and only cut 1 out. I then cut it again for the inside of the card. I used some metalic paper I had in blue and adhered that to the panels. I stamped the "Happy Birthday" in silver pigment ink and it really sparkles. I cut the 11 out in a silver metalic paper from Base Camp and viola. An awesome 11 years old birthday card. Right? Well, it better be because it's almost my bedtime and I am not going to be making anymore cards tonight... ENJOY


So, I am blogging for the 3rd time tonight. If you read two posts down, I had made a birthday card for my son who turns 11 tomorrow. I was pretty happy with the card until I showed my DH. He looked at me in a very strange way and said: "and how old is he going to be tomorrow?" I guess that meant the card was too babyish. So off to my craft room again. After the day I've had I really didn't want to try to do anything but I guess he was right. The card is more for a baby or younger child. So, since I do love making these z fold cards, I thought this one up real quick. Litterally took me 10 minutes from start to finish. Austyn is a real airplane buff. We have an airshow every 3 years in our town and since we live right across from the airport we have front row seats, so to say. I purchased the Stand and Salute cart especially for his scrapbook pages. I used the cart and cut the jet at 4 1/2 inches. The jets are in 3s but I used the hide contour feature in DS and only cut 1 out. I then cut it again for the inside of the card. I used some metalic paper I had in blue and adhered that to the panels. I stamped the "Happy Birthday" in silver pigment ink and it really sparkles. I cut the 11 out in a silver metalic paper from Base Camp and viola. An awesome 11 years old birthday card. Right? Well, it better be because it's almost my bedtime and I am not going to be making anymore cards tonight... ENJOY


As always, have a great day and god bless.
Crafty Daughter afterall???
Hello
so this is a quick post and a second one for the day. I just wanted to let you all know that I might have a crafty daughter afterall. As most of you know, my daughter and her family moved back here from Colorado in November. I usually have one day a week that I try to craft all day...hasn't really worked out so much since they have been here. To noone's fault, just things have changed a bit with a 1 year old in the house. LOL Anyway, when I do find some time to craft, she comes and watches and has even participated in a few blog hops to "learn" a little. Today she asked if she could make a card for her hubby for Valentines. I gave her my booklets to my cricut carts and told her to figure it out. I would help if she wanted me to, but let her mostly do it herself. She did pretty awesome for her first time completing an entire project by herself. Please check out her blog at http://murphyslaw2010.blogspot.com/ and give her a little feedback on her card. I know she would like a little blog love herself.
As always, have a great day and god bless.
Birthday Card
Good evening
So I had a totally disasterous crafting day. EVERYTHING I tried failed. I had to do a couple of projects for some upcoming events and I didn't get a single one done. I ran out of mod podge. Not a single cut cut clean. I couldn't find a certain sentiment stamp... Can you tell how my day went? Well, I have to work tomorrow and then I am off Tuesday and Wednesday. These projects MUST be completed those two day or else I am in big trouble. Keep your fingers crossed for me please.
I did manage to throw together a quick birthday card for my son. WE LOVE elephants and collect all the TY elephants we can find for him and then I have my own collection of them also. Eventhough he will be 11 tomorrow I think this card is kinda fun for him. It wasn't hard at all. (I guess I did accomplish one thing today). This is a tri-step card or a Z card as some call it. I used the New Arrival cart, cut the elephant head at 4 inches and then the shadow feature the same. I used some party streamer paper for the front and the inside panels. I cut the Happy Birthday (welded) in SCAL and gluedotted the BIC markered rhinestones on for his eyes. The inside panel then has the shadow cut as the base to write him his birthday message. Again, very super easy and quick. Hope you like it.


As always, have a great day and god bless.
Wednesday, January 19, 2011
Valentine and Challenge
Good day all crafty birdies,
Today I wanted to share a quick Valentine's card I made for my hubby using my gyspy. You don't have to use the gypsy, but because I have a very boring job and a lot of downtime I take my gypsy to work and create my files. It's truly a time saver. I used the card base from A Child's Year and cut it at 11 x 5. I have never used the cardshapes on this cart and wish I had tried this sooner. This is so neat. I cut the base once in white and then again in the striped pattern paper with the birds and heart cutout from the gypsy font monogram. I cut the piece of striped paper in half. The birds and heart monogram was cut at 1.68 x 1.68 square. I cut that piece again in white and in pink. I layered the pink paper between the striped paper and the white card base. (kinda unnecessary, but gives it a bit of depth). I used glitter glue to trace the heart to make it pop. I cut the birds off of the white card stock and put glue on them and then glittered them up. I layered them ontop of the striped pattern paper. I cut a tag and with my cri-kit gel pen I wrote "You make my" and then colored it in. I found a cute pearl colored heart button and cut the shank off and adhered it to my tag. I had a matching pearl for the top of my tag. I cut the word "flutter" out of white glitter cardstock at 2.25 x .74. I still think this card needs something, but just not sure what that might be. I am sure that after I post this and look at it again I might add something. If I do, I will for sure post a revised picture.


Today I wanted to share a quick Valentine's card I made for my hubby using my gyspy. You don't have to use the gypsy, but because I have a very boring job and a lot of downtime I take my gypsy to work and create my files. It's truly a time saver. I used the card base from A Child's Year and cut it at 11 x 5. I have never used the cardshapes on this cart and wish I had tried this sooner. This is so neat. I cut the base once in white and then again in the striped pattern paper with the birds and heart cutout from the gypsy font monogram. I cut the piece of striped paper in half. The birds and heart monogram was cut at 1.68 x 1.68 square. I cut that piece again in white and in pink. I layered the pink paper between the striped paper and the white card base. (kinda unnecessary, but gives it a bit of depth). I used glitter glue to trace the heart to make it pop. I cut the birds off of the white card stock and put glue on them and then glittered them up. I layered them ontop of the striped pattern paper. I cut a tag and with my cri-kit gel pen I wrote "You make my" and then colored it in. I found a cute pearl colored heart button and cut the shank off and adhered it to my tag. I had a matching pearl for the top of my tag. I cut the word "flutter" out of white glitter cardstock at 2.25 x .74. I still think this card needs something, but just not sure what that might be. I am sure that after I post this and look at it again I might add something. If I do, I will for sure post a revised picture.
Recipe
White card stock
Striped card stock
White glitter card stock
Pink card stock
Pearl button
Pearl
Glue
I am also using this card for an entry to a challenge over at Kandrew. This challenge is for the birds. LOL

(Excuse my granddaughter's hair brush, but I needed
something to hold the card up) ha,ha,ha,ha,ha,ha,

I used the cutout of the striped paper for the
inside of the card just to add something to it.

Glittered birds and glitter glue for the heart for effect.

Enjoy
As always, have a great day and god bless.
Friday, January 14, 2011
Valentine Treat Bags
Good evening,
I just wanted to share these cute valentine treat bags I made for this weeks Wacky Wednesday Challenge. I will be giving these to my coworkers and dart team. I had initially wanted to make these for my son's class for school, but I don't think the kids would appreciate them as much as the girls at work. I got this idea from CapadiaDesigns. The cut file was no longer available, but it was really simple to duplicate. I had so much fun making and embellishing these.


I just wanted to share these cute valentine treat bags I made for this weeks Wacky Wednesday Challenge. I will be giving these to my coworkers and dart team. I had initially wanted to make these for my son's class for school, but I don't think the kids would appreciate them as much as the girls at work. I got this idea from CapadiaDesigns. The cut file was no longer available, but it was really simple to duplicate. I had so much fun making and embellishing these.

Recipe
Cardstock
Ribbon
Glitter Glue
Punch
Gel Pen
Ziplock baggies
Treats
SCAL
First I used my SCAL and welded a scalloped heart to a rectangle. The measurement is 3 x 9. When it is folded up it measures 3 x 4. I scored at 4 and then again at 5. I was able to cut 2 bags per sheet of cardstock. Keep the remnants for embellishments. I also cut the scalloped hearts out in white and layered them on top. I used glitter glue and polka dotted around the scallops. Remember those remnants? I cut 1 inch strips by 9 inches to make the rosettes. I scored the strips at a 1/4 all the way down. Then I cut the scored strip in half again. I had a bit of a time making these rosettes. This is the first time I had ever made them and since they are so small it was a bit difficult. 38 rosettes later, I think I got it. LOL I had cut tiny hearts out also and used them for the center of the rosettes. I used glitter glue around some, rhinestones as centers for some and even glitter glue dots for others. I didn't use all the remnants, so then I decided to use my border punch to embellish some of the bags a bit more. I made a lot of punched strips and had plenty of them left over. I also used my white gel pen and faux stitched around the edge. Remember those remnants of punched strips? Well I used them some more. I glued them around tea lights. I left them hang over the bottom a bit and then gently pushed them under. This gave it a little rise. I really liked the way that turned out. I put a tea light and a few kisses in a ziplock baggie and inserted them into the treat bag. I then used my crop a dial and hole punched all three layers and tied it shut with a ribbon. I am really very pleased with these treat bags. I know the girls will love them also.


I would love it if you gave me some blog love and leave me a comment.
As always, have a great day and god bless.
Thursday, January 13, 2011
Work
Top of the day all -
just a quick post to keep you updated on up and coming things.
Remember to check back tomorrow for our Festive Fridays bloghop. Click on the picture on the left if you don't know what I am talking about.
Today I am at work and creating on my Gypsy for a challenge I want to enter. I love my "real" job cuz it allows me to create, create and create some more. My only problem is that when I get home at night I am too tuckered to cut and assemble what I've created. I knew my gypsy would come in handy, but then the files just sit there. Ugh. I don't have another day off till next Tuesday, but with some determination I will find the time to cut this file and assemble and post pictures for the challenge by Sunday.
I also wanted to let you know to check back here for an announcement coming soon. I am so excited. You know when something exciting happens and you can't tell anyone for a while...well that is happening right now and I am busting at the seams...ssshhhhhhh, zipping my lips now.
Well, I guess I should be done rambling for awhile and hope to see you all tomorrow for the Festive Fridays bloghop.
As always, have a great day and god bless.
Monday, January 10, 2011
Birthday Plate
Good morning crafty beings,
Today I wanted to quickly show you a plate I glass etched. When we knew that the baby my DD was having was going to be a girl, she told us she was going to name her Bella. Since they lived in Colorado I was not going to be able to be there for her baby shower, but I wanted to be part of it. I had made her a diaper cake and I wanted a special plate for Bella. I thought about making a real cake plate. I found a glass plate at a discount store that I really liked. I etched Bella's name on it. I had to flip the letters in SCAL because I was going to glass etch from the back side. Believe it or not, it did take me a few tries to figure this out. I used a mirror to look at my SCAL program to make sure it was right. LOL I mailed the diapercake and the plate to her friend in Colorado and she put it together and brought it over the day of the shower. She really loved it.


Today I wanted to quickly show you a plate I glass etched. When we knew that the baby my DD was having was going to be a girl, she told us she was going to name her Bella. Since they lived in Colorado I was not going to be able to be there for her baby shower, but I wanted to be part of it. I had made her a diaper cake and I wanted a special plate for Bella. I thought about making a real cake plate. I found a glass plate at a discount store that I really liked. I etched Bella's name on it. I had to flip the letters in SCAL because I was going to glass etch from the back side. Believe it or not, it did take me a few tries to figure this out. I used a mirror to look at my SCAL program to make sure it was right. LOL I mailed the diapercake and the plate to her friend in Colorado and she put it together and brought it over the day of the shower. She really loved it.

I had bought the winnie the pooh and friends cart, because she had told me she wanted to use that as her theme. As you all know, she did change the theme to frogs. LOL I still like this cart, but it's definately somewhat complicated in the layering. Anyway, back to the original project.
When they moved here, I asked my DD to make sure and bring the plate because we would be using it for Bella's birthday. I then had to also etch her birth date on it. Here is a picture showing how I used the vinyl on the backside of the plate with the etching cream. I know the vinyl is cow patterened. I had gotten it on clearance somewhere. Its a huge roll and I use it mainly for etching purposes.
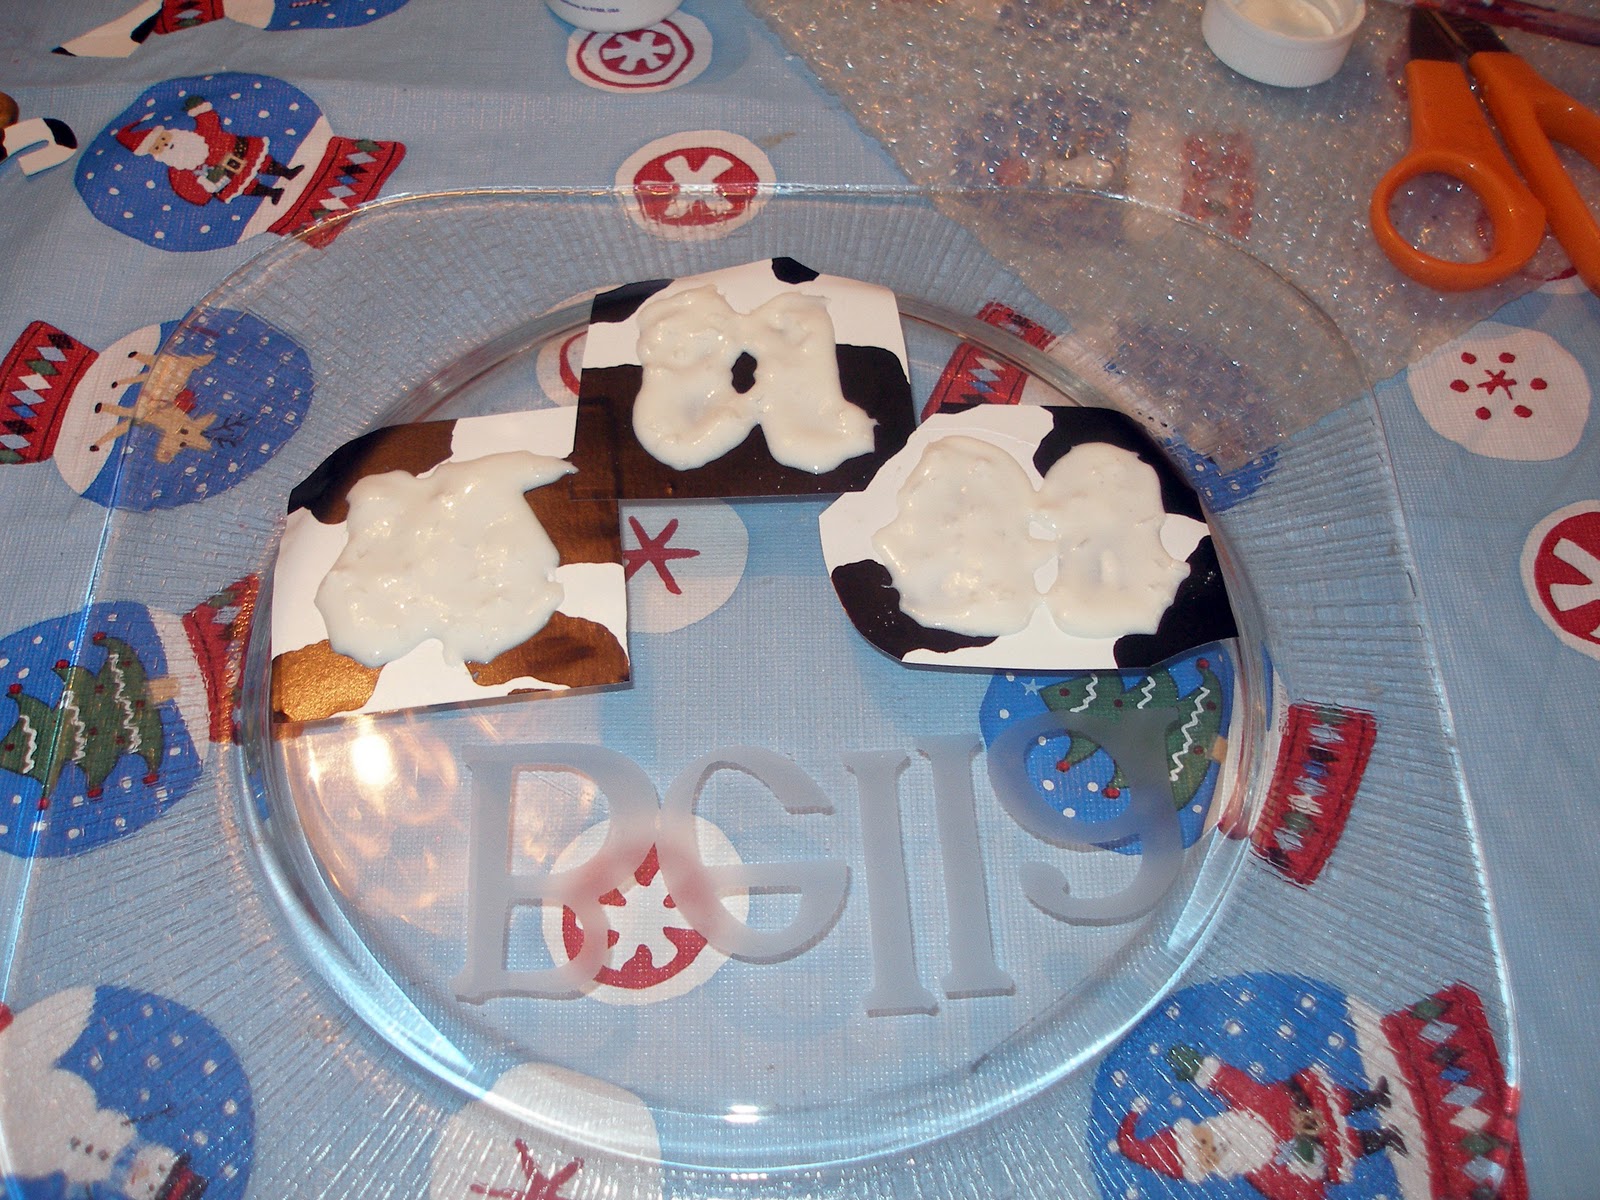
Here is the picture of it completed. We will use this plate every year for her birthday cake or cupcakes. Depending on what we have.

I hope you enjoyed this quick idea.
As always, have a great day and god bless.
Subscribe to:
Posts (Atom)