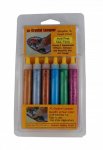
Good morning and welcome to my second post of the month for Sakura Craft and Hobby. I cannot tell you how much I love using their 3d Crystal Lacquer and Terri Sproul Mixers. I'm not much of a painter, but if I were, I would paint the world with these two items.
Today I want to show you the difference in colors. I purchased this belt at a closeout store. I think I paid 50 cents for it. I loved the detail in the buckle and new I could "fix" it up. I just really wasn't too keen on the metal look, but I loved the design of the buckle.
I mixed the Interference Lilac Pearl with the 3D Crystal Lacquer and just painted the buckle with it. I missed and some got on the leather part of the belt and I LOVED the color it gave. Sometimes oopses are happy mistakes. Anyway, so you can see what the difference in the "color" there is depending on what you are applying the "paint" to.
It turned out soft on the metal part. I love the "lavender" color on it. Now the leather on the other hand became very bold. I just love the contrasts. I added a few crystals because I have to have bling and created drab to fab. Tell me what you think?
You have a couple of days left to get 20% off your order when you purchase any of their products here using the coupon code crystal06.
I hope you enjoyed seeing my transformation of the cool belt buckle and as always, Have a great day and God Bless.
Thursday, June 27, 2013
Belt Buckle Redo
Labels:
3d Crystal lacquer,
crystals,
Interference Lilac Pearl,
Sakura
Wednesday, June 26, 2013
Got Golf
Good Morning...today I'm so eager to show you my June Inspiration for Amazing Mold Putty Design Team. This is something outside of my box, actually it isn't that far outside, just a bit different than what I've been making lately.
Recently I was asked what inspires me and I said "nothing in particular". That said, I started thinking more about that question and I guess it's my family. You know, most of what I make is usually for them or for me, LOL. Golf has recently (the last 3 years) become an addiction to my youngest son. If he's not at home you can usually find him on the golf course. It's great that it's basically in our backyard and he can go whenever he wants. For Christmas this past year we bought him a Junior Membership at the Club and now he spends every day there. I'm hoping he goes pro so I can retire and just enjoy watching him golf.
Anywho...he has signed up for 12 tournaments this summer and we (he) have now completed 3. He took 4th place at the first one, didn't place the second one and got 2nd place the third tournament. I'm just thrilled that he's enjoying it so much and for each placement he receives a medal. So ... yes, I could have gone to the pro-shop and bought him a nice case to put his medals in, but with AMAZING Casting Products, I can do almost anything I want!
I started with casting an actual golf ball and only filling it half full with Amazing Casting Resin so I would get "half" golf balls. I drilled two holes, one on top of another with my dremel. The top hole was for the nail and then bottom hole for the cup hooks. Then I painted the pieces with white acrylic paint and nailed them to the board that actually was a piece of a drawer front that we got as a sample when we were looking at redoing our kitchen cabinets and put two hooks to hang it with (I recycle everthing). Then I painted the top of the nail again so you can't see it. I cut the words out of vinyl with my Cricut and now he has a place to hang his medals.
I really hope I've inspired you to try some Amazing Casting Products. There is simply no end to what you can create with it. Have I inspired you to create something? Please leave me a comment here and send me a link if you have created something with these products. Remember, you can get them at Michaels or even Hobby Lobby and if you can't find them there, you can always order them online here {AND there's a coupon below, too}.
..............................
__________________________________________
Use this COUPON to shop at the Amazing Mold Putty
website HERE and receive 25% OFF your purchase.
Please use coupon code " summerhaus " {no quotations}.
Coupon expires June 30, 2013.
__________________________________________
.................................
Labels:
Amazing Casting Resin,
Cricut,
cuphooks,
dremel,
Golf,
medals,
white acrylic paint
Tuesday, June 25, 2013
I Love Golf vinyl decal
Good day all,
I just wanted to put up a quick post of something I did late last night. I've had such a crazy schedule again and don't see it slowing down any time soon. I wish I could spend as much time in my craft room as I do at my 3 jobs. CRAZY!
Anyway, hubby found something on facebook yesterday (he just got a smart phone and now he finds all kinds of fun stuff and of course wants me to either look at it, or make it, or comment on it (lol)) and tagged me on it. I so knew I needed to make it immediately!
So without further ado...I dusted off my cricut and pulled out some scrap vinyl (because you know I NEVER throw anything away and here is my new vinyl decal for the back window of the van.
Here is the complete back of the window...
I just wanted to put up a quick post of something I did late last night. I've had such a crazy schedule again and don't see it slowing down any time soon. I wish I could spend as much time in my craft room as I do at my 3 jobs. CRAZY!
Anyway, hubby found something on facebook yesterday (he just got a smart phone and now he finds all kinds of fun stuff and of course wants me to either look at it, or make it, or comment on it (lol)) and tagged me on it. I so knew I needed to make it immediately!
So without further ado...I dusted off my cricut and pulled out some scrap vinyl (because you know I NEVER throw anything away and here is my new vinyl decal for the back window of the van.
It's really a pretty orange color, but I am not sure why my camera did this???
I downloaded the image and brought it into my SCAL program. Using the trace image portion of the program I made a few adjustments and brought that onto my mat. Then I broke the image apart and took out the "extras" (it had a double line) and cut. Simple as that. Then I used transfer paper and put it on my window. Make sure you clean the area good before applying your decal. I'm no expert on using SCAL but I do try things here and there. In fact, Penny Duncan is heading up a SCAL and ECAL group again. You can find it here at Yahoo Groups or here at Google+ Community. She has some wonderful ideas and lots of step by steps. I know she is planning a hangout soon and that would be a lot of fun also.
Here is the complete back of the window...
I did this vinyl 3 years ago and it still looks great. So don't be afraid to try vinyling your window. I know I love making my own and it's SOOOO much cheaper, :)
I hope you liked my quick post and as always, Have a Great Day and God Bless!
Sunday, June 16, 2013
Baptism Frame
Good morning,
I'm here with another fun project for the Robin's Nest. This is my last post for them and I cannot tell you how sad I am to be leaving this fabulous Design Team, but with summer here I will be very busy. I have enjoyed my time with them and showing you all the wonderful products The Robin's Nest has to offer. Remember, everything I show case for them you can find here plus a lot more.
So for today I will show you an easy way to dress up a plaque. I purchased this in the clearance section with this project in mind. The original plaque was a bit dinged up and scratched, but for 50 cents I couldn't pass it up.
I repainted it with some black acrylic paint. While that was drying...
I cut out a cross with my cricut again using these fabulous papers from the Robin's Nest. I love the sparkle in their glitter papers.
I also cut out a border for the outside of this plague and embossed it also. Then I ran my ink pad slightly over the raised areas to give it a bit more depth.
Glued everything onto it and of course, the best part is adding the embellishments.
I added round dew drops and also the diamond dew drops which we are featuring this month and are on sale. I added them to the ribbon to give it a sort of a burst affect. Love how this turned out. Please be sure to head on over to their On-line store and check out all the fun colors of diamond drops they have. You will be amazed at all the fun colors.
As always, have a great day and God Bless.
Labels:
Cricut,
diamond dew drops,
glittered card stock,
Robin's Nest
Friday, June 14, 2013
Compact (ing) with 3D Crystal Color Lacquer
Hi and welcome to another great evening with Sakura products. For this project I was thrilled to try the 3D Crystal Color Lacquer. I've never had a chance to use these and I tell you, they are AWESOME. The color is so rich and vibrant. Let me show you what I did.
I started with an old compact that had these ugly skulls on them. I know I purchased it with this project in mind and it was only 25 cents. Imagine that. (Sorry if I offend anyone who loves skulls, just not for me)
So I took the label with the skulls off and used my goo gone to get ALL the glue off.
Then I used the 3D Crystal Color Lacquer and simply squeezed it into the rim of the compact with no particular rhyme or reason. Just went with it. Next I took a tooth pick and simply "pulled" the colors together a bit and this is what became of it. I added some dew drops into the mixture while it was still wet.
and here it is. I'll be styling now with my new compact. Better than those skulls, LOL
So quick and easy!
Now if you can't wait to try this technique and if you purchase in June - use the coupon code: CRYSTAL06 for a 20% off on all your purchases and you can by styling also.
As always have a great day and God Bless.
Saturday, June 1, 2013
The Sky is the Limit with Amazing Crafting Products
Good Morning,
I've been published, yeah!!! I'm so excited that my Faux Feather Earrings made the publication. What an honor that is.
If by chance you missed them, you can go HERE and view the tutorial.
All of us over at Amazing Crafting Products have teamed up with PaperHaus Magazine which is a Lifestyle Magazine of all things paper and it's FREE and available online here. Head on over there and get inspired!
Also a quick update: As of July 1 Blogger will no longer be using the blogger reader. So if you have NOT subscribed to my email updates (you can sign up on the right sidebar), do so now. This way you will get an email every time I post on my blog and you will be sure NOT to miss anything. I'm so super excited to show you my next project, so make sure to come back on June 8th. You will be A-M-A-Z-E-D.
I've been published, yeah!!! I'm so excited that my Faux Feather Earrings made the publication. What an honor that is.
If by chance you missed them, you can go HERE and view the tutorial.
Also a quick update: As of July 1 Blogger will no longer be using the blogger reader. So if you have NOT subscribed to my email updates (you can sign up on the right sidebar), do so now. This way you will get an email every time I post on my blog and you will be sure NOT to miss anything. I'm so super excited to show you my next project, so make sure to come back on June 8th. You will be A-M-A-Z-E-D.
So until next time, God Bless and have a great day!!!
Wednesday, May 29, 2013
Antique Milk Can
Good morning
I've been so excited to show you my version of the Milk can that everyone has been making over at Sakura Hobby Crafts. If you haven't been over there, make sure you check it out after reading my post. They are just the greatest? Each one is so unique and I've loved them all. I'm kinda picking up the rear here and hope mine will inspire you to create one also.
I started out with the silver milk can and painted it white. Then I "sanded" a bit of the white off to expose the silver and make it look shabby chic. After that I added back some color and used the Terri Sproul mixers in Shimmer Smoky Quartz mixed with the 3d crystal lacquer. I love this color because it's really antiquey (not a word, I know) looking. After that was completely dried I added a "white wash" spray paint to tone down the color a bit more. Now it really became vintage looking.
I just could stop there...last summer when I was home at my mom's we were going through some old pictures and we came upon a picture of the house she was born in. It's the only one we have and she wouldn't give it up. I took a picture of the picture. It's not the best, but then this is supposed to be "vintage" looking right? I printed the picture out and mod podged it to the painted milk tin. Once that was completely dry I "painted" some brown acrylic paint watered down over the top of everything to give it a balanced look and then painted a thin layer of the 3d crystal lacquer over the top to keep it from scratching off the paint. I then added some flowers and I gave it to my mom for Mother's Day.
I've been so excited to show you my version of the Milk can that everyone has been making over at Sakura Hobby Crafts. If you haven't been over there, make sure you check it out after reading my post. They are just the greatest? Each one is so unique and I've loved them all. I'm kinda picking up the rear here and hope mine will inspire you to create one also.
I started out with the silver milk can and painted it white. Then I "sanded" a bit of the white off to expose the silver and make it look shabby chic. After that I added back some color and used the Terri Sproul mixers in Shimmer Smoky Quartz mixed with the 3d crystal lacquer. I love this color because it's really antiquey (not a word, I know) looking. After that was completely dried I added a "white wash" spray paint to tone down the color a bit more. Now it really became vintage looking.
I just could stop there...last summer when I was home at my mom's we were going through some old pictures and we came upon a picture of the house she was born in. It's the only one we have and she wouldn't give it up. I took a picture of the picture. It's not the best, but then this is supposed to be "vintage" looking right? I printed the picture out and mod podged it to the painted milk tin. Once that was completely dry I "painted" some brown acrylic paint watered down over the top of everything to give it a balanced look and then painted a thin layer of the 3d crystal lacquer over the top to keep it from scratching off the paint. I then added some flowers and I gave it to my mom for Mother's Day.
I just love the way this all came together and now she can treasure her "homestead" for a long time to come.
I hope I've inspired you to create something using these fabulous milk cans and if you do, please leave me a comment and I will come and check yours out. Thanks again for coming by and as always,
Have a great Day and God Bless - Brenda
If you`d like to order your milk cans today - you will get 20% of your ENTIRE ORDER (for the month of May) so act fast as I`m sure these cans will be flying off the shelves.
Use code Sakura 05 at checkout.
Sunday, May 19, 2013
Plaque
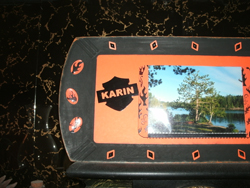
Good morning and welcome to another Robin's Nest post. The papers they have are incredible and this month the Flame Collection is 20% off. There is so much versatility. Here is a plaque I was commissioned to make. My business is picking up more and more and for that I am very thankful. A coworker asked me to make something "Harley Davidson" for her bff. I remembered these papers I had gotten from the Robin's Nest and knew exactly what I wanted to do for her. This is how I started:
I started with one of my trays
and painted it black actually I had to do 3 coats.
I used my cricut to cut out some diamond shapes in orange paper
and I cut their names inside of the "symbol" from vinyl and layered it over orange cardstock.
I used a piece of foam core and glued a photo page onto it
For this month's project we received a punch. I had never seen one of these before and I cannot tell you how much fun this is. I will lead you step by step through the process.
This is what it looks like
Find the placement of your paper
add your "bubble" top
add the safety cap and close the lid
Now put some pressure on it and "punch"
Open it up and out comes your bubble topped embellishment.
Cool huh?
I added orange paper over the black acrylic paint with mod podge. I added the black diamond shaped dew drops onto the orange diamond cut outs
and added some of the rest of the "flame" papers to the edge of the "picture" frame.
She really loved how this turned out. She plans on putting a picture of her friends on their "Harley" into the photo holder. I hope I've inspired you again to alter something and make it into something you love.
As always, have a great day and God Bless.
Labels:
acrylic paint,
Cricut,
mod podge,
punch,
Robin's Nest
Wednesday, May 15, 2013
Faux Feather Earrings
Good day! Brenda here and I want thank Susan for inviting me back to show off some projects I've been making since leaving the Amazing Mold Putty Design Team. I was one of the original designers for Amazing Crafting Products and loved every minute of it.
Since leaving the team, I still continued to use Amazing Crafting Products because these products are ultimately the best. I love the fact that I can create almost anything I want. The molding putty is my all time favorite and of course I love using the Amazing Casting Resin and the Amazing Clear Cast Resin to create those embellishments.
So today I wanted to create some feather earrings that I had seen on Pinterest a while back. I started out with some Creative Paperclay®. I cut the clay in a oval type shape and using a bamboo skewer I added some lines to create those feather like looks. Press your bamboo skewer into the clay to make those veins. It really has great dimension. Once the piece is dry, you can use a nail file to smooth out the edges if you want or need to.
Once the piece dried I then prepared the feather to be encased in Amazing Mold Putty to create the mold. I added some vaseline to the paperclay "feather" as a release to make sure it would not stick to the mold putty. Better safe than sorry I always say.
I took two equal parts of the mold putty and blended them making sure there were no white streaks showing. You have a couple of minutes to get it good and blended. Then I pressed the clay feather piece into the mold putty and let it sit for about 10 minutes. I usually press my fingers slightly into the edge of the mold to make sure it's really good and hard and then I slowly pulled the clay piece out of the mold. Be very careful as the clay piece could break when taking it out of the mold. I will use the clay piece in a scrapbook layout or maybe a card.
I created the earrings with the Amazing Casting Resin and Gold Alumilite Metallic Powder. Add your Alumilite powder to your part "A" and mix well. Then pour your part "B" into your part "A" and mix again. You only have a few minutes before it wants to set up, so make sure you do this quickly.
After the pieces were cast, I added some black rub and buff to tone down the gold. I also sealed the pieces with some Sakura 3-D Crystal Lacquer and placed a few iridescent pearls to the "feathers". Now I have two perfectly matched feathers. I used my Crop-A-Dile to create the holes for the earring wires, it goes through the resin piece very easy. I added a couple of jump rings and the earring wires and now I have a great pair of earrings.
Thank you for stopping by today. I hope you've enjoyed my feather earrings tutorial and I cannot wait to share my next project! You can always find me here to see what else I create. ~ Brenda Burfeind
Tuesday, May 7, 2013
Faux Feather Earrings
Good day! First off, I want thank Susan for inviting me back to show off some projects I've been making since leaving the Amazing Mold Putty Design Team. I was one of the original designers for Amazing Crafting Products and loved every minute of it.
My feather earrings were inspired by some I saw on Pinterest and I invite you to head over to the Amazing Mold Putty Blog and see how these beauties were created. Please leave a comment on their blog and be sure to check out all the other wonderful things the team members have created.
I will be back in a few days with some new inspirations.
Subscribe to:
Posts (Atom)