Followers

Friday, January 27, 2012

Festive Friday Angel

Good morning and welcome again to another year filled with Christmas cards every two weeks.  I know, you are probably thinking "we just got done with Christmas", but this is a way to get all those cards done throughout the year and not have to worry about a made dash in November.  I participated in this hop last year and got so many cards done and I even had some left over.  So come every 2nd and 4th Friday of the month and check out some new cards that we will be making...and lots of surprises too.  So if you just happened upon my blog or you are reading this in an email, please start here with Terri (our hostess with the mostess), but if you came from Angela you are in the right place, so sit back and relax and I hope you enjoy what you are about to see.


Today I made a super easy (I love easy) card, but it's so darn cute too.


I started by using my Amazing Mold Putty to recreate a button that I picked up over the holidays that came in a package of 6 different ones.  I love these cherub angels and I thought I could use it as an embellishment.  I created the mold first and within minutes that set up.  (If you want to see how this stuff works head on over to their site or you can check out a few other things our DT has made.)  Then I added the Creative Paperclay® and let that dry for a couple of hours.  Depending on the size of the item you are creating it can take from a couple of hours to 48 hours to dry.  Just be patient and check your mold periodically.

So here is the original button, the mold and the clay piece
I used my alumilite copper powder, and embossing ink pad
and my wings stamps from Viva Las Vegas
I stamped the images on some white card stock and used
a paint brush to spread the powder over the embossed image.
Then I fussy cut around them leaving a piece in the center
I painted the Creative Paperclay® piece with the Alumilite
powder also to match the wings.
I used mulberry papers and ribbon to create this cute card.
I stamped Merry Christmas with the embossing ink pad 
directly on the white mulberry paper and also used the alumilite powder to enhance it.  
I placed the embellishments on top of that to make it look as if it were in the clouds.
  The picture doesn't do this card any justice, believe me!!!

I for sure love the fact that I can make any embellishment I desire.
Now head on over to Cynthia's blog and check out what she has in store for you.  Remember there is a link on the left side bar with all the stops for you also.  See you in two weeks.

Wednesday, January 18, 2012

Dartboard good luck charm

Good Morning
Today I am going to show you another project using Creative Paperclay® and a stamp.  A while back we were given an opportunity to order some stamps from VivaLasVegas Stamps and I went a bit overboard. I love stamps and of course using it with the clay opens another new world.


I rolled out my clay at about 1/4 inch thickness and stamped the dartboard image onto the clay using a black ink.
Then I trimmed the access around the image before
it dried.  I wanted just the image
After the clay piece was completely dried, I placed
it on a measuring cup inside another cup and poured
a mixture of the Amazing Clear Cast over the top
This will give it a shiny and sturdy coat so I can toss
this inside of my dartcase as a good luck charm.
See how shiny it got?  And now the resin cast
will also protect the clay piece.

I hope you can get a chance to get yourself some Creative Paperclay®.  There are so many things you can make with it and you can purchase it at Hobby Lobby, Michaels and online here.  I also hope you can go out and check out the Viva Las Vegas Stamp site and check out all the fabulous stamps that are available.

Friday, January 13, 2012

Festive Friday Wreath

Good morning and welcome again to another year filled with Christmas cards.  I know, you are probably thinking "we just got done with Christmas", but this is a way to get all those cards done throughout the year and not have to worry about a made dash in November.  I participated in this hop last year and got so many cards done and I even had some left over.  The people who got my cards this past year were absolutely thrilled and it made the holiday season so perfect.  So come every 2nd and 4th Friday of the month and check out some new cards that we will be making...and lots of surprises too.  So if you just happened upon my blog or you are reading this in an email, please start here with Terri (our hostess with the mostess), but if you came from Angela you are in the right place, so sit back and relax and I hope you enjoy what you are about to see.


Today I am showcasing a card I made that doubles as a gift also.


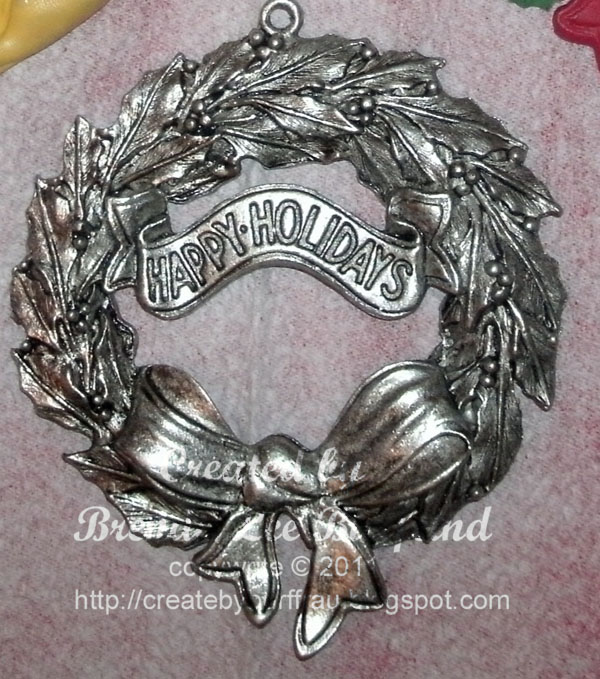
I started by using my Amazing Mold Putty to recreate an ornament that I have.  It has a lot of delicate detail and I just love it, but it's also very heavy.  So I thought I could create a resin of it.  If you want to see how this stuff works head on over to their site or you can check out a few other things our DT has made.
and here is my mold (I've used it multiple times
with different methods).  I didn't want the "Happy Holidays" 
embedded so after I molded the piece I added a bit of
the putty over the wording and it covered it up.  Genius I say!!!
I used the Amazing Casting Resin (liquid to solid in 5 minutes) 
and painted it using green and red acrylic paints.  See how you can't 
see where the wording was?
My goal is to whomever I give this ornament to, I 
am going to stamp their name or the date onto
the ribbon area and they will have a keepsake
ornament from me.
I used removable glue dots to attach it to a card
front and voila....there you have it.  So I guess my first card of the 
year long blog hop was more about the ornament than the card, 
but I hope you enjoyed it anyway.
Now head on over to Cynthia's blog and check out what she has in store for you.  Remember there is a link on the left side bar with all the stops for you also.  See you in two weeks.

Thursday, January 12, 2012

Muppets back together

Good morning all:

I was excited about this blog hop of an oldie but a favorite and it brings back memories for me and my children...check out below the rules and have fun hopping! :) If you came here from Ruby, I apologize that you won't find a project.  I had the date written down incorrectly and am not ready, but you can go visit Shannon and keep hopping.

Here is the entire lineup Minus ME


  • Kari - http://purplefuntastickcreations.blogspot.com


  • Susan - http://susanascorner.blogspot.com/


  • Christel - http://onescrappinsista.blogspot.com


  • Ruby- http://paper-junkie.blogspot.com


  • Brenda - http://createbyburffrau.blogspot.com


  • Shannon Magee - http://www.purplelionpaper.com/blog


  • Maria - http://justgetscraphappy.blogspot.com/


  • Erin - http://comfyonmycloud.blogspot.com/


  • Sher- http://www.patternsbysher.blogspot.com


  • Jamie- http://myamusinglife.blogspot.com


  • Lisa - http://handmadewithlove-lisa.blogspot.com/


  • Shannon Leffew Keith - http://shannonleffew.blogspot.com/ 


  • Lynne - http://slasewcraftiness.blogspot.com/
  • Saturday, January 7, 2012

    Delightful Dart

    Good morning,

    today I am here to show you another fabulous idea using paper clay.  For this project I used the Delight air dry modeling compound.  I love using this stuff because it is so light and fluffy.  I especially like using it for my scrapbooking and cardmaking because of that reason.

    So I started off using a dart
    to make my mold.

    I added the Delight clay to the
    mold and let it sit for about 30 minutes
    and then unmolded it.

    Here you see the mold, dart 
    and the paper dart

    before it completely dried, I 
    trimmed it down a bit with a
    regular pair of scissors.  That's
    another reason I love this delight
    so much, it's soooo soft.

    Then I painted the barrel gold, the tip black and the shaft purple with some acrylic paints and 
    split a flight in half and glued it to the top of the dart.  
    Now I can either turn this into a pin to wear (very light) or I might add it to a scrapbook page about my
     dart tournament I am playing in this weekend.
    I just love all the fun things I can do with paperclay.  
    I hope you will check it out and create something yourself.

    Monday, January 2, 2012

    My Memories Suite


    At Checkout, copy/paste my Promo Code STMMMS28873 and you'll receive $10 discount on the software AND $10 at the store! You save $20!! I absolutely love this software and highly recommend it to everyone!! Happy scrappin'!!

    Thursday, December 22, 2011

    Vinyled mugs with Snowman Soup

    Good morning all,


    I just wanted to share a very quick and easy gift I made for some very special people in my life.  You know the kind...The kind that are there for you whenever you need something, even if it's just an ear.  The kind that do NOT judge you no matter what.  The kind that call you just to chat.  The kind that invite you over for coffee just because.  The kind that ask for nothing and give you everything.  These two people are like parents to me at times.  I am so far away from my own family that it feels great to have someone to take that roll sometimes.  They are both very, very special to me.  So here is a quick and simple, but from the heart, present for them.


    I bought a pair of mugs and vinyled "His'" and "Her's" on them.  I used my cricut and my SCAL 2 and my favorite font, Fiolex Girls (minus the hearts).  
    Then I made up two baggies with SNOWMAN soup.  1 package of hot cocoa mix, a few mini marshmallows, two kisses and a candy cane.  
    I downloaded the tag from here and it reads:
    Was told you've been real good this year
    Always glad to hear
    With freezing weather drawing near
    You'll need to warm the spirit
    So here's a little snowman soup
    Complete with stirring stick
    Add hot water - sip it slow
    It's sure to do the trick
     Now I know it might not be much for such generous people, but again, it came from the "heart".  Now whenever they have their morning coffee or tea they will think of me and know that I am ALWAYS thinking of them.

    Sunday, December 18, 2011

    AMP

    Good morning and welcome to another Amazing Mold Putty creation by me.  I cannot get over how much I love using this stuff.  As we were putting up our Christmas tree this year and going through boxes and boxes of ornaments I came across an ornament that I absolutely love and that's when it hit me...I can make a mold and cast it and then turn it into a pin.  


    Here is the ornament.  It's very heavy, I think its pewter, but I just love the detail in it...
    I casted it using the silver metal powder that I recently got from AMP mixed in with the resin.  
    This stuff is so awesome
    Here you can see the finished piece and the original piece.
    Then I mixed up a bit of black acrylic paint with a little water, painted it and wiped the excess off
    to give it an aged look.  I painted the bows with red acrylic paint, the tree with green
    acrylic paint and added a bit of translucent powder to the tree while it was still wet
    to give it some shimmer and shine.  I also snipped the "hanger" portion off of the tree
    and cut a bit too deep, but I still like it a lot.
    See...I cut the "tree top" off  :(
    Then I added a pin back and let that dry overnight and 24 hours later I have an adorable pin for my jacket


    See the little snowman?  I'll be showing you these next week sometime...so stay tuned for more inspirations.
    I hope I've inspired you to create something with the Amazing Mold Putty because the possibilities are endless.  If you'd like to see more creations by the other designers, click here.  They are amazing...

    Sunday, December 4, 2011

    Lasting Memories #67 - "Sentimental" Journey

    Good morning and happy Sunday to you all,


    Today's layout for the Lasting Memories post is all about Sentiments.  Titles, to me, are the most important part of a layout.  Sometimes just the title is enough for me and I don't add journaling.  I suppose I should so that others may know why I scrapped the pictures or the story behind them, but sometimes I just don't feel the need.  This layout is of my daughter and granddaughter at Thanksgiving
    I used the MyMemories Suite V3 again.  I haven't done any traditional scrapbooking for awhile because I have just fallen in love with digital scrapping.  I also have a hidden agenda that I will tell you all about in a few weeks, so I hope you come back each week to check out my layouts.  Everything on this page was "free" and that to me is a wonderful thing.  The "title" was built using the Word Art Designer.  First I created it in the pinkish color, using the color picker from the flowers on the layout.  Then I created the "title" again using the Gradient color using three colors from the page and layered it upon the pinkish title.  I just love the way this turned out and it took just a few minutes to create.  If you haven't tried digital scrapbooking yet, you should really think about it.  I didn't think I would like it much because I love the touchy-feely of the embellishments, but honestly I have to say this has been so much fun.
    Now I hope I've inspired you to create a layout using a Sentiment and if you like this layout you might want to think about purchasing the MyMemories software.  You can use this code:  STMMMS28873 and you will get $10 off the software and also $10 worth of downloads.  My Memories also has a ton of free stuff and you don't have to spend too much money.

    Thursday, December 1, 2011

    Viva Las Vegas stamps meet Creative Paperclay®

    Good morning all,

    Today I am going to show you how to use your stamps with Creative Paperclay®.  Recently our paperclay DT was asked if we would be interested in teaming up with VivaLasVegas Stamps and create a project using both items together.  I jumped at the chance because not only do I love using paperclay and stamps but merging them would be a lot of fun.  I've stamped words into my paperclay before with great results, but this time I went with an image and totally love the outcome.
    So I began with my wing stamps that I ordered from Viva Las Vegas...(so many to choose from) and stamped them into the paperclay.
    After the clay dried for a few minutes I cut the excess off around the wings.
    then I painted them with white acrylic paint.  I painted
    a bit of glue diluted with water around the edges of
    the wings and added some glitter to create:
    this super cute ornament.  I added a peachy keen face
    to the glass ornament and then hot glued the wings to
    the back of the ornament.  Isn't this cute?

    I hope you can get a chance to get yourself some Creative Paperclay®.  There are so many things you can make with it and you can purchase it at Hobby Lobby, Michaels and online here.  I also hope you can go out and check out the Viva Las Vegas Stamp site and check out all the fabulous stamps that are available.