
Today I am showcasing a card I made that doubles as a gift also.
I started by using my Amazing Mold Putty to recreate an ornament that I have. It has a lot of delicate detail and I just love it, but it's also very heavy. So I thought I could create a resin of it. If you want to see how this stuff works head on over to their site or you can check out a few other things our DT has made.
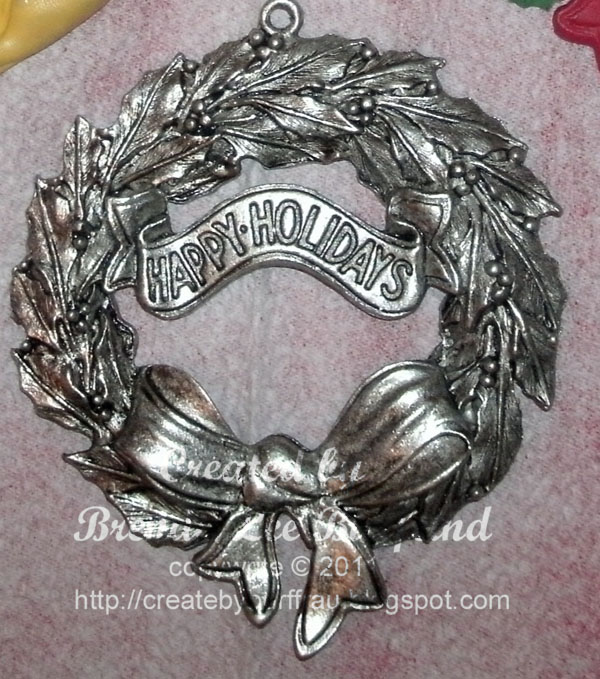
and here is my mold (I've used it multiple times
with different methods). I didn't want the "Happy Holidays"
embedded so after I molded the piece I added a bit of
the putty over the wording and it covered it up. Genius I say!!!

I used the Amazing Casting Resin (liquid to solid in 5 minutes)
and painted it using green and red acrylic paints. See how you can't
see where the wording was?

My goal is to whomever I give this ornament to, I
am going to stamp their name or the date onto
the ribbon area and they will have a keepsake
ornament from me.

I used removable glue dots to attach it to a card
front and voila....there you have it. So I guess my first card of the
year long blog hop was more about the ornament than the card,
but I hope you enjoyed it anyway.
Now head on over to Cynthia's blog and check out what she has in store for you. Remember there is a link on the left side bar with all the stops for you also. See you in two weeks.

Great work...NICE!
ReplyDeleteI love the idea of giving an ornament as part of the card. I do it with vintage jewelry too!
ReplyDeleteReally lovely card - I love the use of the Amazing Mould Putty to create the wreath ornament - such a nice keepsake for the recipient!
ReplyDeleteGreat card I love the wreath :)
ReplyDeleteNeat !!!! Might give this a try sometime !
ReplyDeleteLovely project! Guess I need to bring some of my ornaments back out for casting
ReplyDeleteyou have inspired me to take a look at this product for sure this year I'll give it a try. and love the card/ornament gift -
ReplyDeleteWhat an interesting technique, I'd love to try this! Thanks for sharng!
ReplyDeleteThese are really cool!
ReplyDeleteAMP is the best stuff in the world.. LOL
ReplyDeleteGreat idea to add an ornament to your card. Love the wreath!!!
ReplyDeleteThis is so neat!!
ReplyDeletehugs..Laura
Great card! Great addition with the molded ornament
ReplyDeleteGreat project. You have a great idea in getting your Christmas cards done early. I am going to look into this Amazing putty. It looks fun and exciting :)
ReplyDeleteJani
papercompulsions.blogspot.com