Followers

Showing posts with label recycle. Show all posts

Saturday, April 27, 2013

Elephant pin with coupon

Good morning and welcome to another post for Sakura Hobby and Craft.  Today I want to show you how you can make your own pendant and making it look like it's under glass.  First I took an empty eyeshadow container and cleaned it out real good.  Remember to recycle as much as you can!!!  
I broke the case so that I could get the metal piece out.
and here it is.
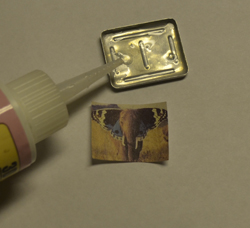
Then I printed off a picture that I really liked (remember I am an elephant fanatic) and cut it down to size to fit snugly into the metal frame.
I then filled it with 3d crystal lacquer
and let it dry for about 24 hours.  It wasn't quit dry in time for the post, but the cloudiness will disappear, I promise.  Make sure not to touch it cuz you may leave a fingerprint...don't ask how I know this. 
I think I might put a pin back onto this and pin it to my jacket.

Don't forget you still have a few days to use the coupon terri04 to get 20% off of the crystal lacquer.

I hope you've enjoyed my little project and hope to see you again soon.
As always, have a great day and God Bless.


Sunday, March 17, 2013

Photo Holder with the Robin's Nest

Good morning and welcome to another fun filled craft 
project with the Robin's Nest.

The one thing I love the best of being a designer at the Robin's Nest is I get to try products I don't know I'd buy or maybe know of.  This month Robin's Nest has teamed up with Epiphany.  I had never heard of this company until I teamed up with Robin's Nest.   Yes, I know, where have I been?  In my box of goodies I received this punch and some framed metal charms.  Can we say "awesome".  Now I do allot of jewelry pieces and that's what came to mind at first but then I went into a total different direction after playing a bit.
Here is the punch and the metal frames.  So cool!
 
Then I gathered my papers and the mini dew drops for the project.  I love this crackled paper.  It has so much dimension and I just love dimension.
Using my cricut I cut out my letters from chipboard and the papers.
I actually cut the letters 2 times from the chipboard and Mod Podged them together to give them more stability and a thicker bond.

Then I covered the chipboard with the papers.
Next I printed out a picture of my two granddaughters and used the punch and the bubble caps to create the frames.

place the bubble cap over the picture that you have inserted into the punch

Close it up and punch.  Works like a "charm", hahaha.
Then I glued the bubble caps with the girls' picture into the metal frame using my E6000 and now they are forever embedded into those lovely frames 
While those were drying I went back to my chipboard letters and inked the edges
Now I needed some kind of a base to put this all together.  Remember, I am a firm believer in recycling.  I have purchased many stamps from Stampin' Up, but never use the wooden blocks they come with.  I like using my acrylic boards, so I have lots of these wooden blocks in my stash.  Perfect base...
I painted the wooden block and the backside of my chipboard letters black with some acrylic paint and glued the pieces together.  I also attached the tops of the letters together with some star brads and added a mini dew drop on the stars and around some of the letters.


Then I hot glued some clothes pins to the back of the "frame" to create my "photo holder" 
and here is my "OMA" photo holder.    

I absolutely loved making this.   
Thank you so much for coming over today and 
checking out another "useful" project.
I hope you go over to the Robin's Nest online store and check out all the awesome papers and embellishments she has and also 
head on over to Epiphany and get yourself some of 
these punches and frames and create something.


Sunday, December 9, 2012

Snowflake Christmas Tree

Good day all,

what a beautiful Sunday it is here.  It started to snow yesterday, very light and fluffy and continued off and on throughout the night.  Today we have a beautiful white blanket covering.  I love the snow, I just don't like the cold that usually comes with it.  Now yesterday I had a day off and decided to take one of Terri Sproul's classes.  She was doing a class yesterday in her linqo room.  I love going to her classes.  She always records them so you can see them any time, but if you go to her live class you can win prizes.  I can't always make it to her live classes, but that's what is so great about her recording them.  Plus if you ever forget how she did something you can always go back and watch the tutorial again and again.  Anyway...onto my project.  She was teaching us how to make a Christmas Tree using curled paper.  She started out with a paper mache cone and card stock.  Go here to watch her video.  Well, I didn't have a paper mache cone laying around and I told Terri that I would be using an empty wine bottle instead.  But first I would have to empty one.  LOL.  So my Saturday afternoon became crafting and wine drinking.  Don't worry, I didn't finish the entire bottle myself, hubby did help a little.
Reisling, one of my favorite white wines 
of course I will be saving the cork for something to make in the future 
Now you need to determine how small or large you want your curls.  I made mine 3 inches in length.  Terri used double sided tape and of course I didn't have any, so I used my ATG gun and ran a strip all the way down the paper and then used some parchment paper to keep the glue from sticking when I cut my strips. 
hmmm, I guess I didn't take a picture of my strips.  Anyway, you would cut this paper now in 1 inch strips and start curling.  Curl from the opposite side your glue is on.  Once you have all your curls made... 
This project took 3 sheets of double sided paper.  Make sure you are using double sided paper, because you will see both sides on your tree. 
now start gluing your strips onto your cone, or wine bottle in my case, by altering your paper here and there. I decided to put a few plain blue pieces onto it and then I embellished those pieces with dew drops from the Robin's Nest and some silver glitter glue.  I also added some blue glitter glue to various snowflakes. 
I cut 3 snowflakes with my cricut at about 3 inches and glued them together to form a topper to my tree. 
See the glitter and dew drops? 
See how my Snowflake topper is 3d?

So I hope you've enjoyed my curled paper Snowflake tree.  I really love how it turned out.  If you make one, please let me know and I will come and check it out.

As always, have a great day and God Bless.

Sunday, June 26, 2011

Lasting Memories #44 "Scrapbook pages that Recycle"

Good Morning,

So here we are again with another Lasting Memories submission.  This week we are using recycle-able things, or reusing something we can re-purpose.  This challenge wasn't hard for me at all...you should see my craft room.  I keep EVERYTHING that I think can be reused, recycled or re-purposed.  When I was growing up, my mom used to say "when we move, we just need to pack Brenda's room, because if you need it, it's in there".  Ha, well mom, I'm still that way!!!  I guess I've been helping save the earth for at least 37 years...uhum!!!  The other day I was going through some of my son's clothes that don't fit anymore and I donate a lot of stuff to Goodwill and such.  He had these awesome dress shirts, but they had some stains so I took the buttons off.  Yup, recycle them babies.  Then I went through the linen closet and found some table runners that I've had for a hundred years and don't ever use.  As I was packing them up when I thought some of them had some lace on them that I could reuse somehow, so out came the scissors.  I was also cleaning out some of my flower designs that have lost their use.  I tore apart a topiary I made a long time ago and kept the flowers, cuz you just never know.  Well, I combined all these things and this is what I came up with:

Now the flowers on the Title are from the topiary set along with the buttons from Austyn's dress shirt.

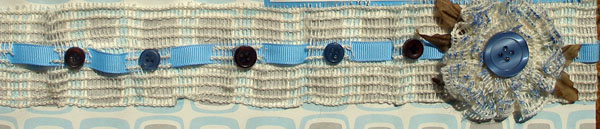
The tan fabric/lace is from the table runner.  I cut about every 9 holes and weaved a piece of blue ribbon through it.

I punched a flower out of blue cardstock and then layered strips of the lacey stuff around the punch with hot glue to make a flower.  Then I inked the fabric and added a button to form the flower and hotglued some leaves to the back of it.

The tags are cut from SCAL's tags shapes and inked around them.  Then I used more of the lacey fabric and cut strips to attach to the tags.  I also used some leftover twine and made my own baker's twine.  If you want to see how I did that you can check it out here.

Now the title/tag I made for myself.  You see, I just underwent some major dental work and I am so excited to be able to really SMILE for a change.  It's been a long time coming and I feel so much better about myself.  I wanted to commemorate this feat for myself, thus the layout is for ME!!!  I used Getting Cricky's stamps set "Positive Thoughts" and "Amazing You".  Now, some say you shouldn't brag about yourself, but I don't think I am bragging, just feeling good about ME!!!  Believe me, it's a new feeling for me to be this happy and confident.  Even my BFF said that I am smiling more and actually laughing out loud.  My mom used to always say, when you feel good about yourself you are a nicer person and it shows.  Well, mom, again you were right!!!

So I hope I've inspired you to create a layout with things you can reuse or recycle.  Remember, every little bit helps.  If you don't recycle on you layouts, remember to recycle through your garbage though.  It doesn't take very long to separate your items and help save the earth one step at a time.