Followers

Showing posts with label Penny Duncan. Show all posts

Friday, September 9, 2011

Happy Fall Ya'll

Good morning

***If you are looking for my Festive Friday's card, please scroll down***

 welcome to another day of challenges over at Love to Crop.  Amy sure has kept me busy the last couple of weeks.  I was asked, just yesterday, if I could come up with a Fall project...oh boy.  I, of course, couldn't say no because I had been thinking about this project for a while now anyway, but I worked until early this morning on this...and I am tired...but I do love how it turned out.

Okie-dokie -- This time around, Amy is challenging you to pull out those FALL COLORS and create whatever your heart desires!!  She recently saw this yummy CAKE at her local Giant Eagle grocery store...  It sure put HER in the mood to use FALL colors:

Your project doesn't have to be a fall project or a CAKE (but it can be if you like), you just have to incorporate fall colors into your project!!  Feel free to make a card, layout, or other art project!!  This week, she has FOUR talented friends to provide some inspiration for the challenge!!  Make sure you pop over to her blog and check out the inspirations.   When leaving a comment, be sure to mention that you're stopping over from Love To Crop! so that she can pick another lucky winner for a little something-something!! :)  She gives out some super cute paper packets...I know, I've won one before...
So onto my creation:
I started with a chipboard circle cutout with my 
E-Craft and wrapped it with raffia and lots of hot glue.
I created the hanger with the raffia also
I really like the look
Most of you know that I am a Penny Duncan
stalker...I just love her flower cuts and you can
find this Hibiscus cut here.  She also has an 
excellent video tutorial there...
Now I pretty much followed her directions to 
a tee in making the flower, except I didn't have 
the stamens she used and my misting didn't 
turn out as vibrant as hers but I am still very 
happy with the way my flowers turned out.  
The stamens are from old silk flowers 
that I had laying around.
Cup your flower and hot glue around it.
It was so late last night while I was finishing 
this project that I did not cut the leaves for the
Hibiscus, but rather used some old silk leaves
that I also have in my stash.  From being a flower
designer I have so much of this stuff it's amazing.
I just hot glued the handmade flowers to the leaves.
I added a sheer ribbon with pearls to the top
and added 2 stick pins.
Now the stick pins I did a little differently 
this time.  I added tiny silk flowers to the 
stick pin also, these were the flowers 
that the stamens came from.  
Love how these turned out.
And here is my wreath.  Sorry for the bad 
picture, but it was 2:30 this morning when I
got it done and the lighting was bad and I was 
tired...I think I mentioned that before...

Now remember to hop on over to Love to Crop with Amy 
and create something with Fall colors to enter into her challenge.
  • You may enter as many NEW projects as you would like as long as they fit in the challenge theme.
  • Please include a link to www.lovetocrop.com so that others may play along.
I also linked this over at Craft Junkie Too TGIF...check out all the inspiration 


Saturday, August 27, 2011

Wedding Cake

Good morning my dearies,


I'm sorry I haven't been here much this week, but my personal life is a bit crazy at the moment and I've just had a lot going on.  I am hoping I can get out of this stuff soon and get back to normalcy...is that even a word?  I won't bore you with all the details because I really want you to come back to visit...hahaha.  I do think that crafting is my therapy and I needed to dig into something time consuming so that I would be able lose myself in a project and this is what I came up with.


My friend Amy at Love to Crop has a challenge for the Decorate to Celebrate blog.  The theme for this challenge is WEDDINGS, ENGAGEMENTS, and BRIDAL SHOWERS!!  So we want to see all of your decorations and party supplies celebrating everything fantastic about the UNION of two people in LOVE!!   I just couldn't resist in creating this beautiful Wedding Cake.  Now as I said, this was very time consuming, but I just LOVE, LOVE, LOVE how it turned out.  So here we go, (picture heavy):
Here is the cake....
doesn't that just look nummy?
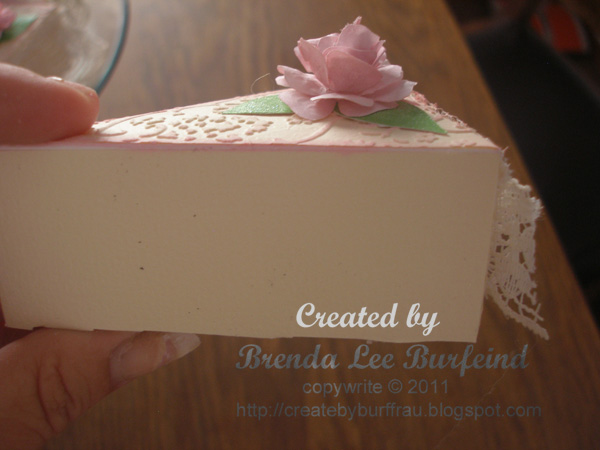
The cake was cut with the Tags, Bags,
Boxes and more cart on my cricut
at almost 7 inches
I inked the edges with a soft 
pastel pink for definition.
If you want to know where I got the idea from the Roses
head over to Penny Duncan's blog.
The rose for the slices were cut on my E-craft from
white copy paper at 1.5 inches.  I misted the flowers with my 
homemade glimmer mist before assembling them. 
 I did not coat each flowers to it's fullest to give it highs and lows shadows.
The roses for the center were cut at 1 inch and the
green leaves were cut from glitter paper also on my E-craft.
The slices open up.
I embossed each piece of cake with my cuddlebug
and the Textile texture folder.  Isn't this just gorgeous?
The lace was from my stash, but I believe it came from
a yard sale or maybe a thrift store.  I have tons of this stuff.
It looks so real.
I used my E6000 glue to glue the plate onto a candlestick
One last look.  I am so happy with how this turned out.

Before adding this to my blog I had shown some of the pictures to a friend the other night.  Her daughter is getting married on 9-10-11 (what a cool wedding date) and she commissioned me to make one for her with teal and brown.  As soon as I've completed it, I will post it on my blog.  
I am also going to etch the last name and the date onto the plate.  
That will be my "gift" to them.

So now hurry on and create something for a Wedding, Engagement or Shower and enter the challenge.

I am also linking this up over at Sew Woodsy.