Followers

Showing posts with label Paper Roses. Show all posts

Wednesday, October 12, 2011

Filekutz Test Rose

Good Morning Everyone! FileKutz is releasing a new file called "Flower Petal Blossoms".  LisaJane asked me to do a tutorial and this is one of the flowers I made for her.  Hope on over to the shop and purchase your file here
You will need 12 large pears cut at 1 x 1.375
and 10 small pears cut at .7 x 1
a snowflake 2 x 1.7
and two leaves 2.25 x 2.45
Ink all the edges front and back
the snowflake doesn't matter too
 much since you will not see it
cut the largest petal from the leaves off
I used the round top from my exacto knife to 
manipulate the petals and soften the paper.
Rub the paper in a circular motion
use your paper piercer to fold around in the middle
and then fold each side backwards
gives you this
Use your exacto knife again to manipulate the paper
of the snowflake also in a circular motion
You will end up with a cup of sort
again, manipulate the leaves
I use my embossing roller to create stems
and veins 
I use hot glue (my preference) but you can use
any quick dry glue to attach the petals to 
the snowflake cup
add to each of the 6 points of the snowflake
in a layered pattern
1st layer completed
now start with the 2nd layer and offset the 
petals using the rest of the 6 large pear petals
finished 2nd layer
now start with the next 8 small pears and layer
them on top of the larger pears
keep going around until they are all used up
you should have 2 small pears left
wrap them around your paper piercer
pretty tightly
gives you this
insert one petal into the other one
snip a bit off the end depending how deep you
want your middle to be...
hot glue into the center of the flower
squish...don't be shy, the hot glue holds
it together firmly, but you need to manipulate
the flower to your liking
I squished from both sides
then cup the flower in your hand
and squish again until you like
the fullness
add a bit of hot glue to the stem of the leaves
and here is your 3d rose
side view
top side

Now head on over to the Filekutz Designs blog and you can see more tutorials on how some of these flowers were made.  I just love being on this DT.

Thursday, September 29, 2011

Paper Secrets 20 plus Digital and Giveaway


Good morning
here's my layout I did for the challenge over at PaperSecrets.  Each week we are given an assignment for a layout. I really don't care if I win the contest, it's just helping me to do more layouts that I should have done a long time ago (or some new ones in this case). If you participate and follow the guidelines you advance to the next week. We started with 27 and 10 moved on again last week, these ladies are serious about their scrapping.  I will keep updating you as I go along. Who knows, I might not be able to participate one week and then I am out, but until then, I am scrapping my butt off, (they used a different word, but my blog is family friendly...hehehe
Here is the sketch:
but of course I rotated it:
And this is what I came up with:
Do you ever make a layout and just know this
is one of the best ones you've made?  
Well I have to say this is my favorite by far so far
The roses are from Penny Duncan's creations.
I've been seeing all these fabric flowers and thought
I'd give it a try.  I made it really shabby chic and
just love the outcome.  I even backed it with some lacy tulle. 
Since I hate my own handwriting but wanted to journal 
I added a journal tag and hid it behind the ribbon border
I created another tag from chipboard and used rubons
as my title...and added another rose
I had to use 5 out of the 10 things on the list
Red highlighted ones are what I used:
raw chipboard (leave raw , paint, ink, etc....your choice)
punch or diecuts
flowers/leavesblingfabric/felt
rubons

mist
hand or machine stitching
3+ buttons
ribbon/lace

Now, I also went digital and tried to "recreate" this layout in a way
So it's far from identical, but I am very pleased with it.
I still haven't touched on ALL the items you can 
choose from, but what I've seen, I've been amazed
I think I'm going to like digital...I even have some
cool plans for what I am creating.
SO, now the fun part...
Do you want to try Digital Scrapbooking?  If so, I am going to give away 1 subscription to this software.
YEAH,!!! RIGHT?
so there are a few rules though
1.  You need to go to MyMemories and check out their fun layouts and 
digital paper packs and then go here and COMMENT which one you liked the best.  
DOING this will get you 1 entry.  Now for extra chances you can:
2.  Go to their Blog and become a follower
3.  Like them on Facebook
4.  Follow on Twitter
Now you do NOT have to do all of these things, but the more you do and comment telling me you've done each thing separately, the better the chances are for you to win it. 4 chances per person...
BUT if you post my giveaway on your blog, fb, twitter or any place you can think of and you go here and comment telling me what you did, I will give you that MANY more entries, so it is completely up to you on how many chances you want.  

I will be announcing the winner OCTOBER 2nd during my Lasting Memories challenge because I have the cutest layout ready for that day using...of course, the MyMemories Suite.

Now, if you DO not want to try to win the software and want it NOW I am giving you a the ability to save $20 if you wanna purchase it NOW here  and enter this coupon code: STMMMS28873


Saturday, August 27, 2011

Wedding Cake

Good morning my dearies,


I'm sorry I haven't been here much this week, but my personal life is a bit crazy at the moment and I've just had a lot going on.  I am hoping I can get out of this stuff soon and get back to normalcy...is that even a word?  I won't bore you with all the details because I really want you to come back to visit...hahaha.  I do think that crafting is my therapy and I needed to dig into something time consuming so that I would be able lose myself in a project and this is what I came up with.


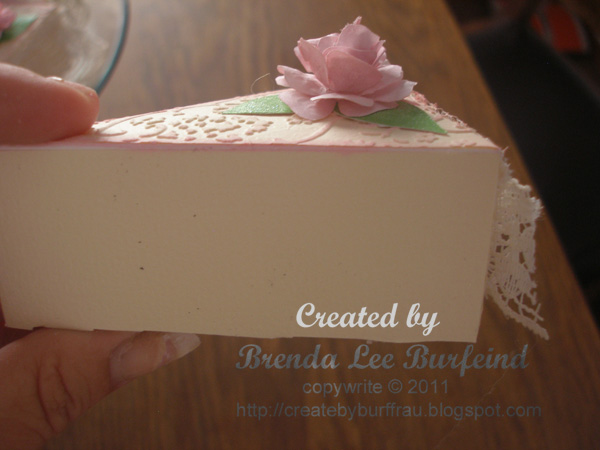
My friend Amy at Love to Crop has a challenge for the Decorate to Celebrate blog.  The theme for this challenge is WEDDINGS, ENGAGEMENTS, and BRIDAL SHOWERS!!  So we want to see all of your decorations and party supplies celebrating everything fantastic about the UNION of two people in LOVE!!   I just couldn't resist in creating this beautiful Wedding Cake.  Now as I said, this was very time consuming, but I just LOVE, LOVE, LOVE how it turned out.  So here we go, (picture heavy):
Here is the cake....
doesn't that just look nummy?
The cake was cut with the Tags, Bags,
Boxes and more cart on my cricut
at almost 7 inches
I inked the edges with a soft 
pastel pink for definition.
If you want to know where I got the idea from the Roses
head over to Penny Duncan's blog.
The rose for the slices were cut on my E-craft from
white copy paper at 1.5 inches.  I misted the flowers with my 
homemade glimmer mist before assembling them. 
 I did not coat each flowers to it's fullest to give it highs and lows shadows.
The roses for the center were cut at 1 inch and the
green leaves were cut from glitter paper also on my E-craft.
The slices open up.
I embossed each piece of cake with my cuddlebug
and the Textile texture folder.  Isn't this just gorgeous?
The lace was from my stash, but I believe it came from
a yard sale or maybe a thrift store.  I have tons of this stuff.
It looks so real.
I used my E6000 glue to glue the plate onto a candlestick
One last look.  I am so happy with how this turned out.

Before adding this to my blog I had shown some of the pictures to a friend the other night.  Her daughter is getting married on 9-10-11 (what a cool wedding date) and she commissioned me to make one for her with teal and brown.  As soon as I've completed it, I will post it on my blog.  
I am also going to etch the last name and the date onto the plate.  
That will be my "gift" to them.

So now hurry on and create something for a Wedding, Engagement or Shower and enter the challenge.

I am also linking this up over at Sew Woodsy.