Followers

Showing posts with label magnets. Show all posts

Wednesday, March 16, 2016

Simple Frame for a birthday girl

Good day crafties

Today is a special day, as it is my granddaughter's 4th birthday.  Happy birthday Miss Alexis!

I try to make something for each of my grandkids for their birthdays.  It's just a way for them to know that while I'm creating I am also thinking of them!

So let's get started:

You will need:  wood blanks, 8 magnets, paint, hot glue gun embellishment, stickers, etc.


First I started out by painting 2 of the wooden fan blades, but you need 4 of them.
She loves purple, so I went with that.
Once they were dry hot glue 2 magnets on either side of 2 of the wooden blanks and then attach 2 more magnets on top of the other magnets.  Put a drop of hot glue on each magnet and then carefully line up the other wood blank ontop of those magnets.  This will ensure them to be equally spaced.
Just tie some twine or ribbon on the top wood blank and you are set!


The other wood blank I embellished with some stickers, bling and of course one of my famous crowns.
I made the crown with my Amazing Casting Products and you can find the tutorial HERE!


Now mommy can proudly display Alexis paintings and drawings from daycare!


Now, I'm sure the other two will want me to make them each one!
With PLEASURE!


Wednesday, March 5, 2014

Sunshiny DAY

Good Day! I am back to show you a Heartfelt Creation I made over at Amazing Crafting Products. I don't know how many times I've said it, but I truly LOVE the Amazing Crafting Products we get to play with over there. I've been so lucky to have gotten to be a part of such a great team leader and fellow designers. Daily I become more inspired and cannot wait to see what's next. 

So with that I made some Love Projects. I love decorating and celebrating Valentine's day and this is what I did back then. This year I decided on creating a suncatcher and a magnet to symbolize the day.

I started out with some Amazing Clear Cast Resin and both Alumilite Fluorescent "Flo" Red Dye and Alumilite Black Dye. Once I poured my mold I let it set up a little bit. Using a wooden skewer I dipped it into the red dye and gently dragged it through the resin in the mold. I did this a few times. Cleaning the skewer each time I dipped it back into the dye. I repeated the process with the black dye dragging it through the red and let it cure for 24 hours.


I love how some of the areas became almost feathery looking. Once it set up, I added a bit more of the  Amazing Clear Cast Resin the front of the "suncatcher" and let that dry. I added a ribbon and there it is...


For my second project I started with the Amazing Casting Resin,
which doesn't take but 5 to 10 minutes to set up. 


I painted it red right away. I've found if you paint your molded piece immediately, it takes the paint better. I just used regular red acrylic paint. 


Once the paint was completely dry I used my StazOn Jet Black ink pad
and inked up one of my favorite stamps and stamped the image directly onto the heart. 


Because I used StazOn I was able to add some Amazing Clear Cast Resin
to the top immediately to make it all nice and shiny. 


I added a magnet to the back and now I will always have
a beautiful remembrance of when Valentine's day is.


What kind of handmade crafts
did you making for Valentine's Day?

I hope I've inspired you to use some of these wonderful products and create your own suncatcher or magnet, or both.  Be sure to hear over to the Amazing Crafting Products blog later today and check or my project for this month.
If you have any questions please leave a comment below and I will get them answered as soon as possible.

As always, have a great day and God Bless.

Saturday, January 26, 2013

Snowflake magnets


Good morning, and welcome to another Creative Paperclay® project.  I wanted to show you another project I made with all those embossed snowflakes and some others.  Remember, you can emboss your paperclay while it's still wet and using a cuddlebug folder or anything with texture just adds element to your project.  I love doing this.  Click on the link above if you don't remember the post or want to see it for the first time.  So let's get started:
After my snowflakes and other cookie cutter cut outs were completely dry, I painted them with acrylic paints and inked around the edges to give them dimension.  I do that allot. 
See how using different embossing folders gives them different looks.  I love this technique. 
So I wanted to turn them into memo holders... 
So I used Mod Podge and added some papers to the front of the clothespins.  Adding a bit of glitter here and there to make them sparkle and another layer of Mod Podge to seal them well. 
Aren't these cute? 
Now I wanted to turn them into refrigerator magnets...so off to my "hoarding" bin and there I found some old 2012 calendar magnets.  Yes, I keep "EVERYTHING" 
I cut them into strips that are the same width as the clothespins and glued them to the backside of them. 
Now they can hang on your file cabinet (like mine) or the 
refrigerator (like my mom did) to keep notes or cards or whatever your heart desires. 
These turned out so cute.  I wanted to make them for my mom, my dad's girlfriend and MIL 
but also wanted to package them up cutely...SO 
I used bakers paper to cut the bags from my TBBM cricut cartridge 
scored them. 
glued them. 
folded them. 
the bottom is also glued, but somewhat fragile if you were to put anything heavy into it, so... 
I just cut a piece of cardboard to fit the bottom of the bag and used an adhesive runner  
placed it into the bottom of the bag
my hand didn't fit, so I used my scissor to make sure it fit snuggly and... 
here they are packaged for gift giving.  I cut some tags using up most of my Christmas paper scraps, punched holes at the top and used some ribbon to close them up.  I gave them to my mom, my dad's girlfriend and MIL and they loved them.

I hope I've given you some more ideas for using your Creative Paperclay® and hope to see you here again in a month.  As always, have a great day and God Bless.

Thursday, August 4, 2011

Chalkboard Tray

Good morning,


Today should be our last day in Boundary Waters...depending on when you are reading this, we may or may not be off the water, but we will be back to civilization today sometime.  Our first stop after returning the canoes will be the hotel for a HOT shower and some real food.  Not that we didn't have real food on our trip, but by now I want some chicken or steak, no more fish for a while.  I love fish but for 4 days of breakfast, lunch and dinner I am ready for something else.  Also maybe a glass of wine to go with my meal.  LOL


Anyway, onto my post... remember the tray I showed you for the "Christmas in July" blog hop last week?  Well, my dear friend had given me two trays so I decided to make a Christmas present for Miss Bella and this is what I made...

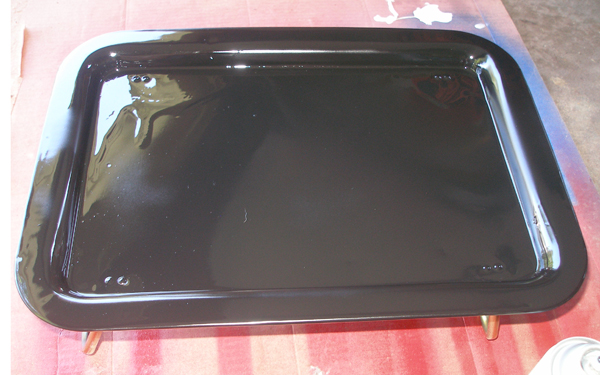
I just love these trays because they have legs.
Make sure you sand the tray a bit first so the paint will adhere best.
Then I painted the tray with black chalkboard paint.
I used the Krylon paint and it is so awesome.
It's very glossy right now, but that will change.
I cut all the letters and flowers with my E-craft out of vinyl
and added some rhinestones to the centers of the flowers.
Then I taped off the center...
and added a sealer to the rim of the tray.  This way she won't
be able to "pick" off the vinyl or the bling.
You must condition the tray with chalk before you can use it.
Just rub chalk over the entire surface in both directions.
Isn't this just the coolest project?
Since the tray is metal I am going to either make or buy
her some magnetic alphabets also.  I think she will love this!!!
I am also linking this up over at AllThingsFee  I love this site because there is such a variety of projects.  So much imagination and brilliance going on over there.

Kristal's  NEWEST Stamp PREORDERS--for a limited time, you can get them at a discount 
and reserve yours before they sell out!!!