Followers

Showing posts with label Alumilite dyes. Show all posts

Friday, October 16, 2015

#Cre8time Amazing Casting Products Collage

Good morning friends,

As all of you know I am a designer over at Amazing Mold Putty and I absolutely love it.  I have created so many molds and therefore I have a gazillion pieces that are filling a huge box.  You see when I am creating I seem to over mix my resin and since I won't waste anything, I pour extra molds.

The other day I was looking for inspiration with the things I already have and had a brilliant idea.  I mixed up some Amazing Casting Resin with some Gold Alumidust and spread it on a piece of wood.  I got a package of these blanks at Hobby Lobby awhile back and they don't seem to go away.


Then I placed a flat mold of some gears I had a made on top of it,
held it down for a few minutes and it give it some texture, because I love texture.


After that was set I used ink pads and more Alumidusts and even some glitter to distress the color a bit.
And of course I forgot to take a picture of that.

Going through my stash I found a bunch of pieces that I had created and adhered them onto the colored piece with E6000 and created a beautiful and fun collage piece.  Some of the pieces where painted, colored with Alumilite Dyes or Alumidusts or inked up in some way.


I absolutely love the way this collage piece turned out.  I think I will make a few more.

I hope you've enjoyed my tutorial today and hope to see you soon again!

Here's another one I made.  LOVE the colors


As always, have a great day and God Bless.

Wednesday, June 24, 2015

Harley Davidson Keychain with Amazing Casting Products

Good Morning crafters,

I wanted to show you a keychain I made a while back for a friend of mine.  It was her birthday and she is a huge Harley Davidson enthusiast.  I had this awesome pin that I had gotten many years ago and she has always commented how much she loves my pin.  I, however, was not about to give it away, but I knew I could duplicate it for her.


I started with my Amazing Casting Products and the Amazing Mold Rubber and created my mold.  I then poured the mold with the Orange Dye mixed with the Amazing Casting Resin.  It was ready in about 5 minutes


Then I added some of the Alumilite Silver Metallic Powder.


If you get some in areas you don't want, you can always use a q-tip and some rubbing alcohol to get it off!


I drilled a small hole with my dremel and added a jump ring and keychain and voila!
She LOVED it!

I hope you've enjoyed my quicky keychain.

As always, have a great day and God Bless.

Monday, February 9, 2015

South Dakota Bullet keychain

Good day friends,

I was recently asked to make a keychain for a client who wanted to commemorate his hunting in South Dakota.  I wasn't too sure if I could pull that off, but of course I would try.  After creating the keychain I was told I didn't use the right bullet, lol.  That just goes to show how little I know about guns and bullets.  Oh well, I'll try again...but here is how I did make the original.


I started out with a bullet and hot glued it to the bottom of a 2 oz measuring cup.  The bullet was just a bit higher than the cup so ...


... I added some painters tape around the cup and poured my Amazing Mold Rubber.  Amazing Mold Rubber is a two part silicon that when mixed together creates a fabulous pliable mold that can be used over and over again.  You can view a "how to" video HERE.


Here is just another view of the cup.  The process of setting up takes anywhere from 4 to 12 hours depending how small or large your "vessel" is.  This set up in a little over 4 hours.


I popped the mold out of the medicine cup and pulled my bullet out.  The mold rubber doesn't leave any residue behind and you can use your "vessel" over again.


Then I decided I wanted to make my bullet two toned just like the original so I "painted some silver Alumilite Gun Metal Metallic Powder in the bottom of the mold, followed by some Gold Metallic Powder.


I also mixed up my Amazing Casting Resin with the same Alumilite Gun Metal Metallic Powder.  
The Amazing Casting Resin is also a two part mixing process
and you can view a video HERE to see how that works.


While the resin is hardening I added a piece of wire half way into the resin and held it with a clothespin while it sets up.  It takes about 15 minutes to harden when you add the powders.


Now I needed to create the State of South Dakota and using my cricut and SCAL, 
I cut 6 pieces of chipboard and hot glued them together to give them some height.


I laid the bullet over the chipboard and with a pencil, 
I drew lines on either side to give it exact width.


and carefully cut it out one layer at a time with my exacto knife 
make sure not to cut ALL the way through the chipboard..


Then I molded it with my Amazing Mold Putty.  
This again is a 2 part process and you can view the video HERE.


Here is my mold.  


Now I mixed up the Alumilite Blue Dye with the Amazing Casting Resin ... 


... and poured my mold.


I glued the bullet to the well of the resin piece with E6000.  
Adding a rhinestone for some bling (maybe to depict where he had hunted) and a chain to create a keychain!


Like I said, after I created the keychain I was told that's not the kind of bullet you use to hunt with, but you get the idea, right?  I say it still could work, lol.  I will need him to give me the "correct" bullet and try this again!  Either way, I now have a wonderful mold of the bullet and the State of South Dakota!

What original keychain would you create?  Please leave me a comment and until next time, 
have a great day and God Bless.

Monday, January 19, 2015

Adding Non Crafting Products for Pendant making

Good Morning friends

Today I want to show you a simple way to embellish a pendant after creating it with the Amazing Mold Rubber and Amazing Casting Products.


I started out with this pendant I had received a while back.  I recreated it with my Amazing Mold Rubber and you can see HERE how you mix that up.  I also used my Amazing Casting Resin with the Flo Green Dye to create the pendant and HERE are the instructions for mixing that up.


I purchased these fingernail decals at my Dollar Tree for crafting.  I just loved the design and knew I could use them for some sort of crafting project.  2 full sheets for a dollar, oh yeah!  I created a template and cut out the decal and placed it inside the middle of the pendant.


I also wanted to add some bling to the pendant.  I pop dotted a few silver rhinestones to some vinyl backing and colored them with a black sharpie.  I glued them to the front of the pendant with some E6000.


I knew I needed a finding for the back of the pendant, but didn't have any on hand.  
I did however have these beauties and with some pliers ... 


I was able to straighten and flatten them.


Using some E6000 I glued the finding to the back of the pendant.


I also added some Amazing Clear Cast resin to the inside of the pendant keeping the
 nail decal in place and here you have an awesome pendant.

I hope you enjoyed my pendant today.  I love comments, so please let me know what you think and do tell me what non crafting product you use in your crafts.

As always, have a great day and God Bless!

Tuesday, June 24, 2014

Chocolate to Resin to Soap, Oh My

Good morning crafters,

I am here to show you what I made for Mold rubber Monday at Amazing Crafting Products.  If you haven't done so, please go over to that blog and check out ALL the cool ideas this fabulous design team comes up with.

It's been a long three weeks that I have had to keep this a secret, but yesterday was my reveal over there and I wanted to share with all my readers also.  This will be a very, very long post and picture heavy with an added bonus of a video because I am going to actually show you three projects in one.

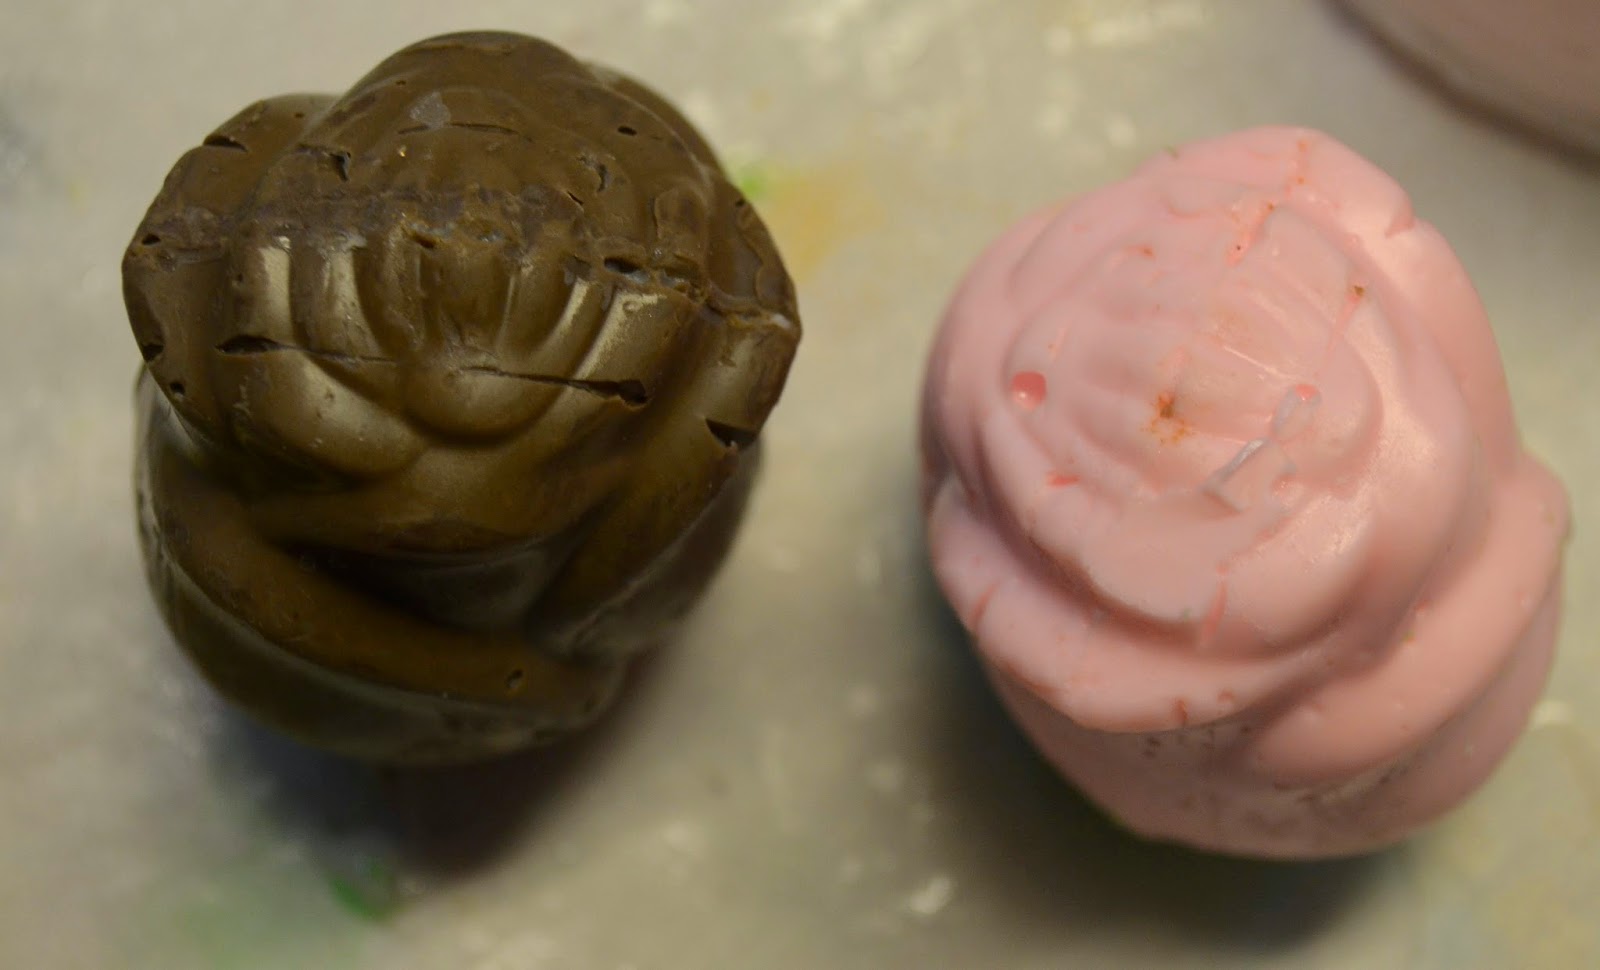
I started out with cleaning my dresser off and found this "yummy" chocolate rose my hubby gave me 10 years or so ago.  I was actually pleasantly surprised that the chocolate wasn't totally white when I unwrapped it.
from this
to this
Now, it turned out "nice" but it definitely had some flaws.  The nice thing about the Mold Rubber is that is picks up ALL the detail of the original item, the bad thing is that it picks up ALL the detail of the original item, LOL
  I then created this


which was pretty in itself, but still had some flaws.
I also created one layered with the Amazing Crafting Resin with Alumlite Flo Red Dye, just the resin without coloring and then with another layer with the Alumilite Blue Dye.  Pretty, right?
After making these I showed hubby what I had made.  He is my go to guy when I've created because he DOES NOT hold back in critiquing me.  Sometimes that's good, sometimes not so good.  This time he looked at the rose, turned it over and over and said "You know..." which means he isn't totally into what I just made "...you could improve on this a bit if you cut those lines out.  Can you cut resin?"
So back to the drawing board I went.
I then created this piece with Amazing Clear Cast Resin and Alumilite Pearlescent Powder just to see how it would turn out.
and here it is, all pretty in sparkly white 
just because this is what I do I used the Oil Pastels from Frog Dog Studio to give it some color
heat set it with my heat gun and rubbed the oil pastel in to give it an incredibly cool shiny color (and when you put heat on the resin, it also softens it a bit so that... 
you can use your exacto knife and trim away all the grooves).  How cool is that?
From that I went to create another Amazing Mold Rubber mixture.  Now when I am ready to mold something I keep all the "extra" bits and pieces of molds that either didn't turn out or the skin from the mixing cups and "bed" my original piece.  It saves on not having to use a lot of the mold rubber and pouring it onto this will actually adhere itself directly to the bits and pieces. 
If you can, always hot glue your original piece to your container.  This will keep your piece from "floating" and creates a nice hole to pull your piece out of. 
and here is my "perfect" rose mold. 
This rose was actually made by first adding a mixture of Amazing Casting Resin and swirling it around in the mold to give it an edge.  You definitely have to have some patience when doing this technique, but the outcome is fabulous.  Then when that was totally cured I added more Amazing Casting Resin with Alumilite Black Dye and filled the mold.  Once it came out of the mold, I also added a little bit of the oil pastel in black around the edges and heat set that again also.  I didn't have to do this, but since inventing this technique I feel I want to heat set everything with oil pastels.  LOL  
I created a wire piece, drilled a hole in the center of the rose and  
glued it with E6000 to make a picture holder.  Since the resin piece is so dense it's actually a solid somewhat heavy piece.

Now, while I was creating ALL these fun roses I had some time between drying, curing, setting, etc and I was looking around my craftroom and found this:
I actually remember purchasing this at Michaels on clearance last fall.  Ding, ding, ding...could you really use the Mold Rubber Molds to make soap?
Here is the proof of what I did, Enjoy
(Now keep in mind this is my first video in a very, very long time...don't judge, lol)
if you don't want to watch the video or cannot watch it, keep reading.  There is a full step by step on how I did what I did.


I melted the soap in the microwave for 20 seconds, added some fragrance and two drops of the purple colorant and poured my mold.
put it into the refrigerator for 10 minutes 
since I had no idea if this would work or not, I slowly pulled the edges from the piece away and it sorta just popped out 
Check this out... 
beautiful or what? 
here are some other pieces I made just because I had the soap all melted.  All the other pieces except the rose are Amazing Mold Putty molds.  So, the proof is that you can also pour soap into those molds. 
I got a little dish at the Dollar Store, wrapped the soaps with some fake flowers and  
Viola, a pretty accent to your bathroom.
now, I do have to say that after letting the roses set out for a day, they "dried" a bit more and kinda crystallized, but I love this look even more than the glossy look. 
If you are still reading here, thank you for sticking around to read all the way through and I hope you had a chance to watch the video also.  It was my first attempt at a video in a very long time and I think I did pretty good.  I hope you enjoyed todays post and thank you so very much for all patience with this oober long post.  Please leave me a comment below with any questions or feedback.  I love to hear what others think.  

As always, have a great day and God Bless.