Followers

Showing posts with label alumilite black dye. Show all posts

Monday, May 16, 2016

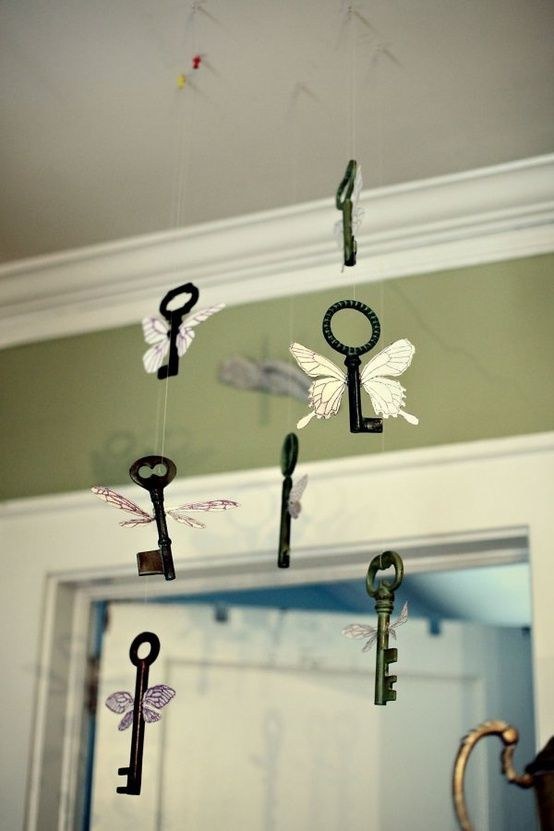
Butterfly keys dancing with Amazing Casting Products

Good morning friends

I love perusing Pintrest and sometimes I find something that I want to make immediately.  Sometimes I have what I need on hand and sometimes I have to punt.  This is one of those times.

This is what I found on Pinterest:
Decorate with winged keys.

And this is what I made:


I started with my molds of keys that I made using my Amazing Casting Products.  I love keys!!!


I made my very lightweight keys.


Then I hot glued my butterfly wings to the keys


all different shapes ...


... and sizes


I tied fishing line to the keys and 
to an old embroidery hoop


I even glued some of the butterflies around the embroidery hoop


I love Pinterest, but I don't always make what I find 
exactly the way I saw it!  I like putting a spin on my project.

I hope you've enjoyed my version of the butterfly keys.

Thanks for looking and I hope you leave me a comment.

As always, have a great day and God Bless.


Wednesday, February 4, 2015

Remelted bracelette

Good morning crafties,

Today I am here to show you a quick tutorial using the Amazing Remelt.  I just love the remelt because if it doesn't work out the way you want you can always remelt it and try again.  No waste!  PERFECT!

I started out with a coin I had found and created a mold using the Amazing Remelt.  You can watch a quick video HERE to see what it's all about.


I usually try to make a couple of mold at one time, but today I am showing you what I did with the coin on the left side of the mold.  I also added some Alumilite Gun Powder Metal to the mold and pour a mixture of Amazing Casting Resin with Alumilite Black Dye to the mold.  Right before it is set up, I added a snap to the resin that will harden around it.  You can see another bracelet I made using this technique HERE.


Then using my punch I added the snapped resin piece to a leather strap.


and here is my bracelet.  Now, I have to admit the piece didn't turn out as well as I had hoped but I do like the odd texture it has. I rubbed some gold rub n buff over the top and am actually happy with the outcome.  Also, this is the beauty of the Amazing Remelt, if you don't like it just REMELT the mold and try again.


I hope you enjoyed my remelt tutorial today and would love for you to leave a comment telling me what you would use the remelt for.

As always, have a great day and God Bless.

Wednesday, January 21, 2015

Hot Glue voided Hair Barrette

Good morning crafties,

Today I want to revisit a barrette I made using a new technique.


A while back I made this awesome barrette for my post over at Anything But a Card.  I just loved the way it turned out and wear it often.  I did get a lot of compliments and therefore I wanted to make another using a different approach.


I started out with the same mold, but this time I added some
 hot glue in a pattern before adding my Amazing Casting Resin.


I mixed up my Amazing Casting Resin with the Alumilite Black Dye and poured my mold.


After about 10 minutes it was set up and I pulled it from my mold.  You can see where the hotglue is.


Then I gently picked the hotglue out from the resin piece.  Pretty cool huh?


Punched two holes on either side of the resin piece and added a chopstick and there you have another version of my barrette.  I just love the look of this.

I hope you've enjoyed my tutorial today and would love to hear
 what you would create with some hotglue as a void.

As always, have a great day and God Bless.


Wednesday, October 1, 2014

Flat bone failure to Amazing Plate

Good morning friends

Remember my post from a couple of weeks back over at Amazing Mold Putty of my bone necklace.  You can view it HERE if you missed it.  Remember also how I said that the necklace was a failure because they didn't lay right since they had a flat surface?  Well, I fixed that by rebuilding.

 I started out with a skull that I purchased last year after Halloween.  It was on clearance (as if I ever pay full price for anything) because it didn't work.  But I knew I would be using these skulls for something.  Of course my Amazing Mold Putty comes in handy for this project.
I molded the skull with the mold putty
I drew a line in the mold with a a sharpie so all of my skulls would be the same height
And poured some with Amazing Casting Resin with Black Alumilite Dye
and some just white 
I glued all my cured pieces onto a charger with E6000 and I wanted to make the center of the plate a chalkboard 
I also rubbed some vaseline here and there which will allow my to rub off the paint in certain areas easily 
After the pieces were all glued down and cured I proceeded to paint the charger with the chalkboard paint.
Believe it or not, I added at LEAST 8 coats of the chalkboard paint and it still wouldn't take the chalk on.  I'm not sure what went wrong or why it happened, but I could not get my chalk to write on the charger.  I got pretty disgusted and was about to throw in the towel, when I came up with another solution...VINYL!  Duh!!! 

Since I was giving this as a gift to my tattoo artist, I pulled up his business card, 
imported it into my SCAL and had an exact match of lettering
I love how the red strikes onto that black charger.
You can also see where the vaseline rubbed the paint off nicely.  
I even "scratched" some areas, just to rough it up a bit more!
My tattoo artist LOVES it!  In fact, even his boss liked it and took the plate from him and displayed 
it in the front of the store on a shelf and said Jason could "visit" it anytime he wanted.

So, see, even if something doesn't work out there is always a solution to recreate an idea.

I hope you liked my post today and hope to see you again real soon.

As always, have a great day and God Bless!
Monday, September 8, 2014

Golf Pin to Golf Tie Tack

Good morning crafters,

It's going to be a busy day for me today.  I've got payroll to do, then off to replenish my Hallmark stores and then off to our Golf Pot Luck this evening.  I'm pretty excited to be showing off hubby's new tie tack I made, but I kinda doubt he's going to wear a tie tonight, he'll probably wear it to the Golf Banquet though.

So let me show you what I made:

Susan, my friend and the design team leader from Amazing Crafting Products sent me a few things a while back she thought I might like.  In this fabulous box of goodies there was this gorgeous Golf bag pin.
 It's gold and the golf bag has mother of pearl (or at least looks like it) laid in it.  Now Susan did not know this, or maybe she did, but Mother of Pearl is my birthstone, so I was even more excited to have received this gorgeous pin.  I knew it would be going on my golf cap immediately and it's been there ever since, until now.  I know we will eventually be having a golf banquet so I thought it would only be fitting for hubby to have a golf tie tack.  (I'm assuming the banquet will be formal?  And if it's not he wears a tie to work everyday anyway so he can wear it then).

So off to gather my supplies:  Amazing Mold Putty to create my mold.  I try to make bigger  molds and add a few things together.  These are acrylic pieces off of a plastic necklace you can get anywhere.  I just cut them apart and I will be showing you a few things I made in the next couple of days/weeks.
See the golf pin to the right?


 Here is the mold after I took all the pieces out.

I dusted in some bronze Alumidust for the bag and Pewter Alumidust for the clubs and latch.  This works very well when you want two tones in one item.  You don't have to paint them afterwards.  I then filled the mold with Amazing Casting Resin with a couple drops of  black Alumilite Dye 
Cool huh? 
I added a tie tack back to the back of the bag and now hubby can wear his new tie tack whenever he wants and I will be putting my golf bag pin back onto my lucky golf cap where it belongs.

I hope you've liked my post today and I would love to hear what you have to say.  Leave me a comment and tell me what you would mold if you had the chance to mold ANYTHING?

As always, have a great day and God Bless.

Thursday, August 7, 2014

Flip Flop Jewelry

Good morning crafters,

Today I am going to show you how you can transform a simple plastic necklace into a one of a kind flip flop adornment.  What am I talking about?  Here follow me to this Amazing transformation.
I started out with these plastic necklaces thanks to Susan, our fearless leader. 
After I cut them apart and made my mold, (you can go here to see how to prepare your Amazing Mold Putty), I dusted them with the Alumidust that you can be purchased off the website.  Click the Alumidust link and it will take you directly to all the different colors they have. 
Then I poured my Amazing Casting Resin tinted with the Black Alumilite Dye directly into the molds (you can click this link to see mixing preparations).  Just before the resin is cured I placed these clip on earrings right into the resin and it works so as a bond.   
Here you can see the finished piece vs the plastic piece. 
Clip them onto your flip flops and you have some Amazing jewelry that you can change out with every outfit. 
I hope you've enjoyed my post today and can't wait to show you another project in the next few days.

As always, have a great day and God Bless.

Sunday, June 15, 2014

Summer Lovin at ABAC


Good morning,

I'm so glad to be here today for our Summer Lovin over at ABAC.  I love being on the design team because it really makes me focus at least once a month on creating "anything but a card".  Not that I have been doing a lot of that either because I tell you, it's been a very hectic summer already.  I haven't had much crafting time, but when I do I am wowed by what I have made.

Today I am here to show you a simple jewelry project that was inspired by my trip to Florida.  I got to meet our fabulous leader Susan and we spent one whole day junk-ing.  I had such a great time with her and we found some awesome trinkets.  Today I will show you two of those fabulous finds.
here are a couple of buttons I found and just loved the detail
using the Alumidust I "painted" all my molds I had created with the Amazing Mold Putty.  
All of these items were found while I was in Florida.  
I decided to go with a green/blue with a bit of purple to remember my days in Florida.  The beaches and the ocean water was fabulous and here, look at the sparkle...love it!
Then I poured Amazing Casting Resin mixed with the Alumilite Dye in Black over the top of all my molds.  So messy, but so much fun! 
I absolutely love the colors.  Who says blue and green don't go together? 
I even added a little bit of purple  
searching through my GIANT stash of beads I found the perfect ones to go with my new recasted buttons. 

I hope you will join us at Anything but a Card and remember there are only three rules.  
1.  Make something summer - y
2.  Anything But a Card
3.  Just have fun while creating!

As always, have a great day and God Bless.