I am starting this morning out with quite a few pictures of our trip. These pictures are all about entering Boundary Waters and setting up camp so if you are not interested, scroll down to see my project for the day.

My nieces and brother in law

My oldest son and sister in law

The youngest.
It's tradition to stop at Subway before entering so that we all
have a full belly before we get on the water. You never know how
long it's going to take to find "camp" and get set up.

Canoe on top of the car. Those poor tires. I secured my camera
in my waterproof container for the paddle in, so I don't have any pictures showing
the paddle in, but if you continue to come back you will see us coming out.

Setting up camp. Yes, the hammock is already up and
that is where the oldest son spent most of his time.
He went to BW with a sprained ankle, but he did very well with it.

Designated firepit

Rugged terrain

Tenting site.


The walk way to the facilities. No I will not show you
the hole in the ground in this segment. hahaha

Beautiful evening sky.

The Tree...I will explain this in a future post.
NOW onto my project:
Amy over at Love to Crop is a fellow DTM at Getting Cricky and she has some of the neatest tutorials and projects. While I was on vacation she had a guest designer who made this super cute box card. I couldn't wait to get home and try it and here is my take. AND there is also a challenge going on and it will be open until 8/11, so hurry up and check out my box card and then go and make one yourself and enter the challenge.
You can also see a video tutorial as I needed this to complete it. Once you watch the video it's as easy as pie.
I started off with 2 pieces of scrapbook paper that complimented each other. I cannot believe I don't have any two sided paper left. I used a spray tac and glued them together and let it completely dry. Then I cut it down to 8.5 x 11 size.


For the belly band I used the left over strips of the papers and glued the flower pattern on top of the checkerboard paper. I also used a strip to make the rosette. I have this flower punch from Marvy Uchida and inked around the edges in purple. Then I stamped the sentiment from the Positive Thoughts stamp set from Getting Cricky also in purple. It just fit so perfectly inside this flower punch.

I also added a white border punch to the outside edges.
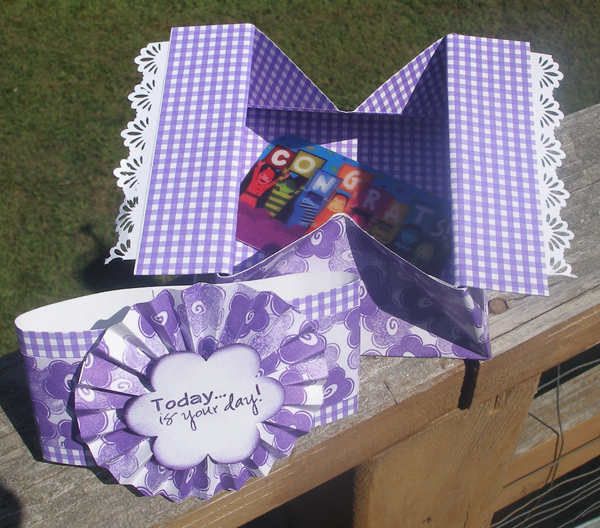
Added a gift card inside and there is a perfect little gift.

This is the back side. I just love how this coordinated so well. So now I hope I've inspired you to make a card box and to join in the challenge over at Love to Crop!!!

Beautiful projects. Where does all our double sided paper go to? Very clever and creative.
ReplyDeleteLove your box card! Very pretty.
ReplyDeleteKelly
http://kellyscraftylife.blogspot.com
What a beautiful card Brenda. I will have to make one at some point. I don't think I will be able to by 8/11. So creative to create your own double sided paper.
ReplyDeleteI love seeing your pics of your trip and reading about the experience. Just fascinating.
Your box is awesome. Love the tip on glueing your papers together to make them 2 sided.
ReplyDeletePrecious Hugs
so cute! i can't watch videos/tutorials right now, so as soon as i can~i wanna make some! beautiful work though!
ReplyDeleteOh my goodness, Brenda, it is GORGEOUS!! :) I LOVE that you made your own 2-sided paper!! WOW -- You totally rocked the box card -- I just LOVE making these -- Now I want to make another!! :)
ReplyDelete(((hugs)))
Amy :) at www.lovetocrop.com
Brenda, This is beautiful!!! So glad you watched to video...it makes it SO much easier!! :)
ReplyDelete♥ Laura ♥
tweetyb@satx.rr.com
http://laurascraftsandmore.blogspot.com/