Followers

Friday, September 23, 2011

Festive Friday 9/23

Good morning and welcome to another edition of Festive Fridays. If you are new to us, sit back, grab a cup of coffee, relax and enjoy some wonderful Christmas Cards. Yes, I did say Christmas...Festive Fridays will be every other Friday with samples of Christmas cards. This way, you can be making your cards all year long and you will avoid the mad rush when you could be enjoying the Christmas Season. You should have just come from Amanda. If you stumbled upon this post you can go back to Terri and start at the beginning. There is also a complete list of the Festive Friday hop on the left sidebar under the Festive Fridays blinkie in case you get lost along the way.
Today I've got a simple card for you.
The paper and ribbon was from my Christmas stash
The mint is cut out of some Christmas fabric and I added some glitter glue to sparkle it up a bit.  I also added some glitter glue randomly to the stick candy canes and pop dotted a few of the mint candies to give a little 3d affect.  This was super easy and took maybe 5 minutes to complete.  I love having these simple cards on hand for a "Oh I need a quick card for the maillady or the newspaper guy"

Again, I didn't use a cricut or E-craft at all this time.  Sometimes simple is best.

I hope you liked my Festive Friday card and hope to see you back in two weeks for another Christmas card.  Now head on over to Angela and check out what she has for you.

Thursday, September 22, 2011

Filekutz September Challenge with Blog Candy


Hi Everyone!! I just wanted to send a quick reminder about the challenge over at FileKutz Free File Challenge and am posting to share with you a sneak peak of the PRIZES for the current Challenge, so don't forget to go get the free file and read the full post and entry rules HERE!

Must be entered in the Challenge by: midnight EST on Wed. Sept. 28th by Noon
that only gives you another 6 days to download the file and get cutting.

AND HERE IT IS!! This is a  SNEAK PEAK OF THE ITEMS YOU WILL WIN FOR THIS CHALLENGE!! PLUS SOME more surprise items :)


Pop Up Birthday Card

Good morning AGAIN


I can't believe I'm posting for a second time today...I just had to show you this super cute card I made.  The other day I got an email update from Terri over at Ramblings of a Texas Craftroom  and she was showing how to make Pop Up cards.  I was fascinated with pop ups as a kid.  I remember my mom bought be this super cute Snow White and the 7 Dwarfs popup book...I couldn't get enough of that book...unfortunately I don't know what ever happened to it :(


So, anyway, I have a birthday card to make for a new friend and thought this would be the perfect card, because she has NO idea she getting a card from me.  I love making others happy and I think she will get a kick out of it.
This is the front of the card...
and this is what you get when you open it.
Isn't that just cute?  If you want to know how to 
make this card, head on over to Terri's blog. 
She even has a video telling you how to make it.
Here's a closeup of the balloons.

I am also entering this over at CTO for their card challenge,
Birthday, (must use balloons).


Paper Secrets 19


Good morning
here's my layout I did for the challenge over at PaperSecrets.  Each week we are given an assignment for a layout. I really don't care if I win the contest, it's just helping me to do more layouts that I should have done a long time ago (or some new ones in this case). If you participate and follow the guidelines you advance to the next week. We started with 27 and 10 moved on again last week, these ladies are serious about their scrapping.  I will keep updating you as I go along. Who knows, I might not be able to participate one week and then I am out, but until then, I am scrapping my butt off, (they used a different word, but my blog is family friendly...hehehe
So now I am a bit intimidated about a lot of white
area on my layouts...I am a firm believer of covering
every little spot...well....
not anymore...I just love how this layout turned out.
First I must say that having little Miss Bella to scrap
is a perfect page in itself, but I am absolutely in love 
with this page.  The only thing I do not like is my 
journaling, but that goes without saying.  
I hate my handwriting.
The only time I used my E-Craft was for cutting the mat. 

What I used for the layout is in red:
raw chipboard (leave raw , paint, ink, etc....your choice)
border punch
flowers/leaves
bling
fabric/felt
rubons
stamped image
hand or machine stitching
glitter/micro beads
ribbon/lace


Now this page inspired another creation and if you tune in tomorrow you just may get to see what I am talking about.  I will have my Festive Friday post in the early morning, but you all may be in for another post sometime tomorrow too.


Wednesday, September 21, 2011

Decorate to Celebrate #9, Birthday

Good morning and Happy Wednesday, everyone! I am so excited to be a guest designer over at  Decorate to Celebrate again!  Decorate to Celebrate is a super-fun challenge blog dedicated to showing off decorations for every celebration.  This is my second guest design spot over there and I am hoping for many more to come.
The theme for today's challenge is: 
BABY BIRTHDAY (anything having to do with a baby's birthday or even "birth" day.  So, I thought I'd take you back in time and show you what I had done for my little Miss Bella's 1st Birthday.  I just love being a grandma and celebrating lots of milestones with her.  I wish I had been "this" crafty when my babies were little, but now I get to decorate and embellish for her and the new baby, (in March).


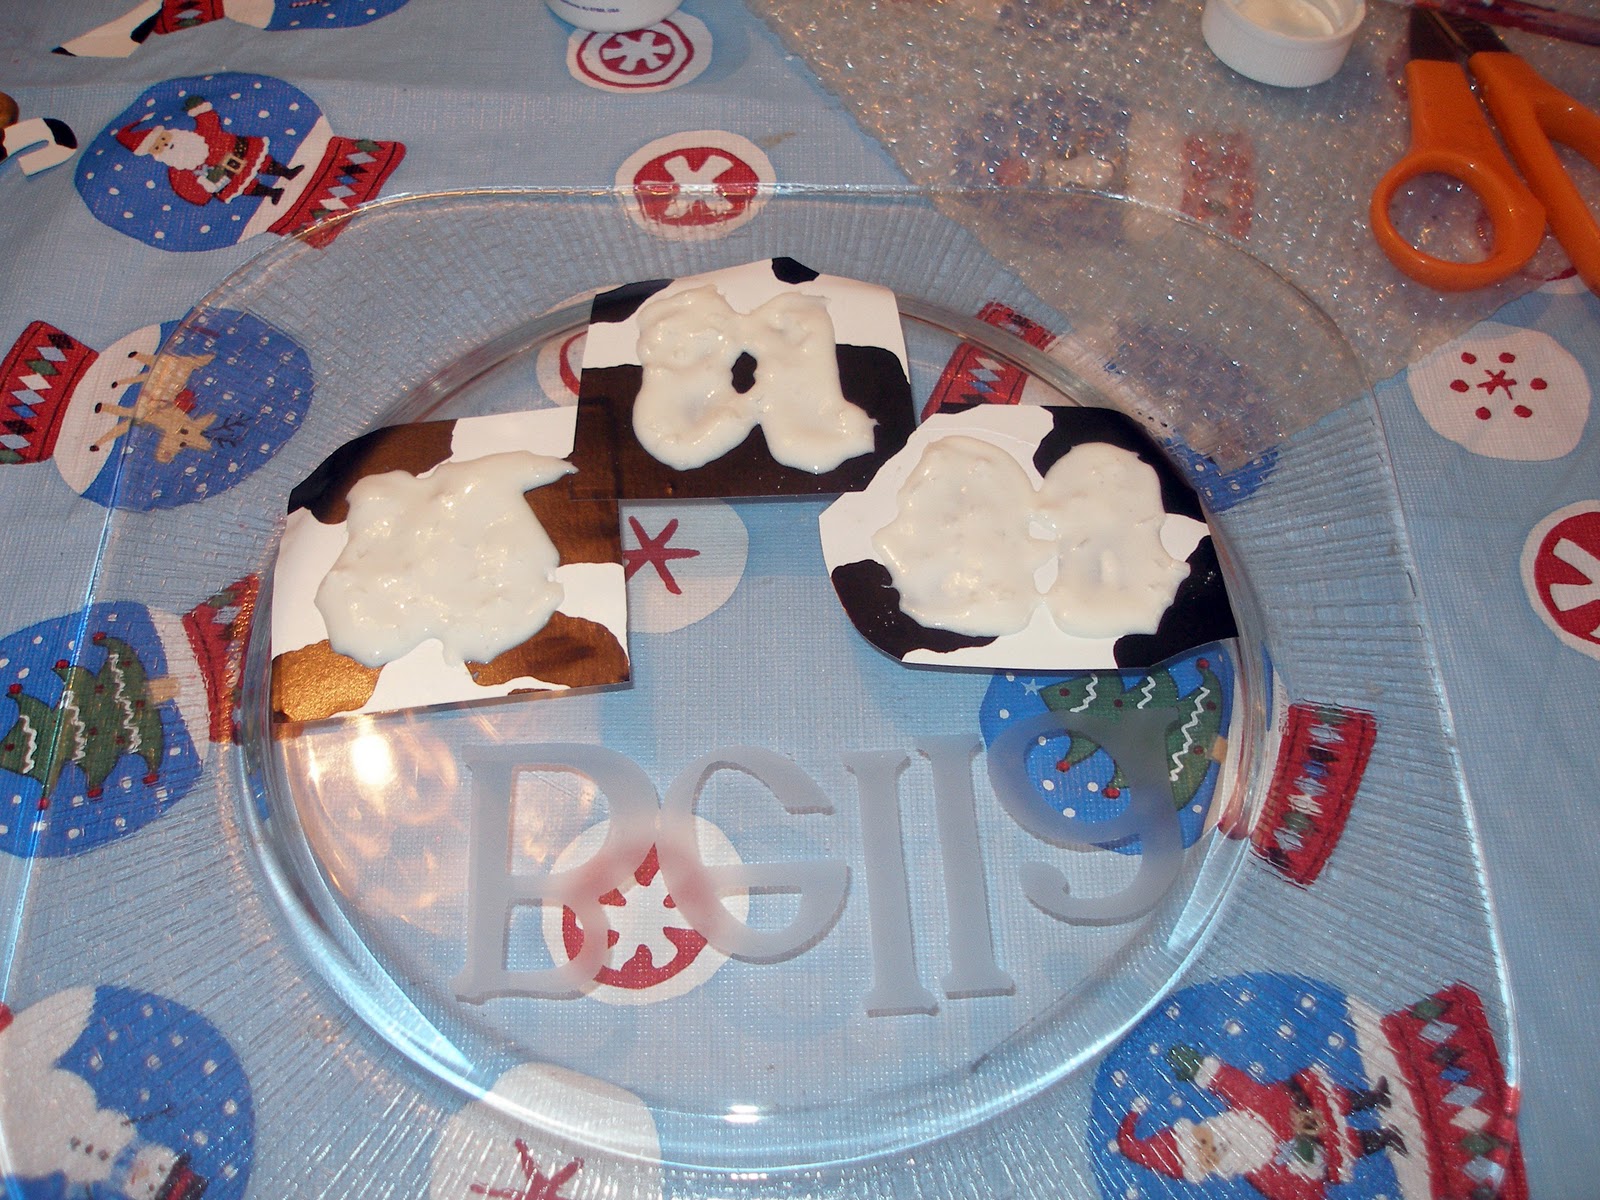
So here we go:  First when Miss Bella was born I made her a "Birthday" cake plate.  This way each year for her birthday we can set her cake on it. 

Here is a picture showing how I used the vinyl on the backside of the plate with the etching cream.  I know the vinyl is cow patterened.  I had gotten it on clearance somewhere.  Its a huge roll and I use it mainly for etching purposes. 
Here is the picture of it completed.  We will use this plate every year for her birthday cake or cupcakes.  Depending on what we have.
This is the diaper cake I had made for her shower
Then for her 1st birthday I made this:


I used my Cricut and my SCAL.  First I created a triangle shape and welded circles onto it to create the scallop look.  I cut this at 4.7 by 5.4 inches (Pink).  Then I created another triangle (Green) and fit it inside.  I cut a scallop circle (Brown) in SCAL at 2.42 inches.  I used the Bernard MT Condensed font to spell Bella's name (Green) and then again with the Shadowed Blackout (Rounded)(Pink).  I used my ATG gun to adhere all the pieces together.  I also used SCAL (game pieces in the shapes library) and broke apart and cut just the crown out of pink cardstock.  I added some rhinestones to the crown for some added bling.  I then used my ribbon punch to punch holes in the triangles and slipped this cute pink and brown ribbon through it.  The best part of this whole project?  I used everything from my stash.  YEAH!!!  I just love the look of this banner.  
  Our theme for her birthday is Princess and Frogs.  Frogs you might ask?  Well, all of my kids had a special theme as they were growing up and you always received something of that theme for each birthday, christmas or special occassion.  My daughter picked tree frogs for Bella.  I know you might think that's kinda weird, but really there are a lot of frogs that are super duper cute.  I am really loving it.  Anyway, this post has nothing to do with frogs.  Hehehe.
I used SCAL and a plain cupcake wrapper to dress up her cupcakes.  I welded Bella's name onto the cupcake wrapper and then I used my new Cri-Kits (green glitter pen) that I won over at Joy's Life to write Princess on the wrapper.  I used the font Fiolix Girls with my SCAL.  This is probably one of my favorite fonts.  The pens really work great.  Then I cut Bella's name out in the DCWV All Dressed Up Glitter Stack in green and adhered them to her name.  SO stinking cute, if I do say so myself.  
 
I also made the party hat for Bella.  All I did was took a piece of paper 6 by 11 and formed it into a party hat.  You know the ones you can buy for a birthday party.  I adhered both sides together with my ATG fun and formed the party hat.  Kristal over at Kandrewdesigns had made a crown a while back for the Knock out Breast Cancer.  She gave the file for free and I snagged it up.  I wasn't sure what I was going to do with it, but now I am glad I grabbed it.  I altered it a little bit by making it smaller top to bottom and then I adhered it to the party hat.  I used the same letters that I had used for the cupcake wrappers and adhered them to the crown.  I then punched two holes on either side of the party hat and added some elastic.  I didn't go too overboard on embellishing it or adding too much detail because, she won't leave it on for long anyway, she doesn't like anything on her head. 
And here are just some random pictures showing the cake and cupcakes.
I made a cake just for her to dig into


And this was the frog for the big cake.  Isn't he just the cutest?
and here she is after digging into her own cake.

Thanks so much for stopping by today and thanks again Amy and Rhonda for letting me be part of your fabulous blog as a guest designer! Don't forget to make your own decorations for a Baby Birthday or "Birth" day and link up at Decorate to Celebrate  I can't wait to see what you create!
.

Tuesday, September 20, 2011

Filekutz September Challenge

Good Morning and welcome to another Filekutz challenge...well, this will be my first, but you might already know about them.  I've been on the Filekutz DT for about a month now and I've been having a blast.  LisaJane's files are awesome I tell you what, but I'm sure I've already told you that.  Check out what I did with the file and I hope I will give you some inspiration to enter the challenge...
Now this is the picture of the Family Flourish Tree 
Cut File offered for this months challenge:
We are to use all or part of it on a card, layout or any other project we can come up with and this what I did with it:
Isn't this just pretty.  
I'm really into the fall colors right now.
Now I did not attach the tree completely
to the background because I wanted to 
give it some movement and it's just beautiful.
I added a few rhinestones here and 
there just to add that extra bling to it also.
The tag was stamped with a $1 bin Michaels stamp
that I've had forever and it worked just perfect for this card.
I also inked around all the edges for some added depth to the paper.
Then I also tied a tiny little bow and added it to the 
bottom of the card.  I'm very pleased with this card.

Now don't forget to head on over to the Challenge Blog and download the free file and enter the challenge.  You have until Wed., Sept. 28th to enter.  The winner will be choose on Sept 29th, and win a RAK Package of scrapbook items from her, plus 1 free file of your choice from FileKutz Design's!!  But you can only win if you enter, so what are you waiting for?

I'm also entering this card at LTC for the Happy Fall Y'all challenge

Monday, September 19, 2011

Fashion Blog Hop

Good morning and welcome to the Fashion Blog Hop.  We have 8 wonderful ladies showing off some fashion ideas for you.  If you just happened upon my blog or are reading this through your email, please start here with Bernice.  I'm so excited to be here today with the wonderful ladies on this hop.  I knew I wanted to make something jewelry like for this hop and remembered a friend of mine AMY suggested I check out a Youtube video a while back featuring grunge bracelets.  I so knew I was going to try to recreate it and this is what I came up with.
I started out with a piece of chipboard, not too thick cut at 1.5 inches by 7.25 inches.  I just held the chipboard around my wrist and this is the approximate size I needed.  I lobbed 1/2 inch off for the added chain I would need for the closure.
Then I painted both sides of the piece with plain white acrylic paint
I also rounded the corners
Then I punched holes on each side for the Orings.
Then I stamped the words LIVE, LAUGH, LOVE
and some random flowers and swirlies on the bracelet
with my Michaels $1 bin stamp set...
Then I added a closure with some o-rings.
I also inked the edges to give it a finished look.
and here is my wrist with bracelet.
and my daughter decided to take it for herself.
I do think it looks pretty good on her also.
Now I hope I've inspired you to try to recreate a grunge bracelet for yourself.  I know I might be making some more now that I've had to relinquish this one...maybe I'll even make a video...it's about time don't you think?  If you would like, you can leave a comment (I'd love to hear what you have to say) and tell me if you would like a bracelet because that's my blog candy for you.  Please become a follower if you aren't already; like me on Facebook or follow me on twitter.  Sign up to receive my emails on the right sidebar.  Leave me a comment for each entry separately to gain more chances to win.  I will draw a winner for ALL of my monthly drawings on October 3rd, so that gives you plenty of time to leave comments and send your friends over to take a peak.

Sunday, September 18, 2011

I won at...

Good afternoon

I just wanted to show you all the prize I just won over at Dana's.  Thank you so much for choosing my comment and your layout was fabulous.  The glitzy leaves caught my eye right away.
I'm so excited to use this paper pack and embellies.
I already have something in mind.

Lasting Memories #55 Sketch and fall colors

Good morning ... today is another Sunday filled with Lasting Memories. Karen really knows how to challenge me somedays.  This week she gave us a sketch to do and challenged us to use fall colors...now I know I've said I like doing sketches, but with my printer still not having any ink, it's hard for me to just run and print a few pictures, so I have been relying on some very OLD pictures.  I found these 2 in my boxes of pictures...actually this part has been very fun, going through old pictures...at least I am getting some older stuff scrapped.  Anyway, these pictures screamed FALL to me...so here goes.
The football, flower and tag were all cut with my E-Craft and I used my 
peachykeen faces to give the football some pop.  The flower was left over 
from a project I did last week and you can find the tutorial here.
I used my Dymo buddy to punch out the title and 
I hand dyed my ribbon to match the papers.
So I hope I've inspired you to do a layout with this sketch and use some fall colors and head on over to Lasting Memories and enter the challenge...they are so much fun.  If you are new to scrapbooking or lost on how to start, Lasting Memories is a great place to start.  There is so much talent over there and the ladies are so inspirational.  See you next week...

Saturday, September 17, 2011

Upcycle Blog Hop

Good morning and welcome to our Upcycle Blog Hop.  I am so excited to be here and the projects you are about to see from all the talented ladies...well let me just say, you will want to be crafting till there's no tomorrow.  If you just hopped over from Bridgett you are in the right spot, but if you are reading this from your dashboard or reading via email then please start at the beginning with Tanya T~ .  
Thank you to all my Amazing sponsors for this blog  Hop: You are all so wonderful !!!
Anita   $20 Michael’s Gift Card
Jennifer B   This sweet stuff
Donna Michael a Martha Stewart fall leaves stamp set
Felicia, sweet Mother’s are angels sign  (Please stop by and thank her for her kindness!)  come back and let me know (in my comments)  for another entry for MY personal blog candy!
Make sure you comment on every blog, for a chance at these prizes!  Cut off is Midnight tonight and Tanya will choose a winner tomorrow!
Many of these incredibly talented crafty friends have also posted their own blog candy for you. Dont forget to comment for a chance to win


So I have known about this Upcycle Hop for about 4 months now and started my project way back then.  When I went to post it, I realized that it's not summer anymore and now I'm not so sure the project should have been made this way, but...as you will see, you can modify it to your liking, so you might want to imagine some fall colors  HEHEHE


So I used to work in a casino and we served liquor there.
I love all the different shapes and sizes of some of the bottles and
would take them home, of course, AFTER they were emptied.  hahaha
I washed it out and took the label off.  Then
using some glass paints I painted the entire bottle
except where the label was with fushia.  With all the 
ridges this bottle has, it gave it some very unique detail.
In vinyl I cut out a butterfly and the word Believe.
I can't believe I took a picture of the weeded portion
and not the outline...what was I thinking?  Anyway, you want
the outer portion of the vinyl so that you can etch the words.
See what I mean?  I used my etching cream and let it 
sit for 20 minutes.  I know the directions say 5 to 10, but
I always want to make sure the etching cream really
penetrates the glass and it doesn't hurt it at all to leave on longer.
So I did that to both sides...the butterfly on one side
and the word Believe on the other side.
Then I filled it with some clear glass marbles that I dyed with
my alcohol inks and added a string of lights through the top.
I added some flowers and leaves from my flower
arranging stash and a little bit of ribbon for balance
Do you see the pink marbles on the bottom?
It's kinda hard to see the word Believe in the photo,
but believe me, it's so much prettier in real life.
The butterfly especially turned out nice and crisp.
I added a butterfly with a stick pin body to one of the
leaves...isn't it just darling?
And there it is, in all its glory.

I hope I've inspired you to upcycle an old bottle maybe and turn it into a beautiful home decor item.  Remember, I made this during the summer, but you could for sure use some fall colored flowers and maybe even add some "orange" lights.  You could use a wine bottle or even a glass pop bottle if you don't have access to any liquor bottles... just let your imagination run wild.
 Now please hop on over to Krista and see what she has made for you.
Tanya T~ http://www.ScrappyScavenger.wordpress.com/
Brie - http://vintage53.blogspot.com/
Janice - http://www.cricutconfessions.com/
Faith http://faithfulecreations.com
Bridgette - www.nutsaboutcuts.com
Brenda - http://createbyburffrau.blogspot.com
Krista - http://www.KristasPaperCafe.com
Jennifer B- http://jlbzlittlecorner.blogspot.com/
Amy - http://www.lovetocrop.com You are HERE!! :)
Heather- http://stampdetails.blogspot.com/ Go here NEXT!!
Haidee-http://created2bunique.blogspot.com/
Roberta- http://decorablesart.blogspot.com
Dawn~ http://strawberryrainsdelights.blogspot.com/
Joe - http://www.createncraft.com/
Beth - http://Mytimetoplay.blogspot.com
Anita~ http://www.anitaandbugs.blogspot.com 
Shannon L~ http://www.Shannonleffew.blogspot.com