Followers

Showing posts with label buttons. Show all posts

Tuesday, September 13, 2011

Creative Paperclay Pumpkin and button Embellishments


Good morning friends

Today I want to share a project that was super easy and fun involving some more cookie cutters.  As most of you know, I am also a designer over at Creative Paperclay.  I love working with it for embellishments for my scrapbooking but this time I used the paper clay to make pumpkins for a wreath.

Here are my step by step instructions, kinda picture heavy.
Just roll you paper clay like usual.  The thickness depends 
totally on you and how thick you want you embellishment to be.
Then just cut it out with your cookie cutter.
I picked this one up at Michaels in the 
Halloween section for $.99
I also cut out some circles that I will turn into buttons.
Now let them dry...again, drying time depends on 
the thickness of them.  These dried in about 4 hours.
Then I painted them with standard acrylic paints.
I used a stamp with embossing ink to stamp my button
and then embossed it my black embossing powder
just gives it a really cool effect.  Now you can
make ANY button to your hearts content.
Then I embellished the pumpkin with google eyes,
cardstock nose and mouth cut with my E-Craft 
and some silk leaves just for a more dramatic affect.
Now, what did I do with these cuties?
Now I started with a free frisbee we got at the
sportsman's show at the beginning of summer and
wrapped it with sparkly purple ribbon.
Wreath...
I made some stick pins and added them behind some
silk flowers that I took apart and hot glued to the wreath.
I added some glass tiger eye blobs to the center and
used my new "glitter gelly roll" pen to give accent
to the purple flower petals.  Really sparkly!!!
I hot glued 4 pumpkins around the wreath.
and added some Halloween colored
glass ornaments to more of the same
purple ribbon and hot glued one of
my homemade buttons to the center.


Isn't this just neat?  Well, I think so anyway.  I hope you liked my Creative Paperclay project today and I will see you again in about 2 weeks for another project.  I hope I've inspired you to create your own embellishments using some Creative Paperclay.  You can purchase Creative Paperclay here or you can even get it at Hobby Lobby or Michaels.

Friday, July 22, 2011

Festive Fridays 7-22


Good morning and welcome to another edition of Festive Fridays. If you are new to us, sit back, grab a cup of coffee, relax and enjoy some wonderful Christmas Cards. Yes, I did say Christmas...Festive Fridays will be every other Friday with samples of Christmas cards. This way, you can be making your cards all year long and you will avoid the mad rush when you could be enjoying the Christmas Season. You should have just come from Amanda. If you stumbled upon this post you can go back to Terri and start at the beginning. There is also a complete list of the Festive Friday hop on the left sidebar under the Festive Fridays blinkie in case you get lost along the way.


This was super simple.  I used my E-Craft to cut the gingerbread man with SCAL3, added some puffy paint to his arms and legs.  I added 3 non-traditional buttons and his face is the Peachy keen Everyday Face assortment.  I love making shape cards, especially for the kids on my  Christmas list.
This week we also have some blog candy.  Robin's Nest has donated a Christmas card kit, so be sure to leave a comment on every blog as you hop through and one winner will be selected by Terri.

I hope you like my Festive Friday card and hope to see you back in two weeks for another christmas card.  Now head on over to Angela and check out what she has for you. 

Sunday, June 26, 2011

Lasting Memories #44 "Scrapbook pages that Recycle"

Good Morning,

So here we are again with another Lasting Memories submission.  This week we are using recycle-able things, or reusing something we can re-purpose.  This challenge wasn't hard for me at all...you should see my craft room.  I keep EVERYTHING that I think can be reused, recycled or re-purposed.  When I was growing up, my mom used to say "when we move, we just need to pack Brenda's room, because if you need it, it's in there".  Ha, well mom, I'm still that way!!!  I guess I've been helping save the earth for at least 37 years...uhum!!!  The other day I was going through some of my son's clothes that don't fit anymore and I donate a lot of stuff to Goodwill and such.  He had these awesome dress shirts, but they had some stains so I took the buttons off.  Yup, recycle them babies.  Then I went through the linen closet and found some table runners that I've had for a hundred years and don't ever use.  As I was packing them up when I thought some of them had some lace on them that I could reuse somehow, so out came the scissors.  I was also cleaning out some of my flower designs that have lost their use.  I tore apart a topiary I made a long time ago and kept the flowers, cuz you just never know.  Well, I combined all these things and this is what I came up with:

Now the flowers on the Title are from the topiary set along with the buttons from Austyn's dress shirt.

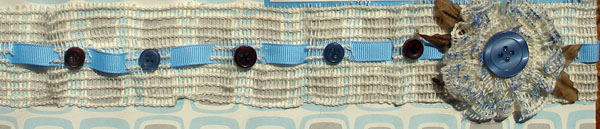
The tan fabric/lace is from the table runner.  I cut about every 9 holes and weaved a piece of blue ribbon through it.

I punched a flower out of blue cardstock and then layered strips of the lacey stuff around the punch with hot glue to make a flower.  Then I inked the fabric and added a button to form the flower and hotglued some leaves to the back of it.

The tags are cut from SCAL's tags shapes and inked around them.  Then I used more of the lacey fabric and cut strips to attach to the tags.  I also used some leftover twine and made my own baker's twine.  If you want to see how I did that you can check it out here.

Now the title/tag I made for myself.  You see, I just underwent some major dental work and I am so excited to be able to really SMILE for a change.  It's been a long time coming and I feel so much better about myself.  I wanted to commemorate this feat for myself, thus the layout is for ME!!!  I used Getting Cricky's stamps set "Positive Thoughts" and "Amazing You".  Now, some say you shouldn't brag about yourself, but I don't think I am bragging, just feeling good about ME!!!  Believe me, it's a new feeling for me to be this happy and confident.  Even my BFF said that I am smiling more and actually laughing out loud.  My mom used to always say, when you feel good about yourself you are a nicer person and it shows.  Well, mom, again you were right!!!

So I hope I've inspired you to create a layout with things you can reuse or recycle.  Remember, every little bit helps.  If you don't recycle on you layouts, remember to recycle through your garbage though.  It doesn't take very long to separate your items and help save the earth one step at a time.