Followers

Showing posts with label Amazing Clear Cast Resin. Show all posts

Wednesday, March 30, 2016

#Cre8time Wine coaster with Amazing Clear Cast Resin

Good day friends,

I want to show you a quick and easy peasy idea for creating your own special coasters.  I love wine and am always looking for ways to craft either using wine products or making wine decor.  I have the perfect job as I work in a wine store.  We carry only South Dakota made wines and also some local gift and food items.

One of my very good friends loves this wine made in Rapid City.  It's a Cabernet and made by Firehouse.  Well, we carry this wine in the store and we open various bottles for tasting.  When this bottle went empty I snatched it up and took the label off.  Now I've tried a gazillion different methods and this is the one I've found to be the best.  I put the bottle in the sink standing up and run water through my coffee maker.  Then I pour the hot water into the bottle and wait about 3 to 5 minutes.  I immediately make another pot of hot water. Then I slowly start peeling the label off.  If it's not easy yet, pour hot water in again.  Honestly, most of the time it works the first time.  It also depends on the actual labels.  Some come off easier than others.  Now you don't have to wait for the label to dry or risk the label tearing by other methods.

Once I had the label off nicely I applied a thin coat some ModPodge to the tile (just got at my local hardware store) itself.  Some labels will still be a bit sticky which works perfectly.  Just place your label on your tile how you like it.  Some labels you may need to trim or place wonky.  Totally up to you how you want it to look.  This label was rectangular instead of square so I placed it corner to corner and burnished down the sides.  I used the labels from both the front and the back of the bottle to make a "set" of coasters for her.  Now let this set up for a half hour or so at least.  Once that is dried completely I brushed another coat of ModPodge to the top to seal the label.  I also let that set up for another half hour.

Now this next step in not necessary, but I wanted my tile to have a nice finish.  ModPodge is ok, but I love the look of the Amazing Clear Cast Resin.  It gives a feel that the label is under glass.

So mix up your Amazing Clear Cast Resin like this HERE.  It's super easy and does not require a lot of experience.  After I've mixed up my resin I let it sit for about 5 minutes to get all the bubbles out from stirring.  Then slowly pour over your tile.  I actually pick my tile up and let it flow around.  Amazing Clear Cast Resin is self leveling so make sure when you have the resin all over your tile that you place it on a level surface.  Also, if you have some bubbles forming you can take a heat gun to it or if you don't have a heat gun, take a straw and blow the bubbles.  You can even take a lighter and go over the bubbles and they will magically disperse.  I found this item at my local thrift store while looking for things to upcycle.  I'm not sure what it is, but Oh Lordy, it's Amazing!  A perfect doming board for my bigger items.  The excess resin just drips into the bottom of the pan.  I'm assuming that someday I will have this filled up and then will need to throw it away.  That will be a sad, sad, day!  LOL


When I work with my resin I tend to overmix and then I need some of my 
molds made from the Amazing Mold Putty to fill up.
Nothing ever goes to waste.  I always have extra embellishments ready for crafting.
Now I placed a box over the tray and let that set up for 24 hours to make absolutely sure it was hardened.  I really wish you could see the thickness of the tile, but I just couldn't get a good picture.  You can see the awesome glare on the tile though.  It's a beautiful finish.  I actually like doming these tiles better because you don't get the streaks like when you use ModPodge and you also have to understand that the Amazing Clear Cast Resin is food safe.  So you could make some tiles for your cheese to eat while you are drinking your wine!

(The stains on the label is actually from the wine when we poured it.  
I was totally ok with that as it gives it authenticity.)

I added some cork to the bottom of the tiles so that they wouldn't scratch 
the surface when placed on the table.

I can't wait to give these to her.  I'm sure she will love them.

I hope you've enjoyed my quicky project and I'll be seeing you soon again.
I've got some fabulous projects in the works.

As always, have a great day and God Bless.

Friday, March 11, 2016

Simply Create Too Challenge #104 - Green Only


Good day friends and crafters.  Today is another challenge over at Simply Create Too and I'm so excited to show you a project I made that came about from a fail. This week's challenge is ALL GREEN.  I love to experiment and sometimes it works and sometimes it doesn't.


It all started with a butterfly cutout I had. I really wanted to turn this beautiful butterfly into a stamp. I mixed up some Amazing Mold Putty and you can see mixing instructions HERE. I pressed my butterfly cutout into the mold putty and waited for about 10 minutes.


When I pulled the butterfly out I realized it didn't look perfect, so I cut around it anyway using regular scissors. There were definitely some imperfections and when I stamped it, it didn't give me a clean look (sorry no picture of the stamped image). I really didn't want to waste all that mold putty and so I thought and thought about what I could do with it.


I remembered a tutorial I made for this Valentine's day pendant.
You can go and view it HERE!


I used the same concept again. This time however, since the Amazing Mold Putty had already set up, I couldn't get my heart clay cutter to go through the putty. I could get a bit of an indentation of the shape and then I just used my scissors to cut the hearts out. Since the putty was so thin, it was very easy.


Here are my hearts and I even used an edge of the butterfly to create the stem for my shamrock. You can see that it had even been stained with the ink.


Now, the hoarder I am... I had these cute little ceramic
coasters that I purchased eons ago at a thrift store.


I tried hot gluing the putty pieces down, but they just popped right off. I sprayed some Krylon Spray Adhesive to the pieces and glued them onto the ceramic coaster. That worked like a charm!


Then I mixed up some Amazing Casting Resin and poured it into the dish, just enough to fill around the shamrock shape. There is a video HERE you can view on mixing instructions.


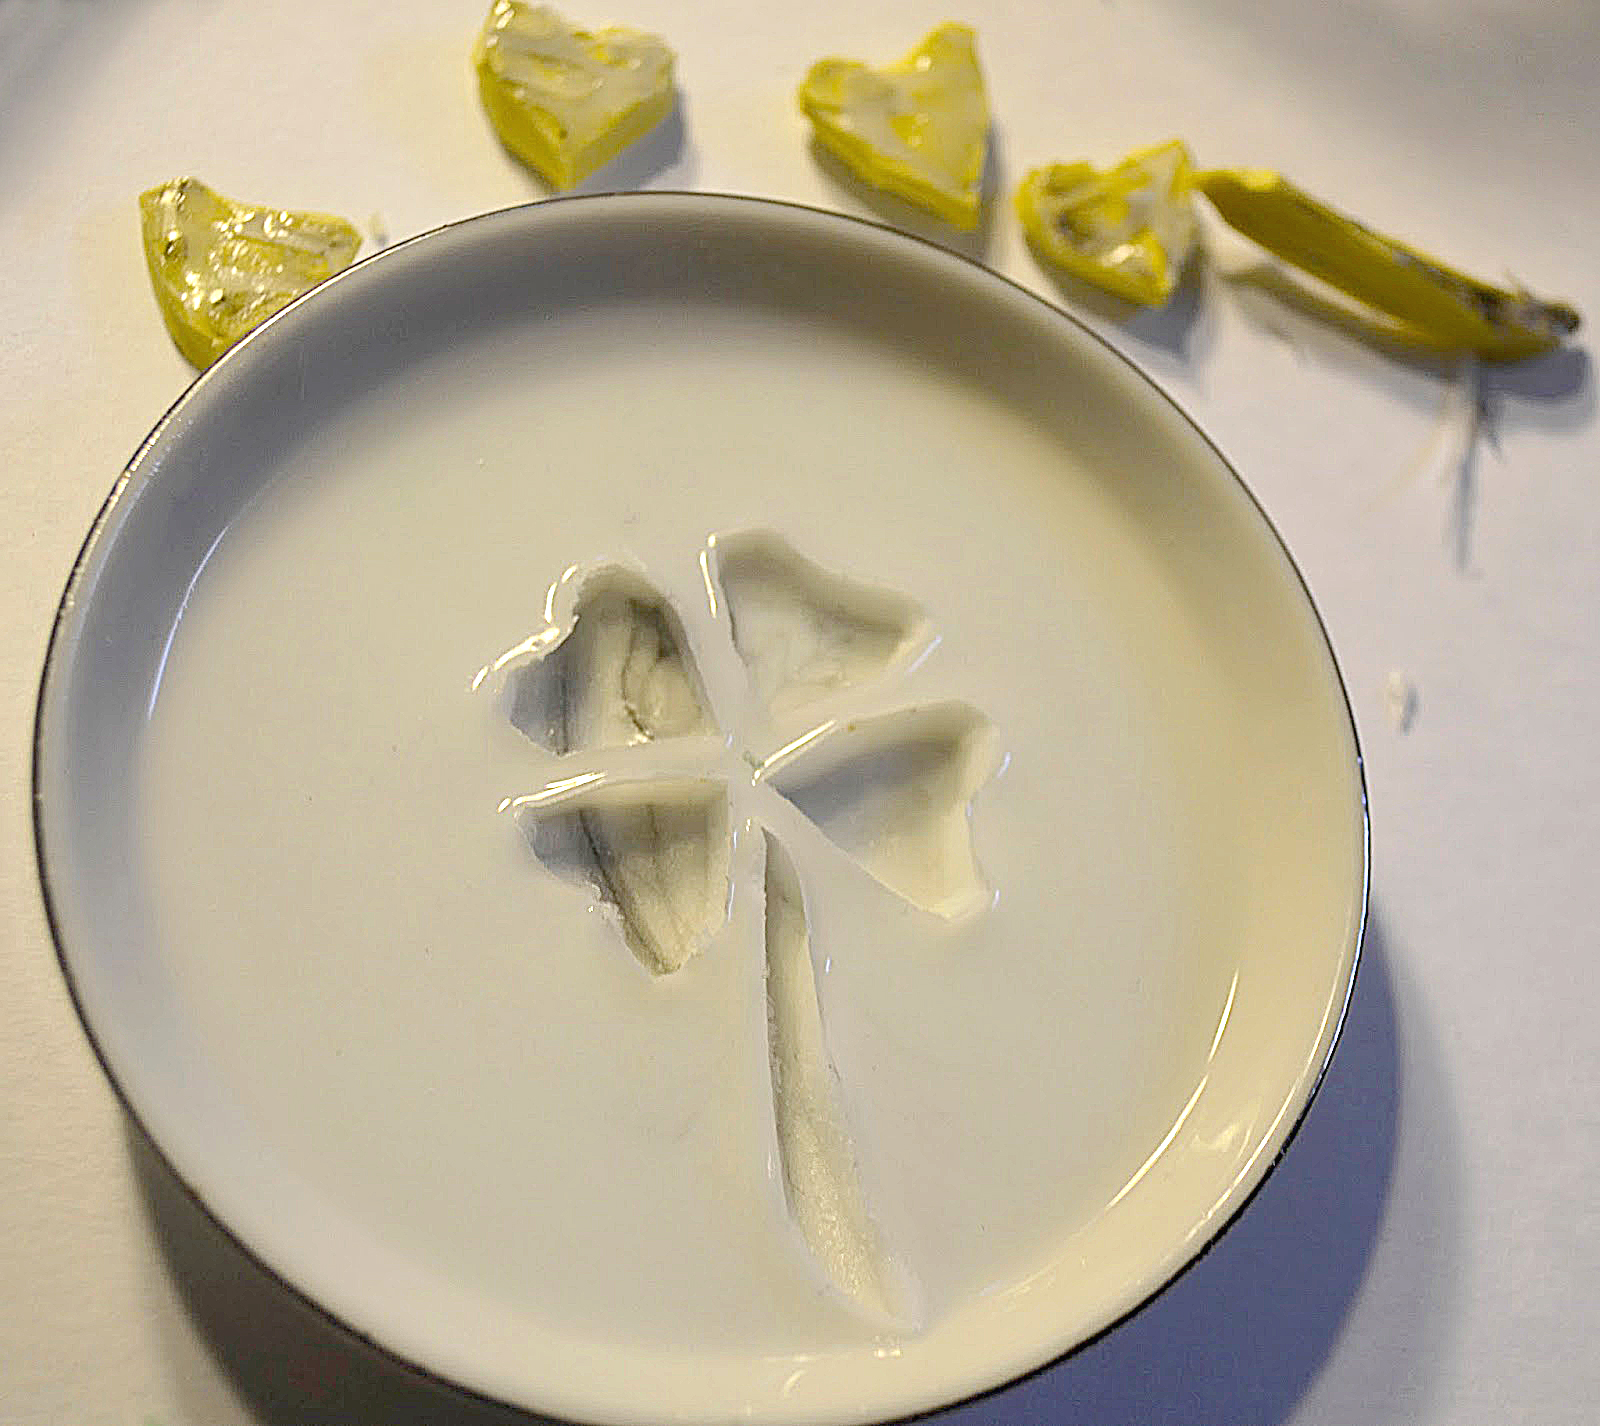
That set up to cure for about 10 minutes and then I gently pulled the pieces out.
Pretty cool huh?


Then I mixed up some more Amazing Casting Resin with the Fluorescent "FLO" Green Dye and filled in the open areas. That also set up in a matter of minutes.


And here you have an Amazing Shamrock ring dish!
You can view more projects by the design team over at Amazing Casting Products HERE


I am so excited about my (failed) fabulous Shamrock ring dish!

Have you had a failed project
that you turned into a masterpiece?

I hope you will head over to Simply Create Too and join our challenge.

Until next time, have a Lucky Day!


Friday, January 15, 2016

Toasting the New Year's Party with a Wine Themed set of Earrings and new design team!


Good day friends and Happy New Year! I am so excited to tell you about a new design team I am on!  YEAH!

I've been on the design team over at Get Creative Challenge and am having a wonderful time coloring digi images.  Angie is also running the Simply Create Too blog and I am one of the newest members over there now also.  I'm really excited about designing with these fabulous ladies because I get to make whatever I want to as long as I follow the theme!  YEAH!

This month's theme is PARTY TIME challenge #100 and thus I created some wonderful earrings that I wore on New Year's Eve.  

As some of you know I work in a wine store and I get asked over and over if we have any jewelry with a Wine motif. My boss just isn't into stuff like that – so I decided I wanted a pair of earrings to wear for New Years Eve and I wanted them to have a wine motif.

So let's get started!


I started out by cutting a wine bottle and glass shape {welded with my Cricut} out of some cereal boxes! I love to upcycle. I cut the pieces 14 times because I wasn't sure how thick I wanted the glued together pieces to be.


Here are my Cricut cuts and I used 5 of them to get the desired thickness.


Then I mixed up a batch of the Amazing Mold Putty – you can view mixing preparations HERE. I sprayed some UMR Mold Release onto the mold putty before pressing the chipboard into it because I did not want the chipboard to stick to it.


The mold came out beautifully!


Next I brushed some Lt. Green Alumidust where the bottle would be and left an area open where I think the glasses would be. I then mixed up some Amazing Clear Cast Resin {and you can watch a video tutorial HERE} because I wanted the "glasses" to be see through.


So far so good... I then took a silver paint pen and highlighted around the bottle, put a stopper on the top and edged around the wine glass area.


I added some seed beads with E6000® and used
a red paint pen to add some color to the bottle.


Attached some jewelry findings with E6000® 
and I was ready for New Years Eve!


I absolutely love my new earrings created just in time for the Party!
If you are going to CHA you might even see my cuts being used!

Now I hope you've enjoyed my post and my first project for Simply Create Too!

Make sure you follow the theme and join in some fun over there.

Tuesday, October 13, 2015

Halloween #Cre8time bangle transformation

Good morning friends.

I wanted to share a quick post on a project I made for the Amazing Crafting Products blog.  Please head here and see how I created this fun windchime piece!


I would love it if you left a comment over there and 
then came back here and left me a comment here also!

As always, have a great day and God Bless.

Wednesday, June 17, 2015

Bottle Caps and Amazing Casting Products

Good morning friends.

Today I am showing you a quicky.  On one of my recent shopping trips I came across these fun bottle cap stickers at Tuesday Mornings.  I got 3 different books and a few bottle caps for $7.  Nice!

This is one of the books.


I also created my own findings


Just peel off the sticker and apply within the bottle cap!  Easy peasy!


I attached my findings with some E6000.


I mixed up some Amazing Clear Cast Resin from Amazing Casting Products to pour into the bottle caps covering the image.  I mixed the two part Resin in a small cup and let it sit for about 10 minutes to get all the air bubbles out.  See how much clearer the 2nd mixture is?


See how nice this gets?


Here are all my finished bottle caps.  Now I will be making some necklaces and key chains.

I hope you've enjoyed my quicky.
As always, have a great day and God Bless!


Sunday, March 15, 2015

Anything But a Card challenge #45 "Green with Envy"

Good morning and happy Sunday to you.  It's the third Sunday of the month and you know what that means. Yup, another Anything But a Card Challenge #45 and this month our challenge is using GREEN!  I knew exactly what I wanted to do since St. Patty's day is just around the corner.  What a coincidence that this month's theme is wrapped in GREEN, lol!  So let's get started:

A couple of years ago I made a mold using my Amazing Casting Products of a horseshoe I cut out in chipboard using my cricut a couple of times and glued them together.  It's so easy when you don't have the exact item to create.


I glued 3 pieces together to give it some thickness.


And pierced holes on either side of the horseshoe.


Then I mixed up my Amazing Mold Putty (you can go HERE and see how to mix it up) 
and pushed my chipboard horseshoe into it.
I like to use up any space to mold something else too.  NO wasting that precious mold putty. 


I used my Amazing Casting Resin with the Alumilite Silver Metallic powder to create this beauty.  
You can view a tutorial HERE on how to prepare it.
Then I glued some silver rhinestones onto it with my E6000


Love it, but now you are wondering where the GREEN comes in?
Well, this was a necklace I made a couple of years ago and ...


this is what I made for this challenge using some of the steps above.  Since I already had the mold (love how they hold up for years) I just casted it in the Amazing Casting Resin which when it cures dries WHITE, but I added the green rhinestones and not as many as the original piece.  Using the Amazing Clear Cast I  painted that over the entire piece making sure those rhinestones would not pop off and also to give it a nice shine.  
I then added a gold chain and now I am ready to make some luck on St. Patty's Day!

Thanks for stopping over and checking out my "GREEN" challenge at Anything but a Card and I hope you will play along.  Remember, the rules are simple
2.  Show off your GREEN
3.  Have FUN!

Until next time, have a great day and God Bless.


Monday, September 8, 2014

Golf Pin to Golf Tie Tack

Good morning crafters,

It's going to be a busy day for me today.  I've got payroll to do, then off to replenish my Hallmark stores and then off to our Golf Pot Luck this evening.  I'm pretty excited to be showing off hubby's new tie tack I made, but I kinda doubt he's going to wear a tie tonight, he'll probably wear it to the Golf Banquet though.

So let me show you what I made:

Susan, my friend and the design team leader from Amazing Crafting Products sent me a few things a while back she thought I might like.  In this fabulous box of goodies there was this gorgeous Golf bag pin.
 It's gold and the golf bag has mother of pearl (or at least looks like it) laid in it.  Now Susan did not know this, or maybe she did, but Mother of Pearl is my birthstone, so I was even more excited to have received this gorgeous pin.  I knew it would be going on my golf cap immediately and it's been there ever since, until now.  I know we will eventually be having a golf banquet so I thought it would only be fitting for hubby to have a golf tie tack.  (I'm assuming the banquet will be formal?  And if it's not he wears a tie to work everyday anyway so he can wear it then).

So off to gather my supplies:  Amazing Mold Putty to create my mold.  I try to make bigger  molds and add a few things together.  These are acrylic pieces off of a plastic necklace you can get anywhere.  I just cut them apart and I will be showing you a few things I made in the next couple of days/weeks.
See the golf pin to the right?


 Here is the mold after I took all the pieces out.

I dusted in some bronze Alumidust for the bag and Pewter Alumidust for the clubs and latch.  This works very well when you want two tones in one item.  You don't have to paint them afterwards.  I then filled the mold with Amazing Casting Resin with a couple drops of  black Alumilite Dye 
Cool huh? 
I added a tie tack back to the back of the bag and now hubby can wear his new tie tack whenever he wants and I will be putting my golf bag pin back onto my lucky golf cap where it belongs.

I hope you've liked my post today and I would love to hear what you have to say.  Leave me a comment and tell me what you would mold if you had the chance to mold ANYTHING?

As always, have a great day and God Bless.

Sunday, July 20, 2014

ABAC Anything Goes Marbl-ous Crayon Creation

Good morning all

I'm so excited to show you a failed but salvaged project including a video for my Anything Goes project over at Anything But a Card.  Just because a project failed doesn't mean you have to throw in the towel.  If you remember a couple of weeks ago I had a mini challenge going on over there and you can view the post here.  The challenge didn't take off very well except Lisette at MrsBeez did an awesome project.  Go check that out over here.  Thanks for participating Lisette, I love your pendant!

Well, anyway, back to my original post...I knew I was going to have my grandkids for a week starting yesterday and I wanted to do some crafty projects with them.  I have all these crayons and thought I could melt them and make them into chunky crayons with some of my molds I have made in the past using my Amazing Mold Putty molds but alas, they were too brittle and didn't hold up well.  I might have to make some CHUNKY molds and try again sometime.  But in the process of this failed attempt, I did however find a new way to marble my resin pieces and you can see the video here.


I just love the way these resin pieces turned out and the texture you get from using the crayons melted onto them is fantastically AMAZING.  I do however recommend that you do seal any pieces you may be marbeling with either Amazing Clear Cast Resin or some other kinds of sealer as to keep them from melting.  I know I will be turning some of my pieces into jewelry and wearing them in the hot sun would just be a HOT MESS!

Here are some close up pictures of some of the resin pieces marbled with crayons.  I am in the process of sealing them with the Amazing Clear Casting Resin as you are reading this post and because I had to resin both sides it will take about 2 days to finish these up.  Therefore do not have the finished pieces available.  As soon as I have turned them into something I will post them here on my blog also.


Can you see all the texture this gives?  I cannot wait until these pieces are finished and I am able to wear some fantastic marbled crayon jewelry!  
I hope you've enjoyed my post today and I look forward to reading all your comments.
Now head on over to Anything But a Card and join in some fun!
This weeks challenge is ANYTHING GOES.
Create anything BUT A CARD
And have FUN.

As always, have a great day and God Bless.