Followers

Thursday, March 31, 2016

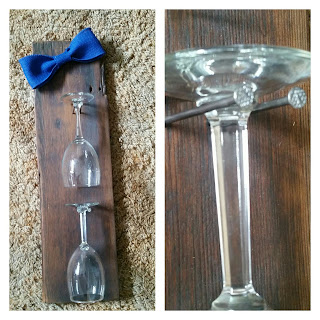
#Cre8time Wineglass holder with reclaimed wood

Good morning crafties,

If you follow my blog you will notice that I don't craft in one way or another.  I am all over the board.  I think outside, inside and next to the box.  My motto has always been "if it can be done, I will try it".  I am a pintrest freak.  I love looking at so many different ideas and then try to recreate them.  Sometimes I fail but sometimes I excel.  And for me, today's post is all about excelling.  I am so excited to share this with you.

My daughter's boyfriend owns a farm and he has a lot of old outbuildings that are falling apart.  He was very generous and gave me a huge stack of barnwood.  Yup, lucky me as this is all the rage right now.  I've been making signs and will have some posts this week and next week yet of all the fun signs I've been making.

Anyway, while we were cutting the board down to manageable sizes some of them break in half.  Remember, this is OLD barnwood.  In fact, this stack that I got is over 100 years old.  EVEN better.  Well I had some long skinny pieces and this is what I created:


I washed and cleaned the boards very well ...


then I stained and sealed them ...


and added nails for the wine glasses to hang from.

I added a bow, some grapes and even created a holder for the bottle stopper.

I am so in love with these.  I will be making some more of these and hopefully selling them this summer at a craft fair I will be at.  I think I'm gonna add some words, like "WINE TIME" to the next one I make.  Or even "it's 5 o'clock somewhere".  

If you would leave me a comment I'd love to hear what you think.

As always, have a great day and God Bless.

Wednesday, March 30, 2016

#Cre8time Wine coaster with Amazing Clear Cast Resin

Good day friends,

I want to show you a quick and easy peasy idea for creating your own special coasters.  I love wine and am always looking for ways to craft either using wine products or making wine decor.  I have the perfect job as I work in a wine store.  We carry only South Dakota made wines and also some local gift and food items.

One of my very good friends loves this wine made in Rapid City.  It's a Cabernet and made by Firehouse.  Well, we carry this wine in the store and we open various bottles for tasting.  When this bottle went empty I snatched it up and took the label off.  Now I've tried a gazillion different methods and this is the one I've found to be the best.  I put the bottle in the sink standing up and run water through my coffee maker.  Then I pour the hot water into the bottle and wait about 3 to 5 minutes.  I immediately make another pot of hot water. Then I slowly start peeling the label off.  If it's not easy yet, pour hot water in again.  Honestly, most of the time it works the first time.  It also depends on the actual labels.  Some come off easier than others.  Now you don't have to wait for the label to dry or risk the label tearing by other methods.

Once I had the label off nicely I applied a thin coat some ModPodge to the tile (just got at my local hardware store) itself.  Some labels will still be a bit sticky which works perfectly.  Just place your label on your tile how you like it.  Some labels you may need to trim or place wonky.  Totally up to you how you want it to look.  This label was rectangular instead of square so I placed it corner to corner and burnished down the sides.  I used the labels from both the front and the back of the bottle to make a "set" of coasters for her.  Now let this set up for a half hour or so at least.  Once that is dried completely I brushed another coat of ModPodge to the top to seal the label.  I also let that set up for another half hour.

Now this next step in not necessary, but I wanted my tile to have a nice finish.  ModPodge is ok, but I love the look of the Amazing Clear Cast Resin.  It gives a feel that the label is under glass.

So mix up your Amazing Clear Cast Resin like this HERE.  It's super easy and does not require a lot of experience.  After I've mixed up my resin I let it sit for about 5 minutes to get all the bubbles out from stirring.  Then slowly pour over your tile.  I actually pick my tile up and let it flow around.  Amazing Clear Cast Resin is self leveling so make sure when you have the resin all over your tile that you place it on a level surface.  Also, if you have some bubbles forming you can take a heat gun to it or if you don't have a heat gun, take a straw and blow the bubbles.  You can even take a lighter and go over the bubbles and they will magically disperse.  I found this item at my local thrift store while looking for things to upcycle.  I'm not sure what it is, but Oh Lordy, it's Amazing!  A perfect doming board for my bigger items.  The excess resin just drips into the bottom of the pan.  I'm assuming that someday I will have this filled up and then will need to throw it away.  That will be a sad, sad, day!  LOL


When I work with my resin I tend to overmix and then I need some of my 
molds made from the Amazing Mold Putty to fill up.
Nothing ever goes to waste.  I always have extra embellishments ready for crafting.
Now I placed a box over the tray and let that set up for 24 hours to make absolutely sure it was hardened.  I really wish you could see the thickness of the tile, but I just couldn't get a good picture.  You can see the awesome glare on the tile though.  It's a beautiful finish.  I actually like doming these tiles better because you don't get the streaks like when you use ModPodge and you also have to understand that the Amazing Clear Cast Resin is food safe.  So you could make some tiles for your cheese to eat while you are drinking your wine!

(The stains on the label is actually from the wine when we poured it.  
I was totally ok with that as it gives it authenticity.)

I added some cork to the bottom of the tiles so that they wouldn't scratch 
the surface when placed on the table.

I can't wait to give these to her.  I'm sure she will love them.

I hope you've enjoyed my quicky project and I'll be seeing you soon again.
I've got some fabulous projects in the works.

As always, have a great day and God Bless.

Wednesday, March 16, 2016

Simple Frame for a birthday girl

Good day crafties

Today is a special day, as it is my granddaughter's 4th birthday.  Happy birthday Miss Alexis!

I try to make something for each of my grandkids for their birthdays.  It's just a way for them to know that while I'm creating I am also thinking of them!

So let's get started:

You will need:  wood blanks, 8 magnets, paint, hot glue gun embellishment, stickers, etc.


First I started out by painting 2 of the wooden fan blades, but you need 4 of them.
She loves purple, so I went with that.
Once they were dry hot glue 2 magnets on either side of 2 of the wooden blanks and then attach 2 more magnets on top of the other magnets.  Put a drop of hot glue on each magnet and then carefully line up the other wood blank ontop of those magnets.  This will ensure them to be equally spaced.
Just tie some twine or ribbon on the top wood blank and you are set!


The other wood blank I embellished with some stickers, bling and of course one of my famous crowns.
I made the crown with my Amazing Casting Products and you can find the tutorial HERE!


Now mommy can proudly display Alexis paintings and drawings from daycare!


Now, I'm sure the other two will want me to make them each one!
With PLEASURE!


Friday, March 11, 2016

Simply Create Too Challenge #104 - Green Only


Good day friends and crafters.  Today is another challenge over at Simply Create Too and I'm so excited to show you a project I made that came about from a fail. This week's challenge is ALL GREEN.  I love to experiment and sometimes it works and sometimes it doesn't.


It all started with a butterfly cutout I had. I really wanted to turn this beautiful butterfly into a stamp. I mixed up some Amazing Mold Putty and you can see mixing instructions HERE. I pressed my butterfly cutout into the mold putty and waited for about 10 minutes.


When I pulled the butterfly out I realized it didn't look perfect, so I cut around it anyway using regular scissors. There were definitely some imperfections and when I stamped it, it didn't give me a clean look (sorry no picture of the stamped image). I really didn't want to waste all that mold putty and so I thought and thought about what I could do with it.


I remembered a tutorial I made for this Valentine's day pendant.
You can go and view it HERE!


I used the same concept again. This time however, since the Amazing Mold Putty had already set up, I couldn't get my heart clay cutter to go through the putty. I could get a bit of an indentation of the shape and then I just used my scissors to cut the hearts out. Since the putty was so thin, it was very easy.


Here are my hearts and I even used an edge of the butterfly to create the stem for my shamrock. You can see that it had even been stained with the ink.


Now, the hoarder I am... I had these cute little ceramic
coasters that I purchased eons ago at a thrift store.


I tried hot gluing the putty pieces down, but they just popped right off. I sprayed some Krylon Spray Adhesive to the pieces and glued them onto the ceramic coaster. That worked like a charm!


Then I mixed up some Amazing Casting Resin and poured it into the dish, just enough to fill around the shamrock shape. There is a video HERE you can view on mixing instructions.


That set up to cure for about 10 minutes and then I gently pulled the pieces out.
Pretty cool huh?


Then I mixed up some more Amazing Casting Resin with the Fluorescent "FLO" Green Dye and filled in the open areas. That also set up in a matter of minutes.


And here you have an Amazing Shamrock ring dish!
You can view more projects by the design team over at Amazing Casting Products HERE


I am so excited about my (failed) fabulous Shamrock ring dish!

Have you had a failed project
that you turned into a masterpiece?

I hope you will head over to Simply Create Too and join our challenge.

Until next time, have a Lucky Day!