Good morning friends
Today I want to share a project that I am extremely proud of. As most of you know, I am also a designer over at Creative Paperclay. I love working with it for embellishments for my scrapbooking and cardmaking, but recently I experimented a little with it for something brand new to me...bookmaking. So, now I am not going to start a business in making books , but I might make a few gifts. This was extremely easy and so much fun to make.
Here are my step by step instructions, kinda picture heavy.
 |
| First I rolled out my paperclay and layed my cuddlebug folder right on top of it and cut around it with my craft knife. This will be the size of my book. |
 |
| Then I inserted it into my zutter machine and punched the holes. That worked so slick. I then painted the cover and back with some white acrylic paint. |
 |
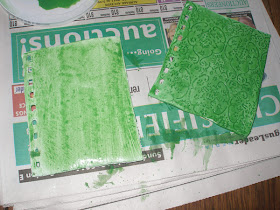
| After the white paint was completely dry, I added a green wash over the top. I mixed some green paint with alot of water. |
 |
| I did that to both the front and back cover. |
 |
| Then I did the same thing with a blue paint and water mix. |
 |
| Using a paper towel I "dried" off some of the color to give it more of an antique look. The pictures really don't do it justice. |
 |
| Then I cut all my pages 1/4 inch smaller than my book and put them in my zutter to punch the holes. |
 |
| They are all punched. |
 |
| See how perfectly they are aligned. Pretty proud of myself. |
 |
| Now I had to bind it together. Make sure that you follow the instructions when binding. You MUST rotate your back cover over your front cover. Do not just place the back cover ontop. |
 |
| Standing tall |
 |
| And it's finished. Now it may not be perfect, paperclay does shrink and warp a bit, but I love it. I wish you could feel the way it feels. It has a leathery feel and look to it. |
Isn't it just gorgeous? Well, I think so anyway. Every year we go on a trip to Northern Minnesota, near the Canadian border and I take a journal with me so I can keep a detailed diary of our trip and then I make a scrapbook with it. This will be my journal this year. It will fit nicely in my day pack and will be handy to keep my every thought in, wait I might need to make a bigger one...just kidding. I hope you liked my Creative Paperclay project today and I will see you again in about 2 weeks for another project. I hope I've inspired you to create your own journal using some Creative Paperclay. You can purchase Creative Paperclay here or you can even get it at Hobby Lobby or Michaels.

This is such a wonderful idea Brenda. Love your notebook.
ReplyDeletePrecious Hugs
Wow, Brenda, this is awsome but it doesn't look easy to me!!! Just the oppose, it looks really detailed!!! You have a great talent, my friend, this is a great project. You shouldn't have a problem doing these on the business end -- good luck!
ReplyDeleteAs I've said before you have good reason to be proud! It's a fantastic job, and you'll have to let us know how well it holds up on your trip. Have fun!
ReplyDeleteHugs XX
Barbara
This turned out great, thanks for sharing the instructions too.
ReplyDeleteEva :0)
evasscrapsncards.blogspot.com
Never heard of paper clay but it looks so cool! Love what you did with it!
ReplyDeleteWonderful creation, Brenda.
ReplyDeleteI love Clay. I used to play with it a lot until I got my Cricut about a year ago. I still have some Paper Clay...bet it's not any good now. You've inspired me. I still have to finish my next door neighbor's window treament. Anyway thanks for the inspiration.
ReplyDeleteDee B
Great job! Thanks for linking up last week at Sew Woodsy last week! Hope you'll join us tomorrow and link up!
ReplyDelete